Have you conceived a major overhaul in the bathroom of the apartment or are you building a bathroom in a private house? In any case, you can not do without waterproofing the floor and walls for further laying tiles, because it is these rooms - the bathroom and toilet need special protection from humidity. The waterproofing of the room is important, at least for two reasons. The first is the longevity of repair, under the influence of moisture, any structure is destroyed, therefore protection is necessary if you do not want to do repairs in a few years. The second reason is to avoid troubles in the form of furious neighbors from the lower floor in case of a leak in your apartment. The waterproofing in this case will protect against unexpected expenses for repair also from neighbors.
What is waterproofing and where is it needed?
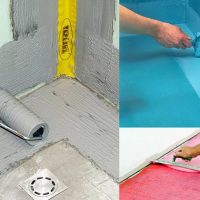
The classic floor of any room looks like a multi-layer cake. It consists of a base of overlapping, screed and decorative floor covering in the form of tiles, linoleum and so on. A careful owner or professional builder to the pie adds one more layer - waterproofing. This layer provides protection from moisture (as the name itself indicates), increases the durability of the entire structure. Water does not penetrate inside, accordingly, does not exert a destructive effect on the materials of which the floor consists. Repair of this coating is postponed for a longer period.
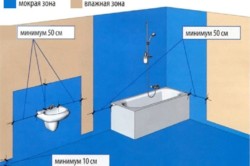
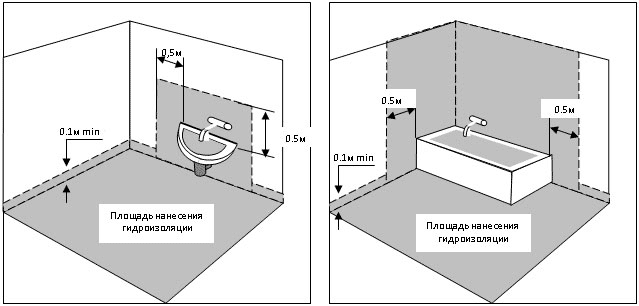
The need for a waterproofing process occurs if the floor is on the walls at least 20-30 cm. In this case, special attention should be paid to the plumbing zone available in the room. In these places, the wall should be covered with waterproofing approximately 50 cm in sides and upwards from the sanitary ware. Also, waterproofing is needed from inside the plumbing cabinet, where the risers are located.
Types of waterproofing and materials used
There are two classical types of waterproofing coating and okleychny. The first type is represented by liquid agents (pastes, mastics, solutions). The second - roll film materials. Both have their pros and cons. In the case of waterproofing the bathroom is better liquid mastics - they are more convenient. First, the technology of work is simpler. Secondly, the material consumption is less. Thirdly, the quality of the coating is higher.
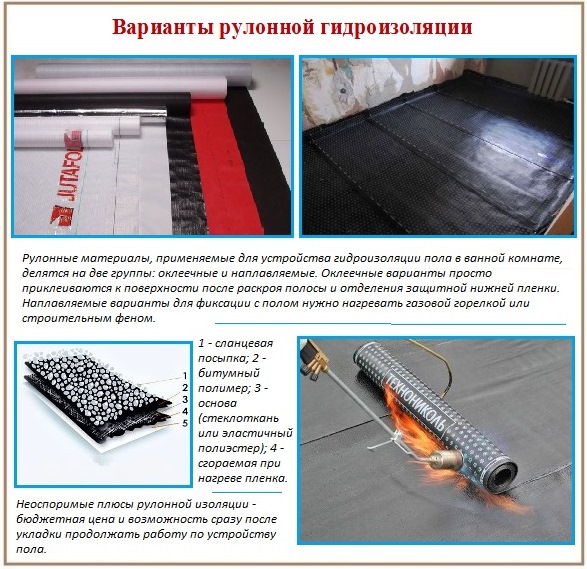
Oakleychnye materials in the form of rolls are mounted in two ways: by fusing the material or gluing. For melting use a building hair dryer or a gas burner. The second option is already equipped with an adhesive surface, it is enough to remove the protective film. Plus this type of waterproofing low cost, and minus the complexity of installation.
If the height of the ceiling is critical, and raise the floor level can not even be a fraction of a centimeter, as a waterproofing layer can be used as a waterproofing impregnation. These are special liquid compounds that are applied to a wet concrete or cement floor, absorbed into it and a film is formed that can protect the floor from high humidity and even water flow. Are such materials for the floor and walls are more expensive, but in this case, the end justifies the means.
Lubricating
Modern liquid means for insulation of the floor and walls under the tile have excellent properties. They are resistant to aggressive factors in rooms with high humidity and temperature changes.
The most popular types of liquid waterproofing:
- cement-polymer mixtures have become classics of the genre. Universal agent for lubricating waterproofing. In fact, this cement slurry is enriched with special additives. This mixture quickly sets (from 5 minutes), differs by good adhesion, is realized in a dry or ready-made form;
- bitumen-polymer mastics - have proven themselves from the very best side. Thanks to special plasticizers, latex filler, organic solvents on bitumen base, this composition is distinguished by its high strength and adhesion to the concrete base;
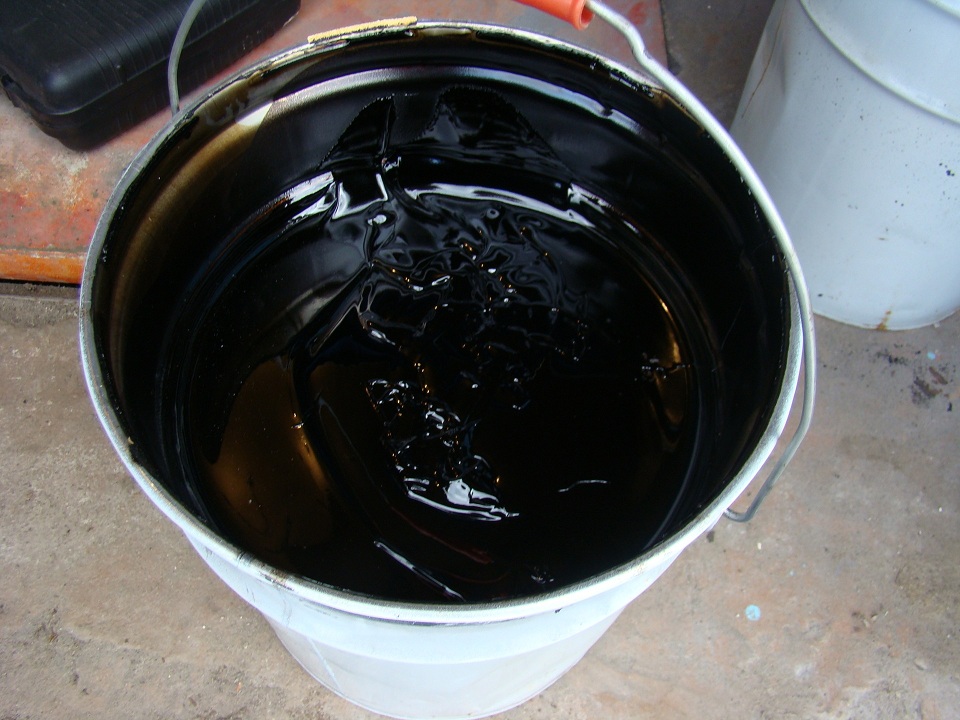
- bitumen waterproofing is a rather popular and economical kind of mastic. There are two varieties of these mixtures that differ in the way they are used: cold and hot. The main minus of the cold is that he is capricious about interacting with concrete. Hot is used when heated to a temperature of plus 160 degrees, this is a hard-to-find way at home;
- acrylic mastic - the most modern type of waterproofing on a water-based basis. It is an environmentally friendly, odorless material with excellent strength, so it is better than other materials.
 Bituminous mastic
  Lubricating waterproofing
 Rolling materials
It happens that for waterproofing under the tile roll materials are used, made on the basis of fiberglass or polyester. The lower part of such material is covered with adhesive composition, and the upper part with a special component providing adhesion to the glue for tiles.
This kind of waterproofing is ideal for wooden floors, because roll materials perfectly tolerate the movement of wood and do not lose monolithic. Also roll method suitable for large areas. Stacking roll materials overlap more than 10 cm against each other with the approach to the walls. When sizing with a roller, it is very important that all air bubbles are removed, otherwise all work will be done in vain.
When and how to proceed with the arrangement of moisture protection
Many people are interested in the question of whether to perform waterproofing before or after pouring screed. This issue raises a lot of controversy among professional builders and, of course, confuses the minds of amateurs who have decided to do their own repairs. In fact, when you need a second coupler, and what role does it play? Here are a few reasons to pay attention to the screed:
- you should definitely do a repeated or clean screed if the insulation is not included in the construction of the floor. In this case, the screed acts as an additional barrier in the process of heat exchange;
- the screed above the waterproofing is necessary for leveling the surface in the case when you have decided not to level the rough floor;
- if you are going to install a warm floor;
- if a toxic bitumen was used as a hydro-insulator;
- a screed is simply necessary if you are going to lay out the floor with tiles, which is most acceptable for a bathroom. In this case, it performs the task of the cushion for mounting the tiles.
If you decide not to re-tie, in any case, it must be primed before installing the decorative coating or tile.
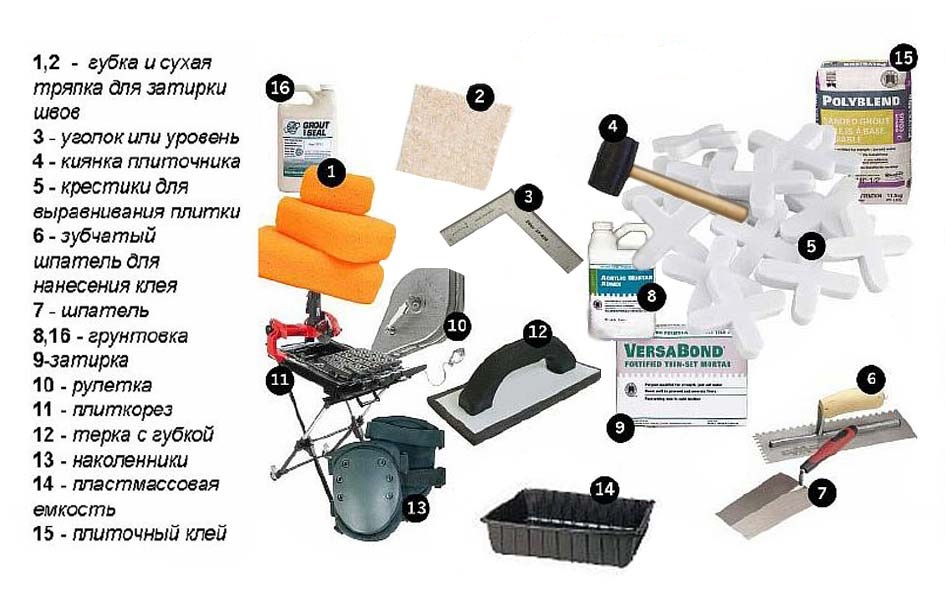
Necessary materials and tools
To qualitatively and quickly create a waterproofing bathroom it is necessary to prepare in advance all necessary material and a tool.
What material will be required to create a high-quality protection against humidity:
- waterproofing mixture;
- rubber waterproof self-adhesive tape;
- primer;
- mixture for pouring (finished or cement-sand mortar);
- cement-sand mortar, expanded clay, reinforcing mesh, if necessary, to make a black screed.
What kind of tool is needed:
- a container for mixing the solution;
- roller or brush for application of mastic and primer;
- profile beacons;
- building rule;
- level for installing beacons;
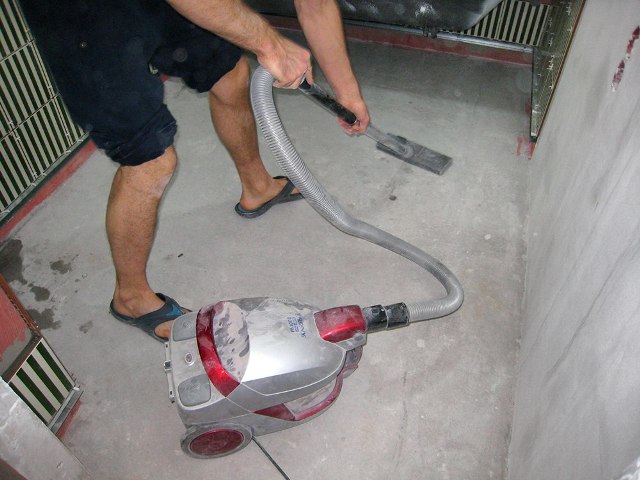
- a broom and a scoop or a vacuum cleaner for cleaning.
 Tools for waterproofing
 Combined waterproofing
For those who can not decide on this or that type of waterproofing there is a comprehensive solution. At the same time, it is not only possible to use coating and gable waterproofing, but also increases the quality of floor and wall protection from humidity.
The order of work with the integrated solution varies insignificantly:
- thorough cleaning of the old coating or foundation, repair of cracks, cracks in chips;
 The surface must be thoroughly cleaned of debris
 - if there is an old screed, you need to check its condition. Eliminate cracks, chips. Be sure to check for voids: when tapping, identify places with a more sonorous sound. In these places, the screed will have to be dismantled, re-poured with cement-sand mortar and wait until it dries completely.
If there is no screed, then it should be done to create a better waterproofing layer. To do this, put the lighthouses at a height of three centimeters. Lay the first layer - a mixture of cement and expanded clay. It is better to mount the reinforcing mesh for the special strength and durability of the coating. Then the top layer is a cement slurry with sand. After a week, the screed will dry completely and you can proceed to the next stage of work.
The readiness of the screed is easy to check with a conventional liter can. It is enough to set the jar upside down in the most dry place (estimate visually). If after half an hour - the hour of the bank has misted, then the screed is not ready. In that case, you will have to wait another two or three days.
Then we work as follows:
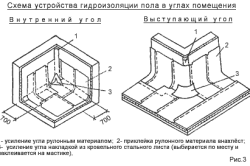
- the angle between the wall of the room and the floor is strengthened with a bentonite cord or cement mortar;
- we ground the floor and the lower part of the wall (to a height of 15 centimeters) by two times, carefully rubbing the primer into the surface. The second layer is applied perpendicular to the first;
 Waterproofing of screeds by canons of execution concrete works is mandatory
 - places where plumbing is in contact with the floor and walls, we process it with a liquid waterproofing compound;
- we put mastic in the angles of contact of the walls with the floor along the perimeter of the room. The width of the coating is 15-20 centimeters;
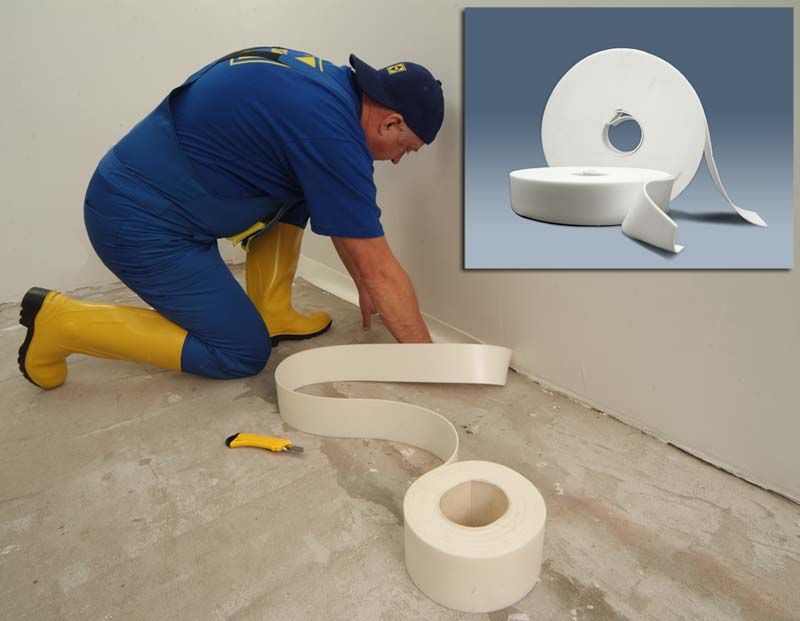
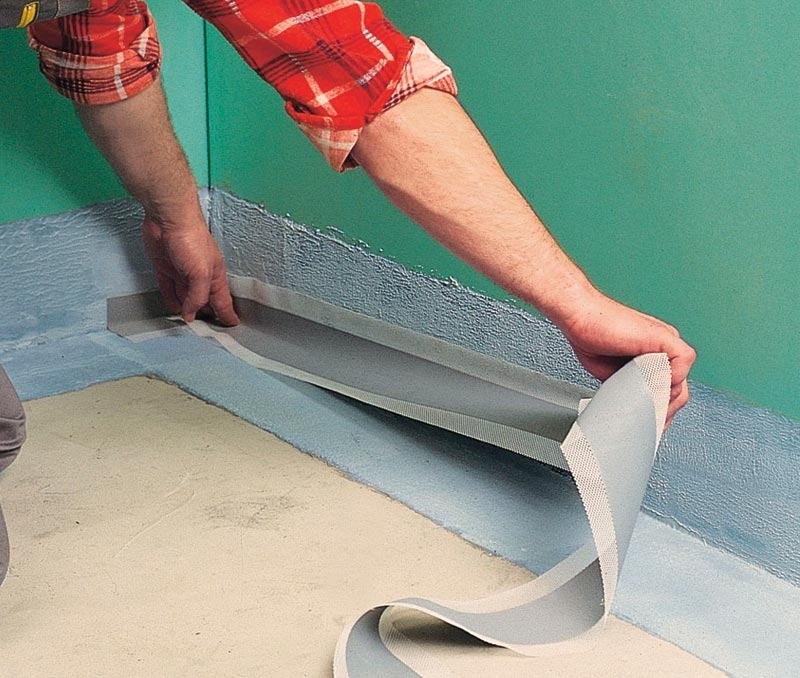
- in the corners glued waterproof self-adhesive tape;
 Conducting in corners roll waterproofing
 - wait until the mastic dries;
- we apply liquid waterproofing to the entire surface of the floor. Do not forget to process the bottom surface of the walls by 15-20 centimeters;
- wait for the complete drying of the first layer. Then we put the second, third layer. Number of treatments the manufacturer indicates on the packaging of the product;
- after drying the waterproofing, we proceed to the installation of the roll. The simplest version is the glue base. An important task at this stage is to gently lay each sheet of overlap on each other no less than 10 centimeters. On the perimeter it is necessary to leave allowances on the walls (15 centimeters);
 Oak waterproofing
 - after laying the waterproofing coating on the floor under the tile, it is necessary to mount the allowances on the walls. To do this, you can warm up the mastic with a construction hair dryer. This will increase the adhesion of materials.
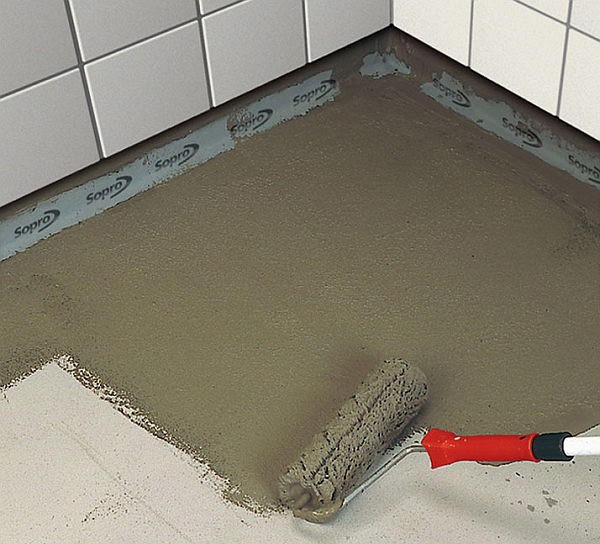
 Waterproofing of the floor with cement-polymer materials
 After finishing the work on waterproofing in the bathroom you need to primetrovat treated surface. Then you can lay out a decorative coating or a tile.
Features of waterproofing of walls
The walls of the room are covered as a waterproofing material with cement-polymer mixtures:
- before the application of waterproofing, the walls are twice primed, and special attention should be paid to the corners and places where the pipes enter;
- the pipes are closed with special cuffs, and the corners are glued with a waterproof sealing tape;
- first, the walls of the room are covered with waterproofing compound, and then with concrete contact. In the hydroprotection it is necessary to drown the reinforcing mesh;
- when the surface dries, you can proceed to the lining.
Regardless of what type of waterproofing in the bathroom wall, the floor you have chosen, adherence to simple rules will help to make protection against humidity even more reliable:
- the floor level in the bathroom is better to do lower than in the other rooms. If you build the sill, this will serve as an additional protection against the flow of water to adjacent rooms in case of leakage;
- water and sewer pipes must be treated with waterproofing material (preferably liquid). This ensures better protection against breakthroughs and protects communications;
- the use of a primer for walls, floor of the room under the tile will improve the quality of the waterproofing.
No effort to protect the walls and floor of the bathroom from excessive humidity will not be in vain if everything is done correctly. The main thing in this matter is to carefully prepare, choose the suitable remedy, and then waterproof the bathroom.
- Ways of waterproofing
Each person daily uses a sink and toilet in his apartment. As you know, nothing lasts forever in our world, so the risers eventually deteriorate, thereby allowing leakage in the bathroom and toilet. Then the water gets to the floor, spoils it and seeps through the floor covering.
Do I need a waterproofing in the bathroom? When making repairs, you need to take care of this issue. High-quality finish in combination with a properly executed protection against moisture will allow for a long time to forget about the repair of the premises. It will eliminate such problems as the flood of neighbors, the blotting of seams, the breeding of fungus and mold.
It is not necessary to seek help from specialists, it is enough to do all the work yourself.
Materials and tools required for work:
- putty knife;
- roller;
- brush;
- mastic;
- specialized materials.
Waterproofing in the bathroom with your own hands
It is a series of works aimed at protecting the room from moisture, which in the future is capable of destroying the structure of the structure.
Stages of work on waterproofing:
- preliminary preparation of the place where the relevant work will be carried out;
- laying and sealing the waterproofing layer.
When installing the coating, it is necessary to exclude the entry of carcinogens into the room. It is recommended that you use a certain material that contains bitumen.
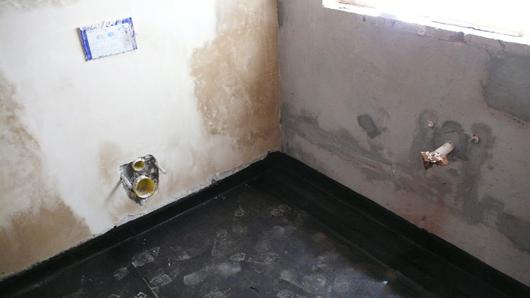
Bathroom zones that need insulation.
Waterproofing in the bathroom is carried out using the following materials:
- pasting;
- lubricating.
All materials used in the installation must meet the following requirements:
- security;
- ecological compatibility;
- hypoallergenicity;
- availability;
- compatibility with a variety of surfaces.
Back to contents
Ways of waterproofing
If there is a waterproofing for the floor, it is recommended to apply a coating type, which is a composition with rubber or polymer fillers.
Oaklechny material used for conventional waterproofing the bathroom. It is based on bitumen and polymers. They cover the entire surface of the bathroom, thanks to high-temperature heating.
Insulation impregnation: penetrating the pores of the walls, a protective layer appears, which prevents moisture from entering the concrete surface.
Paint - a bitumen solution is used, which protects the floor and walls from moisture for 7 years.
If it is necessary to protect the room from moisture, it is recommended to use material from rolls. They contain in their composition a variety of polymers and bitumen, which can create a protective function.
The bathroom is characterized by a constant high humidity of air, so the lubricating waterproofing is suitable for protective purposes best.
As a rule, it is not enough to protect only the floor in the bathroom from moisture, it is necessary to waterproof the entire room.
Back to contents
Preparatory stages before installation
- Before work, it is necessary to clean the surface of the floor from various contaminants. It should be perfectly smooth. To do this, it is recommended to make a screed, which is aimed at leveling the surface. It should be laid out in stripes, guided by special marks.
- Cement screed or concrete is sprayed from the spray gun with water or moistened with a sponge. This will prevent the drying of the insulation solution, thereby achieving greater strength of the coating.
- Due to the primer, the adhesion between the working surface and the protective layer increases. After 2 hours after application, roll insulation or a protective solution can be installed.
- All joints in the room are sealed with a sealing tape. It is recommended that the joints of the tile are putty with a special silicone sealant.
Mounting with roll materials:
- it is necessary to prepare a section of a certain length, width, release it from the protective film and attach it to the base;
- so that the material as hard as possible grips with the surface, it is recommended to walk on top of it with a roller;
- protective sheets overlap, capturing 5 mm of the previous strip.
Coverage should go to the walls at a distance of 10-15 cm, this will reliably protect the floor from leakage. At installation it is necessary to remember about a sanitary locker. After the protective layer is applied, it is necessary to make a screed and lay the tile.
Mounting with lubricants:
- The mixture is applied to the floor with a roller, brush, spatula. If the surface is large enough, then use a special spraying device.
- Using cement-polymer mastic, you can level the floor to a certain level, while eliminating the need for screed.
- The lubricant should be applied very carefully, avoiding gaps.
Thus, when carrying out repairs in the bathroom, you should take care of the waterproofing of this room. It will allow you to get rid of a lot of problems and extend the life of the bathroom. It is not necessary to spend extra money on the work of specialists, it is enough to purchase all the materials necessary for the installation of waterproofing and to do the work yourself.
Waterproofing the floor in the bathroom materials for which a large assortment today can be found in any construction shop, is an obligatory procedure before the beginning of the finishing works and installation of sanitary ware.
The bathroom is the most humid room in a private house and apartment, therefore, whatever material the floors are made of, they need a high-quality waterproofing, otherwise during the operation of the room at the joints of the walls and floor, in places passing through the floors of utilities can arise leakage. Not only that, there is a great risk of flooding the rooms located from the bottom. As you know, moisture, getting into a closed space, inevitably contributes to the formation of mold and fungus, which begin to gradually destroy the construction of the floor and walls, lead to a persistent unpleasant smell of dampness, can cause a number of diseases among people living in the apartment.
There are many varieties waterproofing materials, made on various bases and in various forms. To choose the most suitable option, you should first consider their characteristics and technology to work with them.
So, the type of application waterproofing is divided into the following types:
- Lubricating.
- Oaklechnaya.
- Impregnating.
- Cast.
- Stucco.
Which of these waterproofing is better for the bathroom floor, it's hard to say, since there is not even a single opinion among specialists on this score. The choice of material and technology for its laying is done taking into account the features of the surface, which should be waterproofed, and the allotted time frame for the execution of work.
Waterproofing of the lubricating type
Compositions for lubrication (painting) waterproofing - the easiest to apply
Lubricating compositions for waterproofing are made on different bases and can be:
- Water based, acrylic based;
- Bitumen-rubber;
- Bitumen-polymer;
- Cement-polymer;
- Polyurethane;
- Bituminous.
Compositions on a bitumen base are made with additives from various fillers and organic solvents. Fillers make the mastics more elastic, because they are used as plasticizers, rubber crumb or latex.
Mastics have excellent adhesion, and they are applied to both concrete and wood surface.
It should be noted that materials on the bitumen base have a number of disadvantages, which include:
- possible cracking and the appearance of chips as a result of temperature fluctuations;
- biological corrosion;
- an unpleasant smell during the period of performance waterproofing works.
But, despite these drawbacks of lubricating compositions, they are most often used to insulate the floor in the bathroom, since this is the most accessible method create protection against moisture penetration.
The cost of the mastic of the lubricating waterproofing is quite affordable, but its service life is not more than five to six years.
Materials made on the basis of polymers have practically no negative qualities, so they can be applied without fear.
To the pluses of lubricating compositions can be attributed ease of application of the material to the floor surface and the lower part of the walls, as well as to the corners and joints using a conventional brush.
The material consumption depends on the initial quality waterproofed surface and number of layers. Usually the recommended quantity per 1 m2 area is indicated by the manufacturer of the composition.
How is the application of coating (paint) waterproofing
In the device of this type of waterproofing there is nothing difficult - most importantly, do all the work carefully and adhere to the developed technology.
If the lubricant is purchased in dry form, then the technology of its manufacture can be found on the package. The mixture must necessarily have a uniform state. If the liquid component is supplied with a liquid component, it is first mixed with water and only then poured into a dry mass and mixed into pasty mastic. This waterproofing is called two-component. When the mixture is ready, you need to immediately go to work.
- The first thing to do before applying any coating is to thoroughly clean the surface of fine dust and larger debris. The work is done using a vacuum cleaner.
- Further, from surfaces it is necessary to remove the absorbed grease stains or the remains of paint, if they are - to clean off to "healthy" concrete. The same is done with loose areas where erosion is noticeable concrete slabs. After cleaning, dust and debris are cleaned again.
- The next step is to apply a primer (deep penetration composition). Primer can be poured on the floor and distribute it with a roller.
Angles and surfaces around the outlet of pipes in the wall and drainage in the floor must be treated with a primer using a brush to avoid leaving untreated areas. After the first layer of solution has dried, another one is applied.
- Further, it is possible to proceed to the application of a waterproofing compound. Work begins with covering the mastic corners and all joints of the floor and wall, pipe passages through the floors.
- On freshly made The mastic is packed with sealing tape. It is glued to the wall and the floor with an unconsolidated compound, so that the joint closes completely between it, which is always a weak spot for leaks. A prerequisite is that the tape should be fully expanded, without waves, kinks, folds, under it impermissible voids.
When docking the strips, the overlap must be at least 50 ÷ 70 mm (in the case of primary laying, the place of overlap must be smeared with mastic.).
In the bathroom, in the same way not only the joints of the floor and walls, but the corners of the walls, at a height of at least 150 ÷ 200 mm, are treated.
On top of the tape, another layer of waterproofing mastic is applied.
- Further, it is necessary to glue sealing membranes around the points of supply and discharge of water, that is, outgoing from the walls and floors of pipes or sleeves with the communications laid through them.
Particular attention is given to waterproofing near pipes, holes, sleeves in the floor, etc.
- Then waterproofing mastic covers the entire remaining surface of the bathroom floor and walls to a height of 150 ÷ 200 mm.
By the way, qualified masters recommend not to regret the material and apply a minimum of 500 ÷ 700 mm from the floor, especially around the bath and washbasin - this will protect the walls from fromripening and mold occurrence.
Mastic when applied to the surface of the floor is not smeared thin - it must lie a thick uniform layer of the same thickness, about 2 mm.
- Waterproofing is carried out if necessary in two or even three layers. Education is not allowed uncovered mastic "Islets". Each of the layers is applied perpendicularly to the previous, already dried layer, about five to six hours later.
- When the work on the waterproofing of the floor will be completed, you can start finishing only after 24 hours.
At the end of the section - an example of the performance of a coating in water in the bathroom.
Video: the work of the master of waterproofing the bathroom
Plastered waterproofing
Plastered waterproofing also refers to the lubricating form, but it needs to be separated, because for work used different from the rest in its composition of materials.
AT plastering mixtures There are such components as gypsum, cement and polymers. If the bitumen, used for waterproofing the floor, begins to lose its elasticity at a temperature of 0 degrees, becomes brittle, and cracks can form on it, then the temperature changes are not terrible for plasters.
A lot of plaster waterproofing mixtures of various manufacturers are on sale. The compositions of Knauf and Ceresit are especially popular.
- For example, the waterproofing compound KNAUF FLACHENDICHT includes a component such as a synthesized latex, which gives the material special elasticity. Therefore, the layer deposited on the surface, after polymerization, retains its properties at temperatures from -18 to + 55 ° C.
This composition after mixing does not require heating, and is applied to the surface immediately.
- Another option for high-quality plaster waterproofing is the mixture of Ceresit CR-65, which has excellent adhesion to surfaces, provided that it is applied to the surface treated with primer.
One of the most popular formulations is the Ceresit CR-65 hydroisol
Plaster mixtures are also applied with a brush or roller. The joints of the planes must be glued with a sealing tape. It is desirable to choose all the materials of one manufacturer - they are fully adapted to each other.
Oak waterproofing
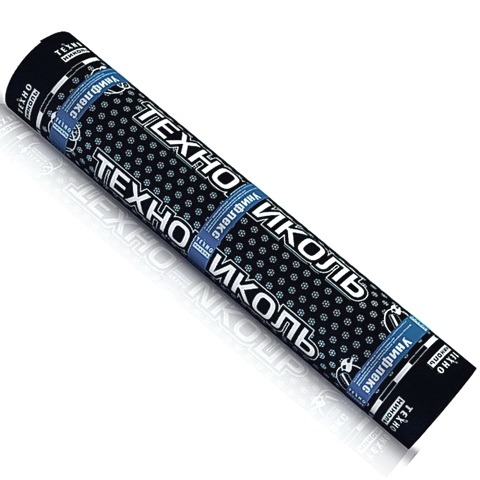
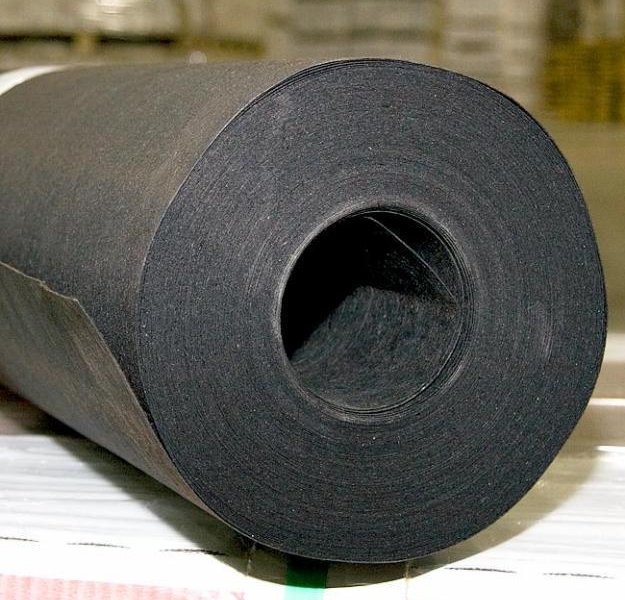
This method of protecting floors from moisture penetration can be called the most effective, but to produce correct packing materials will be somewhat more complicated than with lubricants. The most popular materials of pasting waterproofing: roofing material, isoplastic, eco-flakes, izelast, bridge plastic, technonikol, hydroisol.
Materials are not affected by temperature changes, and if they are laid correctly, according to existing technologies, they will protect the floor surface for many years.
Waterproofing is made in the form of sheets or rolls of waterproof material having good elasticity. But, in spite of this, it is not easy to lay them in difficult places, for example, in the corners of the room.
Two types of overlay materials are made. Some of them fit into onworn adhesive, others are self-adhesive.
For installation of the first type, bituminous mastic is most often used as a glue base. On self-adhesive webs, in principle, the same mastic is applied to the rear surface and is protected by a special film, which is removed only during installation.
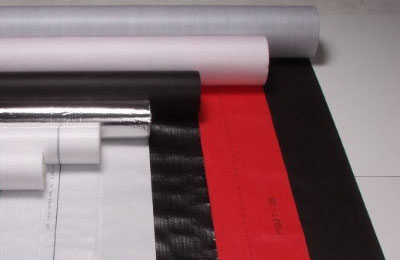
The most common Until recently, a kind of roofing waterproofing was an ordinary roofing felt, but with the advent of more sophisticated materials, it is used less and less. Modern types can have a polymeric or bitumen base, so they differ somewhat in their characteristics.
- The polymer material is a film and a membrane made of vulcanized rubber. Most often they are already covered with glue.
They are distinguished by:
- small thickness;
- long service life;
- excellent mechanical strength;
- no shrinkage;
- resistance to vibration.
- Oak waterproofing on bitumen base is used much more often, as it is more affordable. Such materials, for example, include a waterproof, made on the basis of fiberglass impregnated with bitumen, and the plasticizer makes it resistant to cracking and gives it flexibility. This material is not subject to biodegradation and the occurrence of mold on it.
It can be produced in single- and double-sided versions.
Two-sided material differs from one-sided by the presence of a polymeric protective film on both sides - it melts under the influence of high temperatures during laying. This material is used in the event that a multi-layer waterproofing coating is installed.
One-sided material is equipped with a protective coating consisting of mineral crumbs. - it is usually used for outer coating soft roofing.
Oak waterproofing is used not only for concrete coatings, but also for wooden flooring, which is laid without melting - on bituminous mastic.
Laying of pasting waterproofing
The surface of the bathroom floor before laying the liner material should be prepared more carefully than when applying coatings to it - this is a nuance that must be observed to create a long-term and reliable floor protection.
The work is carried out in the following order:
- Bathroom floors should not have even small protrusions, so they must be removed. If necessary, the surface is leveled self-leveling compositions. Then the floor is well dried and cleared of dust.
- Further, the floor surface and the lower part of the walls are covered with primer compositions, which must also dry well.
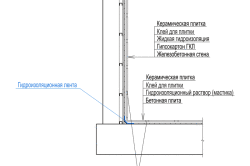
- Then on the surface of the floor and walls to a height of 200 mm, a layer of mastic about 2 mm thick is applied. Mastic may be on a rubber or polymer-bitumen basis.
- Next is the sticker of waterproofing. The first canvas, which will be found on the wall, is laid with a bend, but is glued first to the floor surface, and then to the wall.
Mastic warms up to softening with a gas burner. The surface is covered with a waterproofing sheet, which is then rolled with a roller.
The next canvas is laid on the already laid strip of waterproofing overlap of 80 ÷ 100 mm. Then there are steps and subsequent bands.
- If you plan to lay the material in two layers, then the mastic is applied over the first one and the waterproofing is laid. The second layer is laid in such a way that the middle of the canvas is at the joints of the bands of the lower layer, it completely covers them.
In the same way, the process of installing the technonikol passes, but its advantage lies in the fact that the bituminous layer is already present on the material. When the flooring is left, it only needs to be heated before the protective polymer film melts and roll to the surface with a roller. It is very important not to overheat the material, as the waterproofing from this will become fragile, and its service life will be significantly reduced.
Doing hot work is not a very good idea, since it is recommended to avoid working with the burner in small enclosed spaces. The material of waterproofing and mastic when heated produces a sharp and persistent odor that is poorly weathered. In addition, it is quite dangerous to work independently with a burner without proper experience, but if it is decided to stick a waterproofing in this way, it is better to entrust this process to the specialists.
To perform the work independently, it is better to apply self-adhesive sheets that do not require the use of a burner - this is also called a "cold" method. For such a coating, the concrete floor must be treated with a primer, a special composition made on bitumen base.
Using it, you can create a virtually seamless hermetic coating, since the sheets, lapped by 100 mm, tightly glued together. Before fixing them, a protective film is removed from the adhesive layer, and the sheet immediately presses against the already-printed sheet of waterproofing.
When using a backing material, special attention should be given to water pipes and drainage holes. For them in waterproofing holes are cut out, where rubber seals are inserted. Seats adhere to polyurethane or silicone sealant.
Cast waterproofing
Cast waterproofing can also be made of different materials. As can be understood from the title, the installation of these compounds on the surface occurs by pouring them in cold or hot form.
Hot waterproofing
Hot waterproofing can be asphalt-polymer and asphalt. Consumables for it are hot bitumen, asphalt and pitch. Such material shows good performance indicators - elasticity, high resistance to bending, strength and reliability.
Materials are poured on the surface, where work was previously carried out on the sealing of joints with the help of sealants and mastics.
This type of waterproofing is almost never used for bathrooms in apartments - they are more suitable for the same premises, arranged in private houses.
Laying hot waterproofing
To properly perform waterproofing hot, you need to act in the following order:
- The surface of the floor must be thoroughly cleaned from various contaminants that could remain from the repair work.
- The detected cracks, as well as the joints of the planes, are filled with sealing compounds.
- After that, the floor needs to be dried well - infrared heaters, gas burners and other sufficiently powerful devices are often used for this.
- The priming is carried out. For this type of waterproofing, as a primer, hot bitumen is used.
- After that, the primed working surface along the perimeter is separated by formwork. It is necessary if waterproof only part of the room is needed.
- Waterproofing is heated mass-temperature its heating is indicated on the package.
- Hot composition gently poured onto the surface, evenly distributed over it with the help of a rake, and left until completely hardened.
- If necessary, several layers of waterproofing are poured, but each subsequent - only after the drying out of the previous one.
Cold cast waterproofing
Cold types of waterproofing include materials such as "liquid" rubber and "liquid" glass. The technology of working with these compounds is similar, but their components are significantly different.
"Liquid rubber
This waterproofing material is made of bitumen and polymer additives, which make the resulting emulsion more durable and resistant to external influences.
Packing of "liquid rubber"
As a fixer for bitumen-polymer mixtures, calcium chloride is used, which reduces the density of the material, which allows the installation of "liquid rubber" by spraying. The fixer is diluted with water in proportions of 1:10 before adding to the emulsion, and after that the final composition is mixed.
In order to apply the coating successfully, it is necessary to adhere to the technology, prepare the foundation well and work at a temperature not lower than + 3 ÷ 5 ° С.
"Liquid" rubber is produced in different consistencies, which makes it possible to perform its application on the surface in various ways:
- The pouring method is the most popular, since it does not require special equipment, and the composition at the same time fills all small cracks and creates an even, smooth coating.
- Sputtering is a more complicated method, since it will require special equipment and skills to work with it. With the correct application of waterproofing by spraying, it turns out to be more qualitative than using other methods, since the composition is supplied under pressure and fills not only the cracks, but also the microscopic pores of the base.
- Painting (lubricating) technology - the most accessible of all three existing. The application differs little from the conventional insulation insulation, which was mentioned above. For painting application of waterproofing, "liquid" rubber is produced in the form of paste or solution.
After the treatment of the floor with "liquid" rubber, a sealed elastic film must be formed on the surface, which will reliably protect the overlap from moisture.
The table shows the main characteristics of this material:
| Material parameters | Indicators |
|---|---|
| Breaking strength (MPa) | 2E-3 |
| Elongation at break (%) | 1500 |
| Strength of adhesion to the concrete surface (MPa) | 1 |
| Density (kg / m³) | 1000 ÷ 1100 |
| Number of nonvolatile substances (%) | 57 ÷ 65 |
| The time of curing the composition after its application (hours) | 24 |
| Maximum water absorption for the first 24 hours,% | 0.5 |
| Water permeability at a pressure of 0.01 MPa for 24 hours | No wet spots |
| Average consumption of the main component in the manufacture of flooring material in 1 mm, in the dry residue kg / m² | 1.61 |
Technical and operational characteristics of different brands may differ slightly. But thanks to the fact that all components of "liquid" rubber are environmentally friendly, during operation they do not emit harmful fumes, they are safe for humans.
The positive qualities of all types of "liquid" rubber can be called:
- High degree of adhesion to different surfaces.
- Resistance to chemical attack.
- Possibility of waterproofing on the old cleaned floor.
- The formation of a continuous seamless surface.
- High elasticity and strength of the material.
A clear example of high elasticity and strength of "liquid rubber"
- Endurance at temperature changes.
- The composition has no odor during installation, therefore it is suitable for waterproofing in enclosed spaces.
- Great operating period.
How to apply "liquid" rubber
Work with the lubricating type of "liquid rubber" to describe there is no sense - it does not differ from usual lubricating waterproofing. In order not to repeat, it is necessary to consider only technologies for spraying and pouring waterproofing composition.
The first step of the idea t t radial surface preparation. It is carried out in the same way as under any kind of waterproofing. The main condition is the flatness of the floor surface, without protruding fragments, and its purity.
Before applying all kinds of "liquid" rubber, the surfaces should also be primed. As a primer, a composition polymer-bitumen solution, which not only will create an excellent adhesion to the coating, but also enhance its waterproofing properties. Primer is applied with a roller or brush.
The next stage, after complete drying of the soil, is the application of a waterproofing material. Spraying of "liquid" rubber is carried out with the help of special equipment. To the compressor plant are connected tanks with bitumen-polymer composition and with fixer - solution calcium chloride. Both components are simultaneously fed into the atomizer, which are mixed and applied to the surface under pressure, forming an elastic membrane 2 ÷ 3 mm thick. This process is usually trusted by specialists who have the necessary apparatus with experience in working with it.
The process of spraying "liquid rubber"
The filling method consists in pouring the finished material on the floor surface and distributing it with a needle roller, spatula or raki. The application of waterproofing occurs not only on the floor surface, but also in the previous cases on the lower part of the wall and around the branch pipes of water pipes.
The approximate consumption of this material per 1 m² is 2.8 ÷ 3 liters. Full drying of the coating occurs after two days. After this time, you can proceed to further work on the installation of the floor.
"Liquid glass"
"Liquid glass" - this is another kind of cast waterproofing, carried out in a "cold" way.
Canister with " liquid glass»
This material resembles in its consistency "liquid" rubber, but is made of other materials. This waterproofing agent contains sodium or potassium silicate, quartz sand and soda.
"Liquid glass" has excellent characteristics that make it ideally suited for use in waterproofing works in the bathroom:
- It is an antiseptic, therefore it prevents the appearance of mold on the treated surfaces.
- Hydrophobizer, able to create a seamless waterproof and water repellent coating.
- Antistatic - "liquid glass" does not electrify.
- Special properties of the material make the concrete surface more durable and durable.
- This waterproofing material has a high adhesion, when spreading it penetrates into all tiny cracks and micropores.
- Using a "liquid" glass, you can waterproof not only a concrete, but also a well-prepared wooden surface.
- The solution can be added to the concrete solution to enhance its waterproofing properties. Such a composition is made in proportions of 1: 8, that is, one part of the "liquid glass" by an eight-concrete solution.
- The economy of the application and the affordable price of the material can also be attributed to its merits.
It is worth mentioning about some drawbacks of "liquid" glass:
- The material has a property with time self-destruct, if it is not covered with a decorative coating. In the open form, the term of its operation is limited to 5 years.
- The mortar can not be used to coat brick surfaces, as this can lead to their destruction.
- The coating formed on the surfaces is fragile enough, and this is another reason to close it with a finish.
- Pouring "liquid" glass should be carried out in a short time, because it has the property of quickly hardening, so you need skills in this kind of work.
Waterproofing of the floor surface with "liquid glass"
Waterproofing with this material is carried out both in pure form, and by adding to the concrete solution.
In a clean, water-diluted form, "liquid glass" is used as a priming impregnation of concrete bases. In this case, its average consumption is 150 ÷ 250 grams per 1 m ². To obtain a deep impregnation of the surface by 80 ÷ 100 mm, it must be applied in three layers. This procedure helps to close microscopic cracks and pores, create a protective film on the surfaces.
In the manufacture of concrete or cement waterproofing, the "liquid" glass is mixed with solutions in proportions of 1: 8 or 1:10. This mixture is also good for waterproofing the surfaces of the bathroom, and it is applied to them by the lubricating method described above.
Waterproofing is carried out by casting the composition on the floor surface and evenly distributing the rocket, spatula and needle roller. When applying a "liquid glass" layer of 3-4 mm on a flat surface, it creates a perfectly smooth coating, which is easy to lay decorative trim.
On the lower part of the walls, this material is applied very carefully with a wide brush or small roller.
Impregnating (penetrating) waterproofing
The action of water repellent impregnation for the concrete floor is to fill it with all microcracks and pores to a depth of 150 ÷ 180 mm. In addition, waterproofing impregnations are able to prevent the appearance of cracks and efflorescence on the surface.
A considerable number of waterproofing impregnations is made, and their characteristics differ somewhat among themselves. For example, consider one of them.
Penetron mixture
The dry mix "Penetron" consists of three components: a special cement, quartz fine-grained sand and special additives made on a chemical basis.
Waterproofing penetrating action - composition "Penetron"
The mixture is penetrating waterproofing and is able to protect concrete structures from humidity and corrosive environments, and also to increase their strength.
The active additives present in the mixture form a moisture-tight barrier within the concrete structure, which can make the entire thickness of the screed completely isolated from the action of water, since Penetron is able to penetrate the substrate 500 mm from the surface. Such an indicator is considered the best among similar penetration impregnations.
After application of the composition to the moistened surface, the material components actively penetrate into the concrete. This is due to the phenomenon osmosis - propagation molecules of the mixture in the concrete structure. There, as a result of the chemical reaction, the solution crystallizes and becomes insoluble in water. Thus, a waterproof surface arises. The more the base is moistened, the more intensive the chemical reaction will be.
The advantage of this method of waterproofing is that the newly formed crystals are incorporated into the crystal lattice of concrete, becoming a single whole, and such a coating is able to withstand even moisture falling on the surface under pressure.
In addition, the solution particles that have got inside the structure and have not reacted remain and remain free, and with the formation of microcracks and moisture ingress, they begin to "work" - the process proceeds with amorescence of the surface.
In appearance, Penetron is a gray, uniform powder, which should not have foreign impurities and lumps. In a dry state, the density of the material is 1170 kg / m³, which is practically comparable with the density of cement.
The concrete surface treated by Penetron acquires the following qualities:
- its waterproofing characteristics are improved threefold;
- Strength increases by 5%;
- there is resistance to the impact on concrete of various acids and alkaline compounds.
Grasping of the prepared mixture occurs after 35 ÷ 40 minutes after mixing. The final hardening time of the solution is 2 hours 45 minutes. Finishing works for waterproof "Penetron" surface can be carried out not earlier than 2 weeks after the application of the material.
The composition itself is neither stored, nor after application and reaction with concrete, nor notset is no environmental threat, it is safe for humans.
Application of penetrating waterproofing Penetron
- Before applying the penetrating compound, the surface must be prepared - all large cracks, joints and seams are embedded. For their embedding recommended to use the composition "Penecret", which is produced by the same company.
In addition, the surface before applying "Penetron" should be cleaned of dirt and old coatings, otherwise there will be no proper effect from the waterproofing.
- Further, the surface is covered with a solution of 9% acetic acid and left for one hour.
- After this time, the concrete base is abundantly washed with water, as it must be well saturated with moisture.
- Preparing the mixture - 1 kg of dry powder "Penetron" will need 400 grams. water. As a result, a mass having a consistency of thick sour cream should be obtained. A quantity of solution is prepared that can be used in 40 minutes, because after this time the gripping process begins. It must be remembered that in water mixed according to the instruction, water is subsequently prohibited from being added.
- The prepared mixture is applied to the surface - this is done with a wide brush or roller.
Apply Penetron with a brush
"Penetron" is usually applied to the substrate in two layers - this will guarantee maximum protection against moisture penetration. The second layer of waterproofing is applied to the wetted surface after the first layer is seized.
- Then, for two weeks, it is necessary to moisturize the coated surface, since during this period the crystallization of the material absorbed into the concrete will take place.
The consumption of Penetron per 1 sq. M with coating in one layer will be from 400 to 550 grams. Accordingly, if it is planned to apply two layers, then this amount is doubled.
It should be remembered that penetrating impregnation is useless to apply for waterproofing stone or brickwork, foam concrete and other materials - it is intended solely to strengthen and protect concrete coatings.
In conclusion of the article it is necessary to emphasize that any waterproofed the surface must be closed decorative finishing. For the bathroom, ceramic tiles will be the best option.
Knowing the characteristics and technology of applying various waterproofing materials, it will be easier to choose the one that is suitable for all parameters and will become available for independent performance of work.
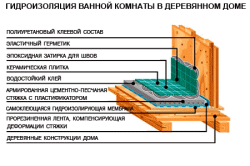
When carrying out major repairs in the bathroom, you will definitely need to conduct waterproofing works. In this particular room, there is always a high level of humidity, and construction Materials, of which the house is erected, can not withstand its destructive effect. Waterproofing layer of special materials must be laid according to all norms and rules - only in this case it is possible to count on long-term preservation of both basic building structures and finishing materials.
Table of contents:Which waterproofing is best for a bathroom?
The most important in the whole process is to choose a quality waterproofing material. In the construction market there is a large selection of similar products, but there are also the most popular / popular ones:
- cement-polymer mixtures - they will show their high quality characteristics only when applied in several layers;
- bitumen mastic - the cheapest option, especially since it is applied to the surface in only one layer;
- sheet / roll material - it fits on the floor of the bathroom with a small "entry" on the walls;
- penetrating waterproofing;
- special hydrobarriers - a material that is made on the basis of rubber.
Note: categorically it is forbidden to use polyethylene film in the work on the waterproofing of the bathroom! This material does not have sufficient level of vapor barrier and will not be able to fully perform the functions of waterproofing.
If a person decides to waterproof the bathroom with their own hands, the most convenient and practical option will be the choice of bitumen mastic and roll material impregnated with the same composition.
It is worth mentioning and another modern waterproofing material, which can be used even in independent work - aquapanels. Together with them, synthetic latex and waterproofing membrane "participate" in the work.
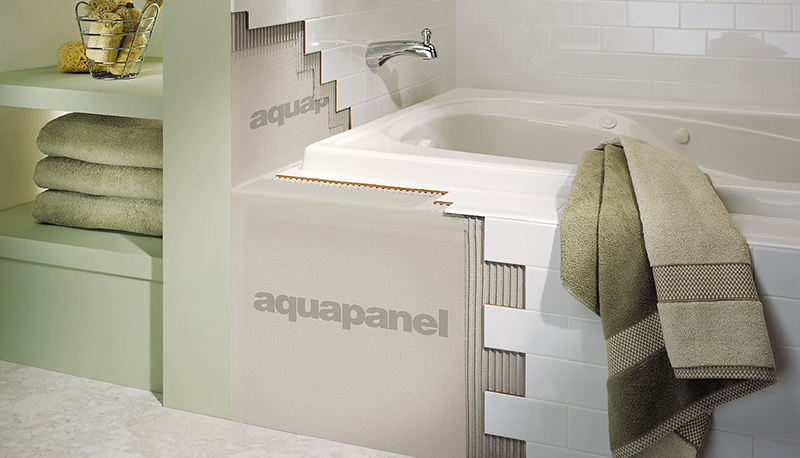 To work on the waterproofing of the bathroom were carried out in accordance with all norms and requirements, you only need to follow the recommendations of specialists. Aquapanels - a modern material with high quality characteristics and featuring the possibility of self-assembly without involving professionals in the work.
Step-by-step instruction waterproofing the bathroom:
- All walls of the bathroom are covered with waterproof aquapanels - they are distinguished by the presence of a core of fine-grained concrete.
- On the surface obtained with a brush, apply a synthetic latex - it has a blue color, so "skip" some section of the wall and do not work with this material will not work.
- All the joints of the walls and floor (corner) must be covered with a special mesh - it already has an elastomer layer that is waterproof. To accelerate this stage of waterproofing works, experts recommend buying ready-made corner products - they are realized with marks for internal or external corners.
- All joints of aquapanels should be treated with the same mesh with a layer of elastomer.
Note: in any case, a mesh with a layer of waterproof elastomer is mounted on top of the synthetic latex layer.
- Now you can apply a synthetic latex over the entire surface of the walls, and begin work on the floor waterproofing.
- On the floor, first apply a layer of cement-based glue - it is usually used for laying ceramic / decorative tiles, but in this case a waterproofing membrane will be attached to it.
- After a slight drying of the cement-based glue, it remains only to roll the membrane over the surface and cover it with synthetic latex.

As you can see, it is easy and simple to carry out waterproofing of the bathroom with the help of the most modern materials - no dirt, dust and complex technical devices. It is noteworthy that experts are the waterproofing membrane, together with aquapanels and synthetic latex, which are recommended for use in this type of work. It's all about the pronounced advantages of a waterproofing membrane:
- with its help, the same thickness of the waterproofing material is always ensured;
- waterproofing membrane overlaps existing cracks, is highly elastic - this prevents the transfer of stresses from the base to the slabs of the outer overlap;
- decorative ceramic tile can be laid on the prepared waterproofing layer, without waiting for the complete drying of the cement-based glue;
- the material is environmentally safe, resistant to chemical and physical aggressive influences and does not require any specific disposal.
Note: work to ensure the waterproofing of the bathroom using aquapanels and waterproofing membrane is considered complete after all the surfaces have been treated with synthetic latex.

Waterproofing of the bathroom with bitumen mastic and roll material
Everyone is good at providing waterproofing in the bathroom with aquapanels and a specific membrane, except for one important point - the cost of these materials is quite high. Therefore, many prefer to act "in the old manner" and use as a waterproofing layer bitumen mastic and roll material. And even this kind of work can be done independently - there is nothing arhispy in this.
Step-by-step instruction:
- Removes all floor covering up to concrete base - as a result of waterproofing works, a multi-layer construction will be obtained, which must begin precisely with a concrete base.

- The concrete base is carefully cleaned of debris and dirt, if the surface is wet, then before waterproofing it must be carefully dried.
- Priming of the concrete foundation. In principle, for this stage of waterproofing work, it is possible to use a primer with any quality characteristics, but there is a special on the market already producing a thin / weak waterproofing layer. The principle of "work" of such a primer is to fully fill all microcracks and pores of concrete, which, after drying, prevents moisture from entering the thickness of the concrete base.
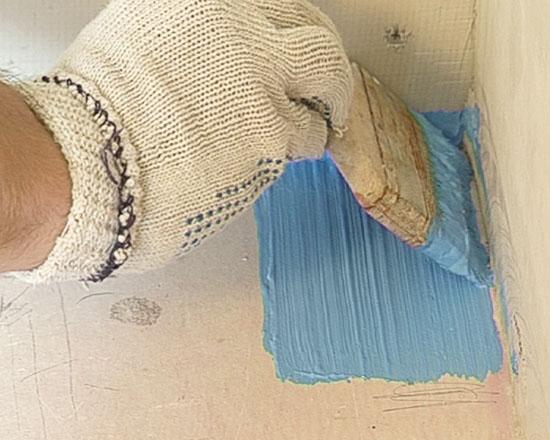
- Application of bitumen mastic. Note that this work can only be carried out after the primer has completely dried. It is applied bitumen mastic with a brush, it is necessary to carefully handle all joints between the floor and the wall, it is necessary to work with bituminous mastic and part of the wall - experts recognize the waterproofing works of high quality, if the bituminous mastic was applied "on the wall" at 20 cm.
Note: in the locations of sewage and water pipes, it is advisable to use rubber seals - they are simply put on pipes. On top of these rubber seals, a layer of bitumen mastic with a "touch" of 10 cm is also applied.
- Roll material is stacked. Here it is necessary to follow the following rules:
- stripes of material overlap;
- there must necessarily be a 20 cm wall entry;
- it is strictly forbidden to join sheets of roll material in the corners.
It is mandatory that all joints of the roll material are treated with bituminous mastic.
Note: to make it easier to lay the roll material in the corners around the water / sewer pipes, it should be heated with a construction hair dryer or blowtorch.
- It is necessary to wait for the drying out of the layer of bituminous mastic. And during this period it is important not to allow the dust and dirt to come on the surface just made - it is recommended to close the room while the bitumen mastic is drying.
On this, in fact, the work on waterproofing the floor in the bathroom is completed. Further on a layer of bituminous mastic it is possible to make a casting from a concrete solution, and then and finishing finishing.
Many will be confused by the fact that in the section on waterproofing the bathroom with bituminous mastic there is not a word about how to work with walls. The fact is that experts do not recommend the use of any bituminous materials for waterproofing works on the walls - bitumen is a very "fluid" material, eventually it will peel off from the vertical surface and it will be necessary to conduct all the waterproofing works again. It is advisable to treat the walls with a cement-polymer mixture.

But here there will be features:
- before the work, the surface of the walls is cleaned from dust / dirt and dries out;
- the wall must necessarily be primed, and before that, if necessary, it is necessary to carefully repair all cracks and depressions;
- then, after complete drying of the primer layer, it is possible to apply a cement-polymer mixture;
- the last layer is again a primer.
Then you can lay decorative tiles, and, experts recommend slightly "drown" in the waterproofing and primer layer reinforcing mesh - this will ensure a reliable adhesion of the tile adhesive with the prepared surface.
Implementation of waterproofing works does not require obtaining permission from special supervisory authorities - there will be no re-planning, and absolutely everything is allowed to disassemble the floor to a concrete foundation. And consider one more thing - bitumen mastic has an extremely sharp smell, so if there is an allergy to any external stimuli, be extremely careful in the work. In general, the safety rules, when working with bituminous mastics you need to use a respirator. And do not worry, after a short time the unpleasant smell of this waterproofing material disappears without a trace.
Water - the basis of life and a tool of destruction, capable of gradually lead to unusable steel, wood, reinforced concrete. Its presence gives civilized conditions to man and creates a favorable environment for the prosperity of microorganisms, turning into a tiny building materials. "Leaving the banks" of bathtubs and shells with forgotten plugs or with clogged pipes, water spoils the decoration, property and relations with neighbors. But you can not live without it. Just need to try to protect yourself from its negative surprises. For this purpose, a waterproofing of the floor in the bathroom is carried out, for the implementation of which there are many methods and materials.
Optimal variant of floor protection from water
Numerous methods for the device of hydroprotection of the floor have a single goal - the creation of a continuous coating, in the shape of a pallet with 10-20 cm bumpers on the walls. The unique capacity made by this method will collect the condensate flowing down the walls, with spills, spilled and splashed water. A monolithic layer of waterproofing will not allow moisture to overlap, prevent the destruction of the base. At the same time, he will get rid of the rot, the spreading of fungi and the harmful fragrances released by these unpleasant representatives of the biosphere.
The goal is one, but there are many ways to achieve it. Actually choose the best option, not knowing the specific technical conditions, is not realistic. The choice of the most suitable waterproofing, the type of which determines the technology of its device, depends:
- from the state of the machined roughing surface;
- from the materials from which the floors are made;
- from the time allotted for the complete arrangement of sex;
- from number of storeys;
- from the possibility to reduce the height of the ceilings and even from a number of nuances, which can only be revealed while being on the site.
Affect the choice may the area of the room, the complexity of its configuration, the presence of a construction hair dryer or a burner and the ability to use them. One can not ignore such important arguments as the cost of material and the complexity of the performance.
It is highly doubtful that any technology would meet all the conditions, but after a thorough evaluation of the pros and cons, the best method to choose is still possible.
Methods of waterproofing and materials for its implementation
To protect the floors from water and yourself from expensive repairs can be by laying a roofing felt, filling with a mixture of soil enriched with liquid glass and bentonite. However, because of the high cost, toxic odor or because of too much layer thickness, these methods are rarely used.
Waterproofing of the floor in the bathroom is carried out by two methods:
- by applying a water repellent mixture forming an impermeable membrane;
- by gluing strips of roll material, which prevents penetration of moisture.
In the first case, waterproofing is applied by coating, hence the name of the family "coating" materials. The second according to the corresponding technology is called "okleychnymi." In the composition of both varieties there must be bitumen, the toxic properties of which are minimized by the introduction of polymers.
Features of coating materials
The progenitors of insulating coatings were oils and animal fat. Now, materials for lubricating waterproofing are available in the form of dry formulations, mastics and pastes with a different set of components. Dry mixture before use in the case will need to be closed with water or a polymer emulsion, as indicated in the briefing on the package. Buyers of pasty and liquid floor waterproofing in the bathroom, the cooking process will not bother, as the hermetically sealed in Euro-banks mixture is fully prepared for application.
A paste-like or liquid mixture, depending on the consistency, is applied:
- a broad fly brush on a stick or a mackerel, if the waterproofing material resembles ordinary paint;
- trowel with teeth, if the water repellent "coating" is similar to plasticine.
The consistency of the lubricating mixture is a characteristic that makes it possible to create a waterproofing of a certain thickness that automatically delimits the scope of application:
- Liquid mastic compositions with a base of oxidized oil bitumen are applied at least twice to each other by continuous layers. The thickness of each of them is approximately 1.0-1.5 mm. Most often, the screed is poured on top of the mastic, therefore no one claims any special requirements, except for cleanliness, dryness, absence of contamination and obvious damage to the roughing base.
- Bitumen-containing pastes enriched with mineral or polymeric substances are laid with one or two seamless layers of thickness of 3 mm. Pasty mixtures can perform two functions: insulation and screed. In view of the fairly thick thickness, this type of waterproofing, by analogy with the screed, is reinforced, but not a steel grid, but a PVC mesh, is used to strengthen it.
Note. For the first layer to harden, the time interval specified by the manufacturer must be maintained. The second layer of liquid waterproofing is laid on a dry, hardened surface. To cover the floor for the third time it is possible on a "wet" surface, if this is permitted by the instruction.
Mastics and pastes cover the floor with a waterproof coating, removing a certain amount of mm or even from the ceiling height. But those who are extremely dear to mm, can find impregnations in the line of liquid waterproofing materials, the principle of operation of which differs from conventional coatings.
Cover the penetrating insulation can be a damp floor, some manufacturers strongly advise pre-moisturize the surface being treated. In a wet concrete or cement-sandy environment, penetrating waterproofing forms needle crystals unfolded by the base to the intended flow of water. "Newly-baked" structure freely misses evaporation and staunchly reflects water attacks, does not reduce the height of the ceilings. However, it costs a lot, because it is not too actively used.
Specificity of waterproofing
Its predecessors were only roofing felt, not happy with environmental priorities and ease of installation. Advanced representatives of roll materials are produced on the basis of elastic polyester, easily spreadable fiberglass or flexible fiberglass. Bitumen is applied from the outer and inner sides of the material. From below is also a sticky substance that provides adhesion to the roughing floor, on top is a component that improves adhesion with the glue for the finish coat.
Note. To improve the adhesion properties with adhesive compounds, the surface of the waterproofing is sometimes sprinkled with medium-grained sand. Its excess is swept off after the insulation material has hardened.
The family of pasting materials is divided into two subgroups, one of which must be fused with a gas burner or at least heated with a construction hair dryer. The second subgroup of water-repellent roll protection can be banally pasted, separating from the strip, cut according to the previously calculated size, a protective film.
It is easier, easier and safer to stick strips, both for an inexperienced artist directly, and for material melting from the slightest overheating and tearing from careless movements. On the basis of what the method of fusing trust the builders. Among them, too, not too many people wishing to work with toxic rolls in a small room. Therefore, for the device of waterproofing glue type on the floor in the bathroom, self-adhesive variants are often preferred.
Cons of glued waterproofing coatings:
- The material can be glued only to a previously dried, leveled, prepared surface with a height difference of max 2 mm. Detection of the falls is carried out within a two-meter level gauge, placed on the floor in different directions.
- With fused varieties it is better not to get involved not only because of complex laying, but also because of the release of toxic volatile substances that continue to poison the air for a long time after completion of work. Because of their toxicity, they are recommended to be placed under the screed.
- Stacking requires special care, careful jointing of seams, scrupulous alignment of the corner joints.
In the list of validly recognized advantages of roll pasting appear:
- affordable price is the most convincing argument;
- strength of fastening to roughing;
- the opportunity to proceed with further work on the arrangement of the floor without any technological interruptions.
In addition, it is by pasting make a waterproofing of the wooden floor in the city and country bath. Elastic materials without problems experience the rapidity of the movements of wood, and, despite the constant tension and compression, persistently store monolithic. They do not clog the pores of natural organic matter, they do not interfere with aeration phenomena.
Complex approach in the device of waterproofing the bathroom
Depending on the technical specifics of the premises, the owner may choose one of the above methods, but complex measures are considered as the most effective. Their essence lies in the use of both types of waterproofing materials, resulting in a double insurance. We will consider it.
Competent preparation is the key to success
We will assume that we had to remove the old screed after the worn floor covering from a concrete prefabricated ceiling or from a monolithic concrete slab. With a spatula or large emery paper, remove the old oil coating or the top layer of plaster from the bottom edge of the walls to the height of the future "edges" of the waterproofing. A priori, we take the need to remove chipped fragments, dust, grease stains, oil paint residues, etc.
- Let's start with repairing cracks and sealing shells in the body of concrete, for which all the notches are preliminarily expanded, and then fill with repairing structure, for example, isotope.
- On the line of joining the walls with the floor, make a width / depth penalty of about 1 cm. Fill this groove with a bentonite cord, Penecrete or mortar prepared for repair. To strengthen corners and zones of interfaces it is necessary, since these are the most vulnerable places for the destructive action of water.
Waterproof barrier device
After repair operations, we carefully process the floor and the part of the walls prepared for insulation (Ceresite, Betonocontact or others).
- We ground in two steps, rubbing the composition into the roughing base. The second layer of soil is sent "to the cross" first, so that there is no accidentally missed holes.
- Fill liquid waterproofing The intersection of overlaps with risers and other elements of water pipelines.
- We process bituminous mastic stripped sections of walls and the adjacent floor along the perimeter. Until it has grasped, we reinforce the mating of the walls and the floor with a mesh PVC tape.
- We apply mastic or paste (Technikol, Penetron, Elastomix, Ceresite, Hyperdesmo, etc.) in the manner prescribed by the manufacturer the required number of times. We wait, while will harden. In the period of drying paste or mastic, you must stop any possibility of settling dust and grains of sand on the surface. Lubricants in this case play the role of leveling, additional insurance and glue, the properties of which will be worsened due to dusting.
- After drying the last of the layers of liquid or pasty waterproofing according to the measured dimensions of the floor with the added approaches to the walls, cut the strip of Isoplast, Aquaizol, Ecoflex or analogue.
- From the upper edge of the strip it is necessary to retreat to a distance equal to the height of the edge of the safety pallet. We glue the part that comes to the floor, we rub it with effort, using a roller.
- Each successive strip is stacked with an overlap of approximately 10 cm to the previous one, so that the result is a continuous waterproof web. For reliable fixation on the laid surface, it is necessary to walk with a heavy roller.
- We will tack on the walls. We warm up the wall of the mastic treated with a hair dryer and fix on it not pasted up the remains of the strips laid on the floor. Angles need to be tightened with a board, gently pritaplivat them in the heated mastic.
- At the end around the pipes you need to again perform the bitumen treatment.