One of the most beautiful options design of the plots are fences made of wooden picket fence. Wood has always been one of the most attractive materials for construction - its noble colors and picturesque textures create a special warm atmosphere. Now in Moscow, such a design option as eco-design is very common: the predominance of natural materials in the interior and exterior of buildings. A wooden picket fence also fits organically into this design.
Modern technologies make it possible to make the installation of wooden fencing simple and quick, and also significantly increase the level of performance characteristics. The fence is beautiful and environmentally friendly, its installation can be done in a matter of hours, and today’s technologies make it possible to extend the life of the product without having to bother with additional processing.
Nowadays, anyone can buy a fence made of natural wood - the price per meter is quite reasonable, in addition, for a higher price you can order very interesting models with different directions of the boards: horizontal, vertical, diagonal, combined.
Prices for wooden picket fences
Prices for a wooden picket fence range from about five hundred rubles for the material itself, but also include additional costs. If you order a turnkey fence, please note that the price per meter will take into account both installation and frame: pillars, logs, construction of brick or stone pillars, strip foundation. Together with painting or impregnation, prices can rise to 1000 rubles per m and more. You can vary the amount through an individual calculation, saving on materials, foundation solidity, etc.
| Product name / height | h-1 m | h-1.5 m | h-1.8 m | h-2.0 m |
|---|---|---|---|---|
| Metal fence frame: pillars 60x60, 2 logs 40x20 or board 100x40 |
350 RUR | |||
| Wooden picket fence (planed board 90x20mm) pitch 1cm | 600 RUR | 900 RUR | RUB 1,080 | RUB 1,200 |
| Wooden picket fence (planed board 90x20) pitch 2cm | 540 RUR | 810 RUR | 972 RUR | RUB 1,080 |
| Wooden picket fence (block house 95x20), pitch 1cm | RUR 571 | RUR 857 | RUR 1,028 | RUR 1,143 |
| Wooden picket fence (planed board 90x20 or block house 95x20), checkerboard with steps of 5-6 cm |
890rub | RUB 1,335 | RUR 1,602 | RUB 1,780 |
| Coating the picket fence with antiseptic, Pinotex, etc. | Consumption: 1 l per 6-8 m2 | |||
| Installation of a fence (metal frame, logs and picket fence) | 400 - 450 RUR | |||
| Strip foundation | 3,500 RUR / 3,900 RUR (for brick pillars) | |||
How to buy a wooden picket fence
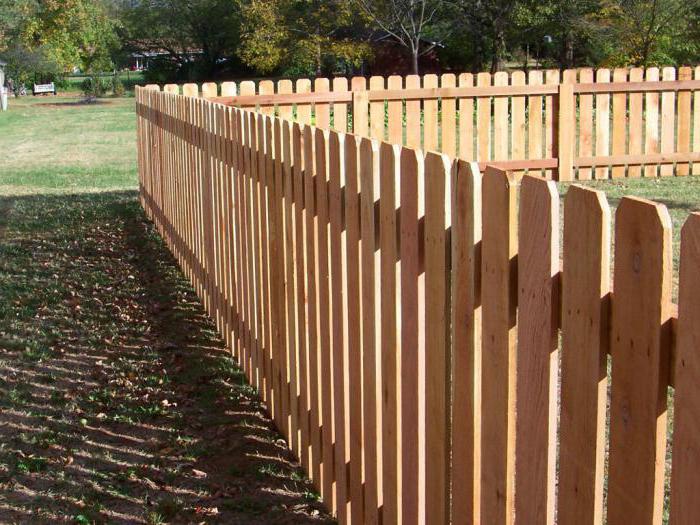
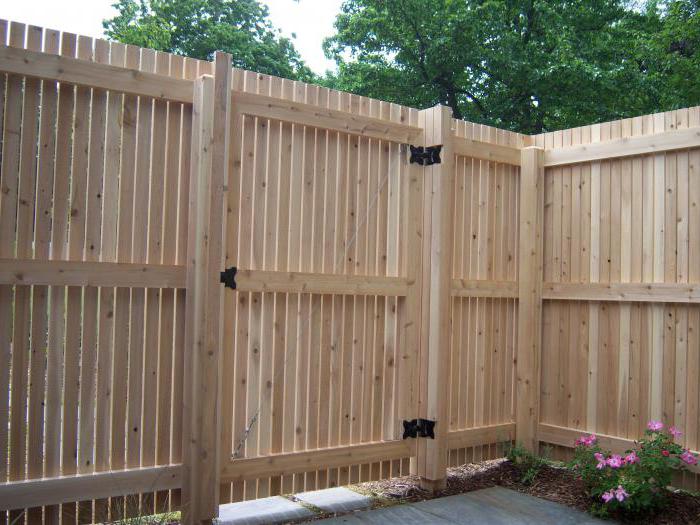
On our website you can buy wooden picket fences of various modifications. These are fences with different pitches (distance between boards), as well as different types board processing. We offer fences made from ordinary planed boards, as well as from a block house - this is a popular processing method when the inner side remains flat and the outer side is made convex. A single or double design is possible, with boards arranged in a checkerboard pattern, as well as decorative options for designing a fence with complex patterns. We can also calculate for you the cost of special impregnations that will additionally protect the wood from discoloration over time, sunlight, moisture, rot, microorganisms and insects.
Not everyone can afford such high prices. The most economical option is wooden fence. In addition to low cost, the picket fence has a number of advantages:
- Wood is an environmentally friendly type of material.
- There is room for imagination - the shape of the boards, the height of the fence and its color depend on the wishes of the owner.
- Easy to install, maintain and operate.
- A fence is not always able to protect against thieves, but for dogs and freely grazing animals it will become a barrier.
- Nice view.
The disadvantage of wooden fencing is its fragility. With care and timely repairs, a picket fence can last 15 years. In the spring and dry summer, when there is a high probability of a fire, a wooden fence, unlike a fence, will not be able to contain the fire.
Financial issue
The cost of a picket fence in different regions
Prices for picket fences differ in the regions of Russia. It depends on how rich the area is in forests and on the number of enterprises involved in timber harvesting. Another factor that determines the cost of a picket fence is the species from which it is made. Usually these are coniferous trees - larch and pine. The fencing from the second option will cost owners less.
Picket fence price with installation
If finances allow, a simple way out of the situation would be to call a team to bring and install the fence. The price depends on the degree of urgency and how long the company has been working in this field.
When the fence is delivered “turnkey”, the craftsmen carry out work on and finishing the fence, hanging gates, attaching locks and handles. At the same time, the cost of the fence increases by several hundred rubles per linear meter. But the owner does not have to worry about the quality of construction. Companies provide a guarantee for a certain period of time. If the customer finds a defect, the workers undertake to correct it as soon as possible.
It is necessary to calculate how much a fence costs individually. It all depends on the region where the owner of the estate lives and the prices of the companies involved in installing fences. 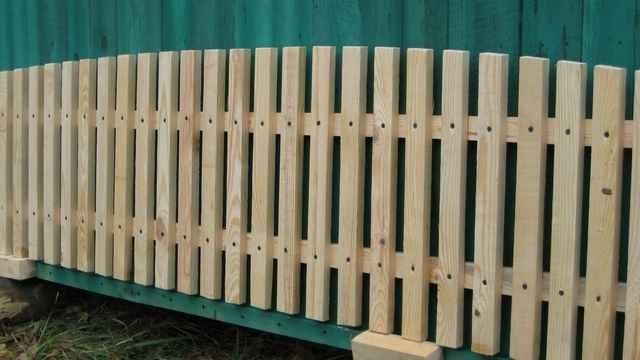
Do it yourself: necessary materials
To erect a wooden fence on the site you will need:
- Support posts– metal pipes or powerful wooden beams.
- Veins– beams with a cross-section of 40 mm and a length of no more than 3 meters. You need 2 pieces for each span of the fence. One is attached at the top, the other at the bottom.
- Picket fences– slats made of planed boards. Their width and shape depend on the owner’s ideas.
If your arsenal of tools allows, you can prepare all the material yourself.
The wood must be thoroughly dried, otherwise the finished fence will be deformed. To do this, the boards are stacked. The place where this structure will be located is cleared of grass and debris. The area for the stack is made as level as possible, otherwise the board may lose its shape during the drying process. Wide, thick boards or several logs are laid on the ground so that in the spring, when the soil is loose, the stack does not “move” to the side.
The base of the stack is covered with film or roofing felt so that moisture evaporated by the ground is not absorbed by the wood. The first boards are laid no lower than 30 cm from the ground. The “floors” are separated from each other by wooden or plastic slats 2-5 cm high. The width of the stack should not exceed 80 cm. It should not be built too high - there is a high probability that the supports will not hold up and the structure will collapse. Ideally, the boards should be under a canopy, but if the owner does not have such an opportunity, then it is enough to cover the material with slate. How long it takes to dry depends on the type of wood. On average the process takes 2 years.
To speed up the process, you can contact a timber processing plant that has installations for drying wood. Or plan the installation of the fence so that there is enough time to prepare the wood. All cuts must be treated with sandpaper to avoid cuts and scratches.
If you don’t have the tools, desire and time to do this yourself, you should contact a woodworking company and order what you need there. This will save time, but will require serious financial expenses. A well-dried, sanded “constructor” to create a fence should arrive at the owner’s site. 
Fencing installation
Before you begin installing the fence, each wooden element should be treated with a protective agent. This will allow the picket fence to serve for 10 - 15 years without requiring major repairs.
When everything is ready, you need to determine where the fence will rise. The area should be cleared of stumps, grass and bushes. Need to mark installation locations support pillars . It is not worth making a span longer than three meters - over time, the vein will sag under the weight of the slats, and the fence will tilt to the side. That part of the racks that will be underground is treated with hot pitch, tar or a special solution that protects the wood from rotting, or is covered with roofing felt.
A hole 1.3 - 1.5 meters deep is dug under each pillar. To prevent the support from “moving” to the side or from sagging during periods of precipitation and snow, a 20 cm layer of gravel is poured onto the bottom. The stand is fixed in a vertical position. Earth, concrete or cement is poured into the hole layer by layer.
There are two ways to complete the next step: either the spans are attached to the posts, and then the slats are nailed down, or the spans are assembled separately and then hung on the supports. There is no big difference in the expenditure of time and effort.
Important: when working on an uneven area, it is necessary to make the fence in “steps”, evenly distributing the difference over the entire length of the side of the fence.
To make the fence look nice, the distance between the pickets should not be greater than the width of the slats themselves. The fence can be mounted using either nails or self-tapping bolts. The metal racks have special corners for securing the cross beams. 
Finishing work
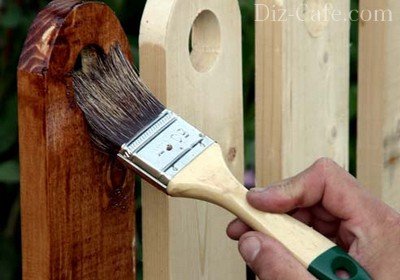
When the fence is ready, you can start painting it. The natural color of the wood pleases the eye and seems ideal. But if he spends some time in the rain, snow or scorching sun, no trace of this beauty will remain. Therefore, a prudent owner is obliged to choose a paint whose color he likes and fits into the overall exterior of the house, or stain. The latter, in combination with colorless varnish, will help to imitate wood of any species or “preserve” the original color.
Moreover, it is better to apply the paint with a brush, and first spray the stain with a spray bottle.
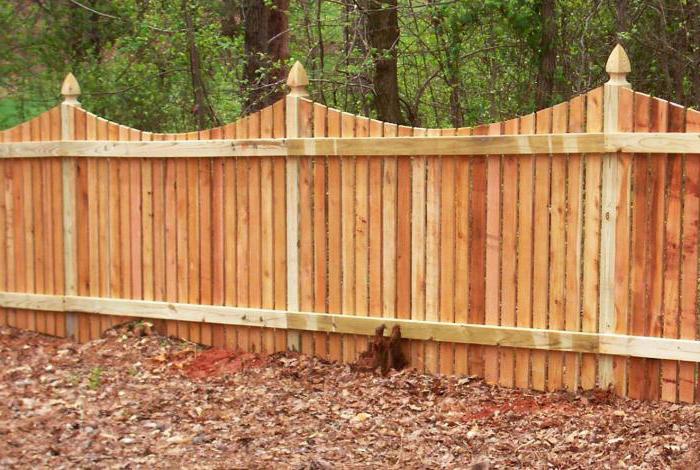
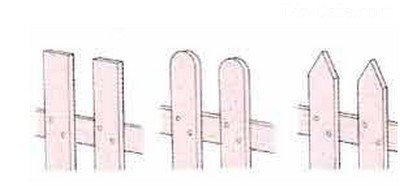
The top of the fence can be given an interesting wave or semicircle shape. To do this, you will have to arm yourself with a pencil and a drawing tool. You should not rely on your “diamond eye”, since the consequences of failure will be very difficult to correct. Decorative elements of various shapes made of wood or metal are suitable for decoration on the front side of the fence.
Good to know: If the fence is designed with regular even boundaries, then ropes need to be pulled along the lower and upper edges. Then there will be no problems with the correctness of the lines.
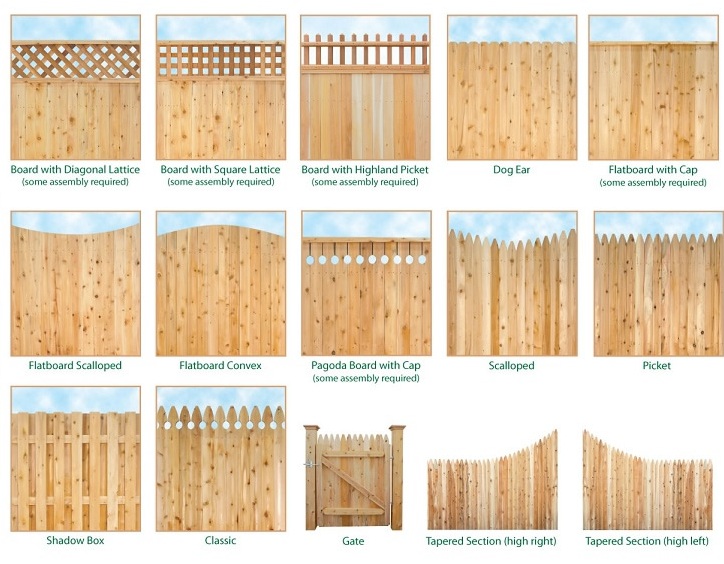
Options for decorative solutions for the top of the fence.
For those who like to profit from other people's goods, picket fences with a conical top will cause great inconvenience. Also, nothing prevents the owners from stringing barbed wire on top.
This wooden creation should be crowned with a reliable gate or gate - it all depends on the wishes of the owners. In any case, the “doors” in the fence must be locked. If necessary, there can be several gates.
If the person erecting the fence is the happy owner of an entire farm, and on the site, in addition to the house, there are hectares of beds, a mini-farm, a pasture, etc., then it makes sense to consider a picket fence for zoning the territory. Low wooden fences around flower beds and bushes also look very nice.
In order for the owners of the plots to be inspired by the idea of building a new fence, they are shown in the photo below beautiful fences from a wooden picket fence.
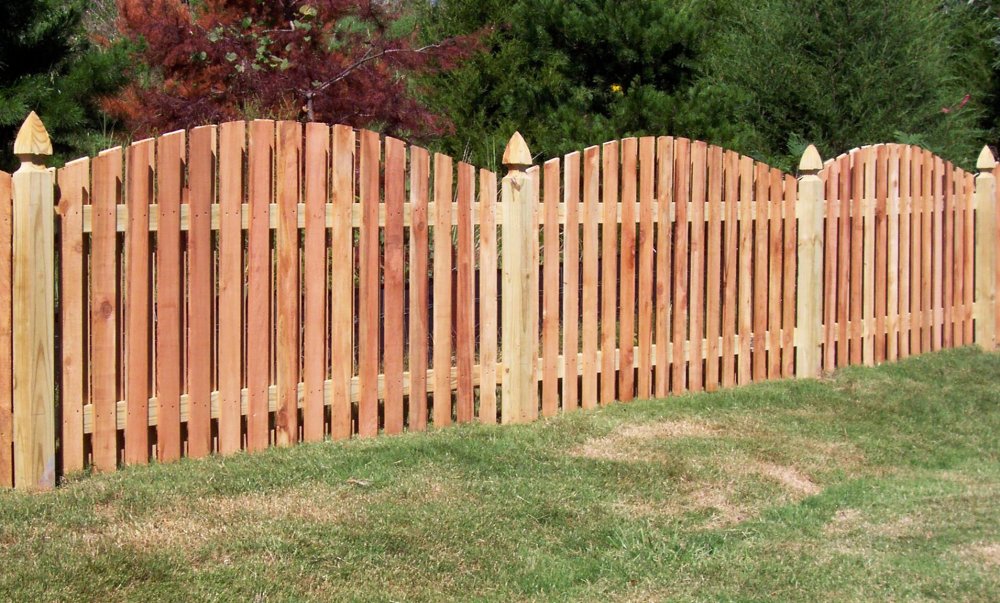
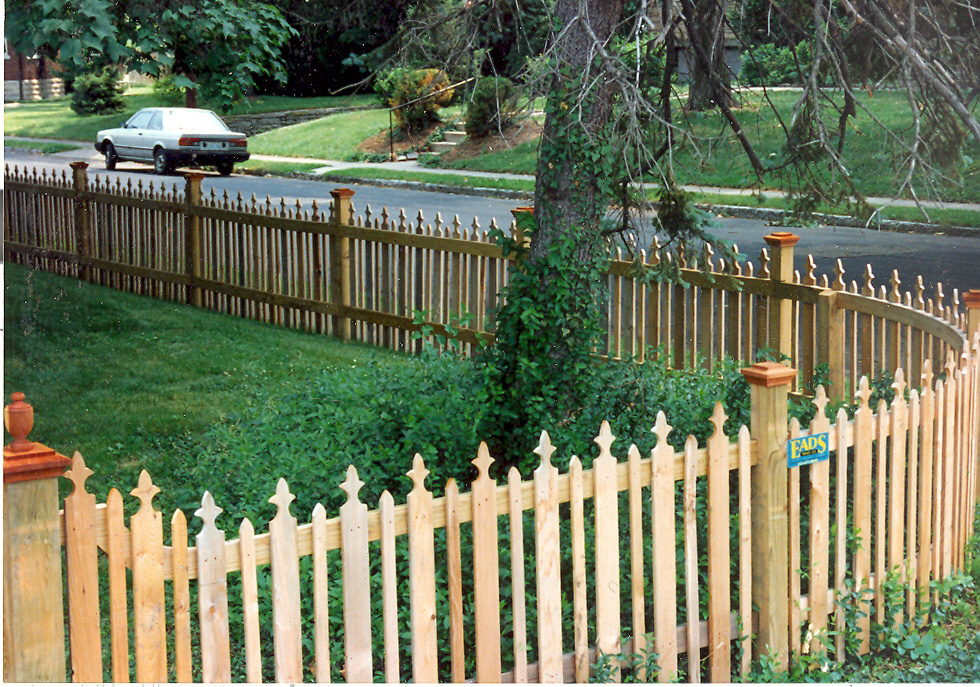
Classic. Arched spans, pillars with decorative tops.

Another solution for the top of the pillars. A small detail is a different image.

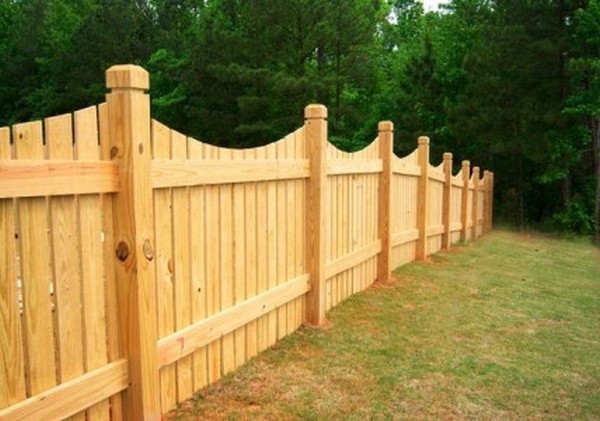
Reverse arch.

A gate made of the same material and an arch above it fit very nicely into the fabric of the picket fence.

Above the gate you can place not only an arch, but also a pergola.
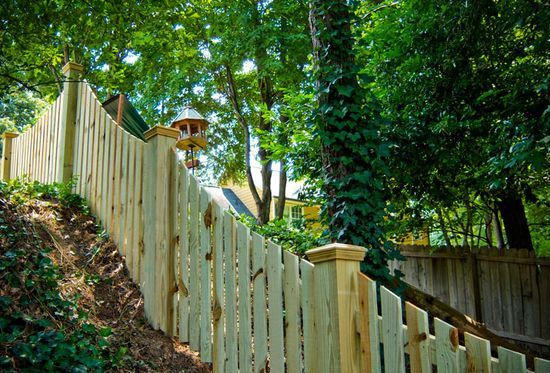
"Flowing" fence. A wooden picket fence is one of the few fence options that can easily accommodate complex terrain.

Step solution.

Luxurious option on a stepped base.

Sometimes an unusual color sets the style.

A radically different style solution. Although the focus is also on color.

A bright yet classic color option.
Chameleon fence. The artistic coloring makes it that way.

Another creative color option.

Fence colors with a nod to colonial style.
The original version of the spire. Nothing prevents you from coming up with and implementing your own.

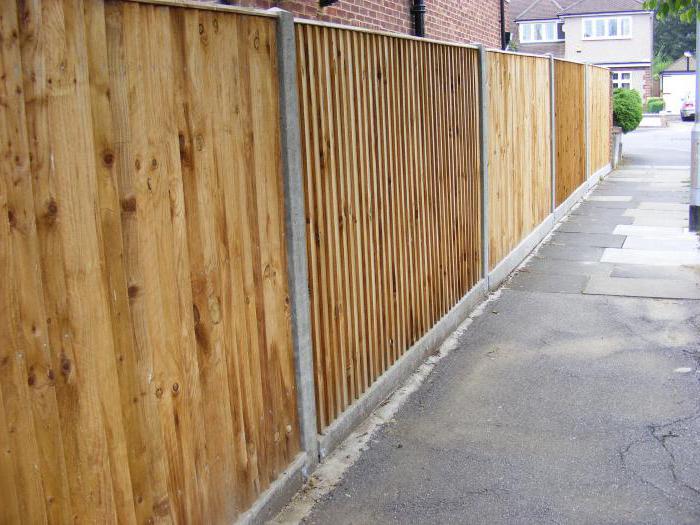
Variations with the direction of the pickets are possible. They are mounted not only vertically, but also horizontally.

….A mesh option is also possible.
It is difficult to say how long the entire fencing installation process will take. If the materials are prepared, the area is small, and there are helpers, then you can get it done in a day. A team of specialists will need the same amount. A week is not enough for a person who does everything alone and has to fence off a large area.
About the assembly on video
Find out how to assemble a fence from a ready-made picket fence in the material below.
- Materials and tools
- Manufacturing technology
A wooden picket fence is one of the most popular types of fencing used to improve country cottage area. This is a very successful solution that allows you to decorate your yard, the main thing is to implement it correctly. This type of fence has secured enormous popularity among summer residents and villagers due to a number of advantages, the main of which are the low cost of the structure and its aesthetic properties. It is preferred by connoisseurs of environmentally friendly materials, which, without a doubt, include natural wood. In this article we will tell you how to make a picket fence with your own hands, and what you need for this.
Materials and tools
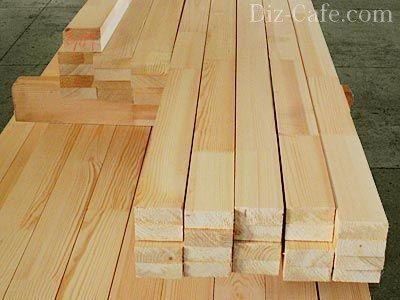
In principle, there is nothing special in preparing the material and tools, since installing a wooden picket fence does not require special devices, of course, unless we are talking about combined structures consisting of several different types of materials, such as stone or brick. Load-bearing vertical and horizontal supports for the fence can be made of both wood and metal. So, to install the picket fence we need:
- wooden beam 50x50 mm;
- wooden beam 20x40 mm;
- nails or screws;
- antiseptic;
- paint material.

We need a square beam to make vertical supports, and its length is planned in accordance with personal wishes, because everyone determines the height of the future fence for themselves. Don’t forget that each support is buried at least half a meter into the ground, so don’t forget to add 50 cm to the desired height of the fence element.
A beam of smaller cross-section, in our case 20x40 mm, is intended for horizontal reinforcement of the picket spans, and its quantity will directly depend on the length of the fence being installed. Both nails and screws are equally suitable as fastening elements, although the second option is more preferable, because the screws do not become loose during the operation of the structure. Fasteners must be purchased from galvanized metal, which does not rust from exposure to atmospheric conditions. As for antiseptics and paints and varnishes, there are a great variety of them on the building materials market; you just need to choose products intended for outdoor use. The tools you need to prepare are a wood saw or a jigsaw. If you fix the boards with nails, then you will need a hammer, and it is better to fasten the screws with a screwdriver. We will also need a shovel for installing support posts.
Manufacturing technology
The step-by-step diagram for assembling a picket fence with your own hands, located in the next part of our article, will help you understand how to properly organize and complete the work from start to finish.
- At the first stage, it is necessary to properly prepare the wood, which means that all natural material you need to soak it several times with an antiseptic using a regular paint brush. Despite the fact that this process is quite labor-intensive, it should not be ignored under any circumstances. This measure will help protect the tree from the harmful effects of the environment and protect it from the process of rotting, respectively, extending its service life.
- Now you can begin installing the supports, and we begin work by marking the places for their installation. So, in places where the fence changes direction (at corners), we install pegs and stretch a strong rope between them. Next, we need to calculate the number of supports, for which we measure the distance between the pegs and divide it into equal intervals, the length of which does not exceed 2 meters. The resulting value will be the step between the supporting pillars, and at the site of their installation it is necessary to dig holes, taking into account the fact that the support must go into the ground at least half a meter, necessarily below the freezing point. For long and reliable service support structures wedged with coarse gravel and compacted with earth. Increase life wooden supports It helps to lay roofing felt in the holes dug for the posts, and the supports themselves are wrapped in the same roofing felt in the places where they are buried in the ground.
- At the third stage, transverse fence guides are usually installed. The main thing is that each vein is located strictly horizontally, which must be controlled building level. As a rule, horizontal supports are mounted in two places (at the top and bottom of the fence), but in the case of a high fence you will have to install an intermediate guide. The veins are fixed to the vertical supports of the picket fence with self-tapping screws or nailed.
- The final step is to install the wooden picket slats directly onto the fence. The longest, but very simple process is to ensure that each picket is screwed strictly vertically at equal intervals. To make the task more comfortable, it is recommended to tighten the thread on the lower edge of the pickets, which will ensure that they are placed at one level.

In principle, at the fourth stage the assembly process ends, the wooden picket fence is now ready for use, all that remains is to paint it in any chosen color, however, many craftsmen often additionally decorate the fence using simple techniques, providing it with a complete appearance. This mainly concerns the design of the upper edge of the pickets, which are given a certain shape.
Sections of the fence can be made in the shape of a wave or an arc, for which markings are applied to the fence, according to which trimming is carried out according to the template. The pickets are also sharpened on both sides to the shape of a sharpened pencil, which will additionally protect the yard from unauthorized access. You can often find picket fences with carved planks, but here we are talking about the whole art of carpentry, and such work cannot be called simple. If desired, decoration options can be found online, where numerous photos of the most interesting carpentry solutions are collected, the main thing is that the homemade product pleases its owners and fits perfectly into the existing style of the local area.
Alternative to wooden supports
No matter how you prepare and process future supports, wood is wood, and in terms of durability it is significantly inferior to metal. If you want a wooden picket fence to last a long time, and its service life is not limited to 15 years, it is better to give preference to a metal base, which is mounted in the same way as the method described above, with the exception of a few points. In this case, the posts are made from a metal pipe with a cross-section of 40 mm, and they are fixed in the ground with concrete mortar. To ensure optimal adhesion of the load-bearing element to the concrete, scraps of reinforcement or metal plates are welded to the bottom of the vertical supports.

Horizontal veins here are made from a metal pipe of smaller diameter and welded between the vertical support elements, also ensuring the horizontal placement using a level. Next, the process is performed as described above - each picket fence is fixed to the previously constructed metal carcass with special pointed screws. Despite the fact that we will get a wooden picket fence as in the previous version, in this case it is reinforced with a metal base. Even if the pickets become unusable over time, they can be replaced, while the supports will remain the same, and this is a significant cost savings.

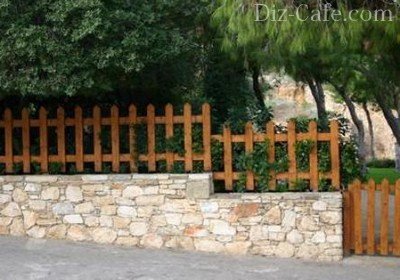
The photo above clearly demonstrates that a wooden picket fence has a lot of options, and can be used as a base here brickwork, which in combination with natural wood gives an amazing effect. Also, instead of brick, if finances allow, they often lay out spans of stone. Of course, for such a massive structure it will be necessary to provide a full-fledged foundation, and this is a much more labor-intensive process. Now you know how to build a fence from wooden pickets without any outside help, entirely on your own, and you also have the opportunity to choose various auxiliary materials to suit every taste and budget.
Wood has long been one of the most popular materials in construction. They build from it log houses, make interior items and window frames. This list is far from complete. The material is environmentally friendly and can be used to create an atmosphere of coziness and comfort indoors.
Why choose a picket fence
Wood can also form the basis of a picket fence, which acts as one of the most common types of fencing, which is especially true in the matter of suburban construction. With the help of such a fence you can mark the boundaries of the site without obscuring the territory. By building a wooden picket fence with your own hands, you can give it any shape and height. The distance between the elements can also be selected individually, thanks to this the design takes on an original and attractive appearance, complementing the exterior of the suburban area.
The popularity of such fencing is explained by several parameters, including:
- versatility;
- ease of installation;
- ease of care;
- reliability.
Additional benefits

By making a wooden picket fence with your own hands, you can fit the structure into any landscape. It combines perfectly with other materials and looks organic even with products made of brick, stone, metal and concrete. Installing such a fence is quite simple; any home owner and summer resident can do such work. There is no need to resort to the help of professionals.
Caring for such a fence is quite simple. Its surface can be painted, and, if necessary, some elements that have been damaged during the season can be replaced. By making a fence from a wooden picket fence with your own hands, you can create a pretty high design, which will be a reliable protection of possessions. One of the main advantages of a picket fence is the ability to plant plants at its base.
Preparation of materials
In order to build a fence, you should prepare some materials, including:
- support pillars;
- fence;
- veins.
The pillars can be made from thick beams or metal pipes. As for the picket fence, it has the form of separate slats, the width of which is quite small. Pickets can be made from planed or edged boards. The transverse slats for the fence will be positioned horizontally, their length should be equal to the limit of 2 to 2.5 m.
The veins will be based on bars, the cross-section of which is 40 mm. If you decide to make a fence from a wooden picket fence with your own hands, then the material can be purchased at finished form or do it yourself. The first approach saves time. The fence can be installed on the day of purchase. However, the disadvantage may be raw, low-quality wood, which formed the basis of the picket fence.
If you have time, you can make a picket fence yourself, spending a few days on it. You can guarantee the result. First you need to determine the length of the fence, the pitch between the supports, the height of the structure and the size of the picket fence. If you decide to purchase lumber, then preference should be given to well-dried products. When the material is prepared independently, craftsmen usually saw down and sand the tops. Supporting pillars made of wood from below are treated with hot pitch. This will prevent rotting and significantly extend the life of the wood.
Fencing installation

A do-it-yourself wooden picket fence, a photo of which you can see in the article, is made on the basis of support posts. But first, the area in the direction of the fence should be cleared of tree branches, bushes and weeds that could interfere with construction. On the site, laces are tightened and places for installing poles are marked. The distance between them should be 3 m or less. If the spans are made too long, the crossbars may sag under the weight of the picket fence.
The supports are usually installed in the ground, but if you want to make the structure more durable, you should use the technology of pouring a solution of cement and sand. Making a fence from a wooden picket fence with your own hands involves installing supports on a gravel cushion, which will prevent the posts from being squeezed out when the ground freezes. The pillars should be fixed vertically, covered with layers of soil and concrete.
The posts should be positioned as evenly as possible along the fence line. Sometimes veins are installed between them. Installation of a fence is usually carried out using one of two methods, the first involves attaching crossbars between the supports, as well as installing a picket fence. The second technology involves assembling the spans separately, after which they are attached to the supports with blocks. Usually the pitch between the pickets is equal to the width of the boards. The cross bars are fixed on using self-tapping screws, nails or bolts. The veins are attached to the metal posts with angles for fastening the timber.
Before starting work, be sure to read the instructions. A do-it-yourself wooden picket fence is assembled only after installing the posts. In place of the pegs that are driven into the ground at the marking stage, holes should be dug. Their depth should be 50 cm or more. When installing supports, you should not trust your eye; it is better to use a plumb line or level. The bottom of the pit should be concreted. To prevent the pole from sagging, it is recommended to make temporary spacers that will hold the product until the mixture hardens.
If you are thinking about the question of how to make a fence from a wooden picket fence with your own hands, then it is important to become more familiar with the technology of assembling structures. You need to start this process only after the pillars are securely held in the concrete mixture. To do this, after pouring you need to wait about 2 days. Further work will resemble the assembly of a construction set.
The fasteners are installed on the poles. The veins are fixed to the fastenings with self-tapping screws. At this stage, it is necessary to mark the places where the picket fence should be located on the veins. You should use a marker or pencil for this. This will allow you to ensure that the distance between the picket fence elements is maintained. It is better to use a screwdriver to screw the slats.
Finishing the fence
Before starting work, experts recommend familiarizing yourself with the ideas. A DIY wooden picket fence can look very original. Its appearance is largely determined decorative finishing. In addition, applying a protective layer allows you to extend the life of the structure. If we are talking about freshly planed boards, then you should not use film-forming agents, as they do not adhere well and do not last long. You need to clean the surface of the wood with medium-grain sandpaper. Applying varnish will protect the material from moisture. You can use its transparent variety or stain.
For reference
Installing a wooden picket fence with your own hands may involve the use of supports made of different materials, including:
- wood;
- metal;
- concrete;
- brick;
- stone.
In any case, the same distance must be maintained between the elements; finished sections will be located between the supports. For additional rigidity, the pillars can be supplemented with bases in the form of stops that will go to the side. After pouring the concrete and hardening, the resulting depression can be filled with soil.
Conclusion
Quite often lately a metal picket fence has been used to make a fence. He has polymer coating, therefore does not require painting. But if you want to make the exterior more natural, then it is better to use wood; at the final stage, it is covered with stain and special antiseptic agents. This way it will be possible to preserve the natural color of the material and eliminate the impact of negative factors on it.
In Russia, wood has long been widely used as building material. It is used to build log houses, window frames, interior items, and kitchen utensils. This natural material allows you to create an atmosphere of internal comfort and coziness. A wooden picket fence is one of the most popular types of fencing in suburban construction, which is simply indispensable when arranging a site in rustic style. Such a fence, on the one hand, outlines the boundaries of the site for us, and on the other, its territory is not obscured.
Picket fences can be given any height, shape, color, and even clearance distances, thanks to which they acquire an original appearance and their own appearance complement the design of the suburban area.

A wooden picket fence is used as a reliable fence personal plot, an element of territory zoning, decorative framing of beds and flower beds

Stems with flowers, filling the gaps in the gaps between the vertical slats, give the fence a more attractive appearance
The continued popularity of this type of fencing is explained by a number of its parameters and properties, the main ones being:
- Versatility. Wooden fences fit perfectly into any landscape. They go well with any other bases, organically fitting into an interior made of stone or brick, concrete or metal.
- Easy to install. Any summer resident or owner can install a picket fence independently. country house without resorting to the services of professional craftsmen.
- Ease of care. Caring for the fence consists only of timely painting of the surface and eliminating defects that may arise during operation as a result of mechanical stress and seasonal precipitation.
- Reliability. A tall wooden fence will serve as more than just a decorative element. landscape design, but also reliable protection for the owners of the site.
One of the advantages of a picket fence, in comparison with a traditional solid fence, is the possibility of planting plants right at its base.
Preparation of material for arranging a fence
To erect a picket fence you will need:
- Support pillars. They can be made of metal pipes or thick beams.
- Picket fences. Narrow slats are made from edged or planed boards.
- Veins. Cross bars, placed horizontally between the support pillars, 2-2.5 meters long, are made from bars with a cross-section of 40 mm.
When choosing a material to make a picket fence, you can go in two ways: purchase a ready-made picket fence or make it yourself from boards. The first method saves time. The finished fence can be installed on the day of purchase. But a significant drawback can be low-quality raw wood, which serves as the basis for the picket fence, which will “drive” the fence during operation. When choosing the second path, the owner will need to make an effort to spend several days making all the elements of the fence. But as a result, he will have a picket fence that fully corresponds to his ideas and wishes.
If the material is not sufficiently dried, it is necessary to use special dryers for wood, because under natural conditions drying can take several seasons
The service of drying wood, as well as cutting crossbars and pickets, can be ordered at a place where wood products are manufactured. When preparing the material yourself, you must carefully file down and sand all the tops.
Design options for the tops of a wooden picket fence
The lower part of the wooden support pillars must be coated with hot varnish. This will prevent wood from rotting and extend the life of the structure.
Installation and installation of fencing
The installation of a picket fence is carried out according to the same principle as the construction of other types of fencing. First of all, the direction of the future fence is determined. It must be freed from weeds, bushes and tree branches that will interfere with construction. Then beacons are stretched in the cleared area and a place for the pillars is marked along the stretched cord. The distance between the pillars should not exceed three meters. Otherwise, long spans between supports may cause the crossbars to sag under the weight of the pickets.
Support pillars can be installed directly into the ground, but to create a more durable structure, it is better to construct them using cement-sand mortar.

To install the posts, you will need to dig a hole using a drill, the depth of which is determined by the height of the fence. On average, a depth of 1.3 m is sufficient
The posts are installed on a 20 cm gravel cushion, which helps prevent the support from being squeezed out when the soil freezes. Vertically fixed columns are covered alternately with layers of concrete and soil mortar.
After installing the posts along the line of the fence, you can install veins between them. In principle, there are two ways to install a fence: with the first, the crossbars are first attached between the posts, and then a picket fence is nailed to them, and with the second, the spans are assembled separately and fixed to the supports using blocks.
Protect from atmospheric conditions and other negative factors.
It is necessary to seal all cracks and chips with putty compounds, saturate the picket fence with an antiseptic, and then cover it with varnish, stain or paint
Film-forming agents do not adhere well to freshly planed boards and do not last long. To “roughen” the surface of the wood, you can sand it with medium-grain sandpaper.
Stain is an excellent preservative that protects wood from the development of microorganisms and mold
The varnish will protect against moisture. Using stain and clear varnish, you can also imitate various types of wood.