Columnar foundation do it yourself quite easily and economically, but also reliably and efficiently. You can achieve a good result only if you do everything building codes and requirements, since any violation can lead to the building being distorted or damaged. The most important prohibition on the construction of a construction project is the impossibility installation work on heaving soil. There are many videos and literature describing the installation process, but today we will discuss the most easy diagram and find out how to do the work correctly.
Advantages and disadvantages
The main advantage of such a foundation is, first of all, its versatility. This quality is manifested in the ability to install a foundation on any type of site with minor preparatory processes and waterproofing. Bookmarking it is quite simple and does not require special skills, so the process can be done with your own hands. In addition to all this, the device has the following number of advantages:
- A very simple way to construct a building that does not require construction skills and watching thousands of videos in order to complete it;
- Installation does not require specialized equipment and craftsmen on site;
- The design is compatible with all types of soil, except heaving soil;
- It is possible to carry out construction work on a hilly area;
- There is no need for preparatory work with the land area;
- Quite low cost of materials compared to other types;
- The speed of construction of the facility is no more than two weeks;
- Minimal waterproofing;
- Good level of foundation strength;
- Long service life. If all standards are met, the building can last about 50 years.
Attention! Of course, this is not the entire list of advantages of the functioning of the foundation; there are about twice as many of them.
To that huge list of advantages, we must add the real disadvantages that the installation has. So, they manifest themselves in the following characteristics:
- Very low ability to withstand loading pressure;
- With such a foundation, the construction of a basement becomes unrealistic.
As you can see, the list of disadvantages is quite short; if your project does not plan to build a basement, and the building itself is a light-weight structure, then you can easily build a columnar foundation with your own hands.
Materials for work

Another huge advantage of such bases is the ability to choose different material. Based on video recommendations and literature, we have identified for you the most popular variations of this construction:
- Asbestos pipes. This material has enough high strength, efficiency and comfort during installation.
- Brick . This is one of the most popular bookmark options. Although it is worth noting that the only advantages that can be highlighted are long service life and durability. However, such material has a number of disadvantages, such as the complexity of installation, the high price of materials and susceptibility to heaving of the earth, which leads to deformations.
- Wood logs. This option is the most economical and is used in construction projects for light types of buildings. Another advantage is the ease of installation of the facility. Among the disadvantages there are such negative characteristics as fragility and the mandatory need for waterproofing and treatment with a special septic tank.
- Reinforced concrete material . Concrete has a very high level strength, long service life. It is worth noting that this is exactly the option when quality equates to price. But there is also a drawback, which manifests itself in the complexity of installation work.
Attention! Looking at the above materials, we can say that you can make a columnar foundation with your own hands either from a monolith or a prefabricated structure.
It is worth noting that it is better to opt for a monolithic foundation, since the kit includes it and reinforcement, which increases the foundation’s ability to withstand loads. If you choose a prefabricated type of construction, then in the winter season the pillars may be pushed out, which will lead to numerous repair work. It is for this reason that we still recommend choosing a monolith.
Design features

It is very easy to make a columnar foundation with your own hands, but in order to do the installation correctly we need to know the design features. This section is dedicated to this information. The base of the support points is compacted with a 20 cm cushion of sand, which helps remove precipitation. After this, they need to be filled with concrete mortar - this will create a monolith of the base. The structure also includes a columnar support with reinforcement reinforcement. The poles should rise half a meter above the ground. It is worth considering that they are connected to each other by a grillage.
Attention! A very important and necessary detail of the integrity of the structure is waterproofing, which can be made with roofing felt.
We carry out calculations for construction

Many citizens who plan to erect a building are concerned with the question of how to make a columnar foundation. It is for this reason that this article was written. First. What needs to be done is to produce accurate calculations. For this process, it is better to use the services of professionals, as this is a rather complex and responsible process.
If we consider the basic data, they include the area of the building and its weight. A geodetic analysis of the site should also be performed. In addition to this data, the calculation information must also contain the following list of descriptions:
- Possible amount of additional load on each support;
- Materials needed for work;
- Number of floors in the building;
- The depth of soil freezing and the level of protrusion;
- Data on the course of surface waters;
- Features of the land within the construction project area.
The information obtained will allow you to determine the number of pillars, laying depth, required installation technology, type of grillage and many other data. If you wish, you can do the calculation yourself using a calculator.
Attention! If you have professional level documentation, then registering the project will become much easier.
Stages of construction work for different types of materials

Even at the design stage, we decide on the choice of the necessary material. As we have already found out, the most polar of them are the following types of pillars:
- Concrete;
- Brick;
- Rubble concrete;
- Brick;
- Stone.
After studying the literature and videos on this topic, we determined the simplest method of construction work on the construction of the foundation. Before starting, you need to clear the area and level the surface. If you have clay soil on your site, then you need to add crushed stone, which will add rigidity to the soil. After this, you can begin marking. This action should indicate location points for all structural parts. To summarize everything, we offer you an option on how to make a columnar foundation with your own hands step-by-step instruction:
- Clearing the site;
- Territory marking;
- Excavation work that can be done with your own hands or using special equipment;
- If you are installing short pillars up to a meter, then you don’t have to strengthen the wells;
- Otherwise, you need to widen the hole and install a spacer. You can also create a reinforced concrete cushion at the bottom, which will make it possible to avoid subsidence of the room.
- Next, formwork should be done. Wooden shields are best suited for this action.
- We carry out reinforcement of pillars. Rods with a cross section of 12 mm will help us in this process. To create horizontal jumpers you need to use wire. In order to avoid problems in the future with tying the grillage, you need to leave a distance of 15 cm above the top of the post.
- When the reinforcement is already connected, you can start pouring the solution. When performing this process, care should be taken to ensure that no voids remain. If they appear, then you need to compact the mixture.
- It is also worth performing waterproofing, which will protect your structure from excess moisture. This task can be accomplished using mastic or roofing felt.
- After all the work has been done, you need to start making a grillage. This element is assembled from reinforcement with jumpers, with the help of which a frame is created and the formwork is installed. Now pour concrete into this form and let it dry.
- The last stage of construction work is the removal of the base, which is mainly made of bricks. It is worth considering that you must leave an entrance for ventilation and communication.
As we found out, a columnar base is a fairly simple laying process that does not require any skills or an hour of studying video instructions.
The foundation is the most important element of any structure: from a light garden gazebo to a capital multi-story country mansion. This is the beginning of the building and its foundation in the literal sense. The strength, durability and operational safety of the building depend on how correctly the foundation is selected, calculated and executed. The question of what type of foundation to choose arises even at the construction planning stage. The optimal solution in many cases will be to build a columnar foundation with your own hands: step-by-step instructions for performing the work can give a complete understanding of the principles of its design and the intricacies of the arrangement process.

Advantages and disadvantages of a columnar foundation
Self-calculated and self-equipped columnar foundations for frame houses and buildings without basements that do not exert strong pressure on the ground are easy to implement and relatively cheap.

According to reviews, columnar foundations have a fairly impressive list of advantages:

At the same time, columnar foundations have only two disadvantages:
Types of columnar foundation
Before proceeding with the detailed design and calculation of a columnar foundation, you should decide on what site, what type and using what technology the building will be erected on it. The choice of material for the columnar foundations and the depth of their placement depend on these factors.

Materials for building the foundation
The following materials can be used for foundation foundations:
- reinforced concrete;
- rubble concrete;
- blocks;
- brick;
- a natural stone;
- tree;
- pipes: asbestos or plastic.

Foundation depth
The depth of a columnar foundation is determined by its design, technological parameters of the structure and geological characteristics of the soil in the building area.
Based on their depth, columnar foundations are divided into three main types:

To build a columnar foundation with your own hands, step-by-step instructions are needed as the most detailed and visual aid.
In general, the design of a support-column foundation is a system of supports of the minimum possible cross-section, located at points of load concentration: in the corners of the building, at the intersection of walls, under load-bearing beams, partitions, under the furnace. To determine the number of free-standing columns, the distance between them is taken to be 1.5–2.5 m. To connect the foundation supports into a single structure, a grillage is made between them.

The height of the pillars above the zero mark is individual and depends on the design features of the grillage.
Calculation of a columnar foundation
The construction of a columnar foundation begins with calculations. Most likely, to perform the calculations yourself, you will need a program like “Foundation” or some other that can be found on the Internet and downloaded for free. To work with such programs you will need the following parameters:

The technology for constructing a foundation with columnar supports also requires additional data:
As a result of the calculations made, the following values required for installing a columnar foundation will be obtained:

Columnar non-buried foundation
A columnar, non-buried foundation on supports spaced at intervals of 1.5-2.5 m is used quite often. Such foundations can be erected on non-heaving and slightly heaving soils, provided that the building (wooden or panel house, bathhouse, outbuilding, extension or summer cuisine) has a small area and, accordingly, low weight. Moreover, if construction is carried out on rocky, coarse-grained or non-moving soil, this type of foundation can be installed under a fairly large house made of logs or timber. It is also possible to build a foundation on non-buried supports, provided that the influence of heaving forces on the structure is reduced. To do this, the soil under the supports is replaced with a sand cushion.

As a material for pillars, it is possible to use concrete, rubble concrete, sand concrete or concrete blocks for the foundation, the sizes and prices of which are very diverse. However, most often they take foundation blocks measuring 20x20x40. The price of such a foundation, as well as the number of blocks required for its construction, can be calculated independently or using an online “foundation” calculator. You can also make a columnar foundation from brick with your own hands, but it must be taken into account that the use of silicate or ceramic bricks with low frost resistance is unacceptable.

Work on the construction of a non-buried columnar foundation from ready-made blocks can be divided into several main stages:

When building a foundation using 20x20x40 blocks with your own hands, video clips and step-by-step instructions will help you understand the technology of work, understand the process and more accurately estimate financial costs.

Shallow columnar foundation
A shallow foundation is one of the most popular types of columnar foundation. The funds and effort that its device requires are minimal, and the range of applications for frame-type buildings is very wide.
As a basis for frame house or a light bathhouse, a columnar foundation is often made using pipes as formwork for the concrete mixture. Since the reinforced concrete pillar will take the entire load, the material of the pipes does not matter much: both plastic and asbestos pipes, usually used for installing sewer networks, are suitable.
The diameter of the pipes depends on the load. For light buildings such as gazebos or extensions, 10 cm is enough; for log buildings, pipes of 25-30 cm are needed. The amount of concrete is ultimately determined by the diameter of the pipe. For 10 m of a pipe 10 cm in diameter, you will need 0.1 m3 of concrete, a 20 cm pipe will require 0.5 cubic meters, and a 30 cm pipe will require 1 cubic meter. The calculation was made taking into account the concrete base pad.

The scheme for carrying out work on constructing a columnar foundation from asbestos pipes with your own hands (a video of the process can be found on the Internet) is generally as follows:
- preparation of the construction site - removing debris, removing foreign objects, removing turf and leveling. Marking the perimeter of the future building, corners, internal walls and their intersections. Places for installing foundation supports are marked with pegs;
- Then, holes are made in the ground using a hand-held post drill. The depth of the well should be 20 cm greater than calculated: for the installation of a sand cushion;
- installation of a sand cushion with mandatory compaction and spilling of sand with water. After the final absorption of water, pieces of roofing material should be laid on the bottom in order to prevent moisture from the concrete mixture from escaping into the sand;
- installation of pipes in wells with a height reserve of at least 10 cm. Leveling pipes and securing them in wells using wooden blocks. If groundwater is close to the ground, the pipes must be coated with bitumen mastic to the ground level for waterproofing;

- then the base of the pipe, 40-50 cm deep, is filled with a thoroughly mixed concrete-gravel mixture (1 part cement and 2 parts sand, diluted with water to form a batter, combined with 2 parts fine gravel). Immediately after pouring, the pipe is raised to a height of 15-20 cm and left in this position until the cement has completely hardened. This is necessary to create a foundation that resists pushing out during soil heaving;
- after the concrete has hardened, the pipe should be waterproofed from the outside with roofing material and the well should be filled with sand, gradually poured and compacted;
- Reinforcement is placed inside the pipes, after which the remaining part of the pipe is poured with concrete;
- after the concrete has completely hardened - 2-3 weeks later - construction work continues. It should be added that it would be useful to waterproof the foundation with polymer or bitumen solutions.

Using the same scheme, it is possible to install a columnar foundation with your own hands from plastic pipes. Videos and photos will help you navigate the intricacies of the work process, which is generally simple.
Columnar foundation with grillage
The grillage is a system of rand beams and strapping beams. It rigidly fixes the foundation, preventing it from moving in the horizontal plane or overturning the entire structure. In the presence of a grillage, the load from the structure is distributed evenly across all installed columnar supports, resulting in increased stability and resistance to destruction.
To facilitate understanding of the process, the necessary work is outlined in stages.

Preparation and installation of supports:
- In any case, the initial stage of preparation for the construction of the foundation is the arrangement of the construction site. After removing debris, etc. the turf and top layer of soil are removed along the perimeter of the future foundation;
- for supports it is necessary to dig holes 20 cm deep than the freezing level of the soil. The width of the pit should be 40 cm greater than the width of the wall, since 20 cm are added on each side for formwork and spacers;
- at the bottom of each pit, a 20 cm high cushion of sand-crushed stone mixture, spilled with water and well compacted, is made. The cushion is lined with roofing felt or polyethylene so that moisture from the concrete poured into the pit does not go into the ground;

- boxes for formwork are assembled from boards 20 mm thick;
- It is recommended to thoroughly moisten the formwork installed in the pits to prevent the absorption of moisture from the cement mortar and facilitate removal;
- After installing the formwork, a frame made of reinforcement is placed in the pits. The frame is assembled separately, from a rod 10-14 mm in diameter. The length of the rods is selected in such a way that when the concrete hardens, their ends protrude 30-40 cm above the ground level;
- the concrete mixture is poured continuously, in layers of 20-30 cm, leveling with a vibrator to avoid the formation of air bubbles;
- the formwork is removed after 3-4 days, the surface of the supports is treated with any suitable waterproofing mixture and the remaining part of the pit is covered with sand. Before backfilling, it is also possible to insulate the foundation with extruded polystyrene foam.

Grillage arrangement:
There are two options for installing the grillage: laying it on the ground or raising it above its surface. The advantage of the second method is the elimination of the effects of heaving forces:

Cost of work on installing a columnar foundation
The total cost of a columnar foundation is the sum of the cost of materials and the cost of the work itself. In most cases, it is significantly lower than the cost of other types of foundations, since almost all types of columnar foundations can be built with your own hands. Videos and photos, instructions and guides found on the Internet are also usually cheap or free.
You can calculate the cost of most types of columnar foundations yourself using special online calculators or programs. Many of them are quite easy to find on the Internet, free and have an intuitive interface.
Only a professional builder can design and implement a columnar foundation with his own hands according to the recommendations of SP 50.100, 22.13330, 32.13330, 45.13330, 27.13330. These grounds are too unreliable; the results of geological surveys should be studied in as much detail as possible.
The technology for installing a grillage along pillars depends on the construction technology of the building for which the foundation is being constructed. Columnar bases are made from structural materials:
- reinforced concrete - pouring into formwork on site, installing the finished product in a 1F or 2F glass;
- wood - logs with a widening base;
- brick - clinker, solid ceramics;
- blocks - wall, only with dense fillers, hollow;
- rubble concrete - stone is introduced into the formwork after partial filling with ready-mixed concrete.
Except strip grillage slab construction can be used. This is the only option for a columnar foundation suitable for a brick cottage on sandy soils with a groundwater level (GWL) below 1 m. In all other cases, columnar foundations are created for log houses, half-timbered buildings, buildings made of SIP panels, panel and frame buildings.
Types of columnar foundation by depth
Depending on the geological characteristics of the building site and wall materials, columnar foundations are:
- buried - below the freezing mark, groundwater level, but may not reach the bearing layer;
- shallow - 40 - 70 cm below ground level;
- not buried - instead of the removed fertile layer, non-metallic material is filled in, underground part absent.
The height of the pillars above the zero mark depends on the grillage design and the technological solutions used in the project. The head is embedded into a monolithic grillage at 20 cm, the beams of the prefabricated grillage are installed on top of the piles. Therefore, the height above the surface is always individual. The construction of buried pillars is justified if there is a bearing layer at this level. This type of shallow foundation is stabilized by soil against lateral shift. Non-buried has a minimal construction budget.
Columnar foundation design
 The fundamental difference between columnar foundations and piles is the occurrence of the base, as a rule, above the freezing mark, the level of groundwater level, and layers with bearing capacity. Therefore, in any case, the support-column foundation is protected from heaving forces and movements in several ways:
- a sand cushion under the base slab; if the base of the foundation is located below the freezing depth, a sand cushion is not required;
- drainage of soil by drainage system;
- insulation of the blind area and basement.
For the last two activities, open excavation of the soil in the building area is required.
Even with a small depth of the pillar itself, you will have to take into account the thickness of the widening (20 - 40 cm slab) and the underlying layer (cushion of 20 cm sand + 20 cm crushed stone). In addition, you will need a ring ditch for laying drains and access for workers to the lower level. Therefore, the size of the well and trench increases several times; it is inconvenient to carry out work from the ground at depth.
Manufacturing columnar foundations by analogy with bored piles is a gross violation of technology. It is difficult to widen the sole; there are heaving forces underneath it. On the side walls without backfill sand acts on the tangential forces of the same processes.

Thus, the correct design of a columnar foundation looks like:
- preparation - sand (layer thickness 20-40 cm) with layer-by-layer compaction with a vibrating plate, pouring;
- footing - serves exclusively for laying waterproofing, is a 5 cm screed;
- stepped plate (sole) – distributes loads due to the increased surface of the sole;
- pillar - a vertical post made of monolithic or precast concrete;
- grillage – reinforced concrete products, monolithic design, timber or rolled metal (channel, I-beam).
Unlike piles, pillars do not have spatial rigidity, so the grillage beams must not just rest on their heads, but must be attached to each pillar to be connected into a single structure.
Step-by-step instruction
Due to the variety of operations for constructing a grillage on pillars, step-by-step instructions are necessary for the individual developer as a guide. If you skip any stage, you will have to redo the work later or return to it, spending more effort and money.
For example, the instructions recommend laying drains at the excavation stage. If you forget about them at the beginning and remember them when landscaping the area, the trenches will have to be dug again, construction will be delayed, and the site will again be clogged with soil. The height of the pillars is selected 20 cm above the bottom of the grillage for walling in concrete.
Below we will tell you how to make a columnar foundation with your own hands correctly.
Geological surveys and calculations

The technology for constructing a columnar foundation depends on the results of geotechnical surveys, wall material, construction technologies. For example, it is prohibited to leave unloaded poles in the winter even if they are tied with a grillage.
Prefabricated loads (the weight of the building, residents, furniture, belongings, wind, snow loads) may not be enough to compensate for the extrusion forces, or the building will gradually sink into unstable soil with excess weight.
Unlike the test screwing of screw piles in the technology of the same name to find the depth of the bearing layer, full-scale surveys are required here, costing at least 30 thousand rubles. The designer needs the following data:
- layered arrangement of layers;
- composition and characteristics of the three upper layers;
- GWL level;
- frost mark.
The cross-section of the pillars must be greater than 40 x 40 cm for concrete or brickwork, 20 x 20 cm or 20 cm in diameter for a monolithic reinforced structure.
Marking and excavation work

Unlike bored piles, reaching the bearing layers, it is much more difficult to pour the pillars into the wells. The main problem will be the lack of sand filling in the sinuses:
- after a few years, the soil near the body of the pile will self-compact;
- will gain moisture and freeze in winter;
- heaving forces will pull the pillar out like a carrot from a garden bed;
- if there is a lower widening, the column will rise upward due to heaving forces, and soil will crumble under the base;
- the slab will not allow you to pull out the entire column, but it will no longer be able to get back into place.
![]()
We dig holes to widen the columnar foundation.
Therefore the only thing the right way There will be marking of trenches taking into account the width of the base, drainage contour, and work on the construction of formwork. Instead of a square shaft of 40 x 40 cm, you will have to remove much more soil, 1 x 1 m minimum. In this case, the thickness of all layers of the foundation pie and the height of the groundwater level are taken into account. If the last characteristic is slightly below a meter, you need to go deeper by 0.6 m, no more.
Preparation
By default, the construction of a monolithic foundation of a dwelling should provide protection from corrosion and destruction. In the absence of oxygen, the only aggressive environment underground remains moisture, which should be removed from the base with drains and stopped at the surface of concrete structures along the entire height with a waterproofing carpet.
Construction is carried out in stages:
- layer-by-layer backfilling - 20 cm of sand with moistening, vibration compaction twice (total height 40 cm);
- footing – screed height 5 cm, no reinforcement;
- waterproofing – 2-3-layer carpet of rolled material on a fiberglass base;
Reinforcement

The technology for constructing an armored belt for a column with an expanded base is as follows:
- knitting reinforcing mesh to the size of the slab, taking into account the side protective layers (40 mm from the formwork to the metal) with a cell of 15 x 15 cm or 20 x 20 cm with a thickness of 12 - 16 mm;
- joining to the mesh rods bent at right angles of 12 - 16 mm, protruding 20 - 30 cm above the base of the grillage (usually 4 pieces in the corners, one in the middle of each side);
- vertical rods are reinforced with horizontal square clamps made of 6–8 mm reinforcement;
- the structure is installed on a waterproofing carpet, which extends 10-15 cm beyond the dimensions of the sole, for subsequent bending onto the side edges of the sole.
It is prohibited to lift the reinforcement structure with metal scraps, bricks, or crushed stone to provide a protective layer.

Widening the pillar
The construction of the sole involves pouring the slab into the formwork. The widening area is twice the cross-section of the column, the height of all elements is a multiple of 30 cm. The formwork is simple - four boards fastened with screws, corners or bars at the bottom of the pit or trench.

Reinforcement of the widening and pillar.
The sides of the formwork should be slightly higher than the design level in order to properly level the concrete surface. The permissible error in the horizontal plane is 1 cm. Filling is carried out after installing the reinforcement structure.
Formwork

We install and strengthen the formwork for the columnar foundation.
Drainage and waterproofing
From the perimeter of the building it can be made at any stage, from foundation pit to backfill. To install drains, a circular trench with a uniform slope towards the underground tank is required. Dornite or geotextile is spread at the bottom, and 10 cm of crushed stone is backfilled. Perforated pipes in the filter are laid in it, and inspection wells are installed. After which, the communication is filled with another 10 cm of crushed stone and covered with the remains of geotextiles.
Waterproofing device - several technologies using different materials:
- impregnations – contain penetrating additives that change the molecular structure of concrete, making it waterproof throughout its entire depth;
- rolled materials - Bikrost, TechnoNIKOL and other fiberglass-based analogues, laid in two layers;
- coatings – epoxy and bitumen based mastics;
- paints – enamels based on bitumen resins.
Most often, combined methods are used to achieve a 50-70 year service life. Rolled coating materials will have to be renewed every 15 years.

Ready-made columnar foundation with reinforced concrete grillage.
backfilling
After installing drainage and a continuous waterproofing layer over the concrete surface, it is necessary to protect the side surfaces from heaving forces. The sinuses are filled with sand; compaction is necessary, since loose soils extremely unstable. The chernozem of the fertile layer is saturated with organic matter and settles after it rots. Other soils contain clay, which swells in cold weather. Therefore, exclusively non-metallic materials are used, in which there is less heaving.
Advice! If you need contractors, there is a very convenient service for selecting them. Just submit in the form below detailed description work that needs to be done and you will receive offers with prices from construction teams and companies by email. You can see reviews about each of them and photographs with examples of work. It's FREE and there's no obligation.
For a specific structure (for example, a house), a specific foundation is expected to be constructed. Columnar foundations are among the cheapest and easiest to construct. More often, low-rise industrial and public buildings and one-story suburban buildings are built on such a foundation. A number of features of support foundations suggest some limitations in their use that cannot be ignored.
What is a columnar foundation?
This type of house foundation is constructed from a support frame where the decks carry the main load. The supports are mounted around the perimeter under the load-bearing walls. The first frame of the house is laid on them. Consequently, the installation of decks is carried out in loaded places: in corners, at the junction of walls, under ceilings and spans of more than 2.5 meters in length.
The dimensions and distance between the pillars are determined by calculation, taking into account the category of building material, the type of construction of the supporting elements, the nature and total weight of the building. The average distance between supports varies between 1.5-2.5 m, the internal cut of rectangular products is 25-40 x 25-40 cm, round - 20-25 cm. The height of the ground structural element above the foundation should not exceed 50 cm. This the parameter for the part located underground is selected depending on the depth of the depth.
Peculiarities
 The supports of the columnar base should be positioned so that the pillars rest on a stable and durable earthen layer. It is not allowed to place support logs on soft humus soils. The upper part of the decks is made in one horizontal plane. It will rely on them.
When constructing light buildings, a grillage is not needed. Instead, metal or wooden beams are used. The elevation of the heads should be located at least half a meter higher above the ground. This will prevent moisture from entering the house.
If a connection between a column and a pillar is intended, a “glass” recess is made in its upper part or fastening anchors are installed to ensure rigid fastening of the support and the supported structure.
Kinds
Features of the arrangement of supported foundations and the choice of deck type are determined by the type of construction, the nature of the soil and other operational requirements. Decks come in different sizes and sections. There are rectangular, square, and round supports.
Columns can be made of concrete (reinforced concrete), block material, rubble stone, brick. According to the manufacturing technology used, foundations on decks are classified into the following types:
- monolithic, when holes are dug, formwork is installed and concrete mortar of a grade not lower than M400 is poured in layers;
- prefabricated, when ready-made elements from blocks, bricks or stones of a certain brand are used.
 Diagram of a columnar foundation.
 The depth of placement determines certain types of supporting foundations:
- Non-buried foundations on pillars, when the base is located on the ground or sand cushion. Such foundations are distinguished by their economical construction, but are used exclusively for the construction of one-story buildings from lightweight materials on weak and non-heaving soils.
- Recessed foundations, during the construction of which the columns are laid to a depth to or below the freezing point of the soil. This design is used on heaving soils with loams or clays. They are characterized by the least cost-effectiveness.
- Shallow, the depth of which is 0.5 - 0.7 parts of the depth from the freezing point of the soil. Half of the foundation is a monolith of a certain shape, and the second is. Suitable for development on low- and non-clayey lands.
By design features foundations come with or without a fastening beam. The grillage is attached to the post and distributes the load from the total mass of the house evenly over the base. Grillage beams prevent decks from tipping over due to horizontal soil movement. However, this element significantly increases the cost of construction and increases the time for arranging the foundation.
Most non-massive buildings are erected on supporting foundations without a grillage. In this case, the first trim is mounted directly on the decks, on top of the waterproofing layer. However, this design is less resistant to horizontal soil shifts and overturning loads.
Feasibility of construction
The feasibility of erecting foundations on supports occurs in cases where:
- During the operation of the building, the pressure on the earthen layer from the decks is less than from the strip structure;
- buildings without basements are erected on panel, wooden and lightweight frames;
- brick walls are built with the required support depth of up to two meters or a quarter of a meter below the freezing point of the soil;
- it is necessary to avoid destruction of the foundation due to an increase in soil volumes at low temperatures.
However, there are cases when the use of supported principles is not justified:
- Due to the instability of the support decks, their installation on weak and horizontally moving soils is not recommended.
- Foundations on decks are unsuitable for the construction of massive walls made of heavy materials: brick, reinforced concrete with a block thickness of more than 51 cm.
- You should not build a foundation on pillars in places with a strong difference in height (from two meters).
Construction
 The pillars to the foundation are poured open method in several stages. At the first stage, the position of the supports for the foundation blocks or monolith is marked. To do this, the type, shape, size and depth of the support decks are initially selected. The construction of a building according to the drawing involves entering into the document a predetermined clear distance between the supports.
When marking yourself at the construction site, you should take into account the fact that the pillars should be from 1.5 to 2.5 meters from each other. A larger distance may lead to increased construction costs due to the need to construct a more powerful grillage. The supports should be located in areas of maximum loads - in corners, at the junction of walls, under ceilings.
At the second stage, work is carried out on the ground. Digging holes for rectangular rubble, concrete, rubble concrete, block or brick pillars. If the pillar should have a sole at the bottom, then when digging a hole its dimensions are taken into account. Wells need to be prepared for tubular supports. They are drilled with drilling machines, hand or garden augers. The well should be made with a cross-section 5-10 cm larger than the diameter of the support pipe.
At the third stage, concreting of the pillars is carried out. More often, reinforced concrete monoliths of the required cross-section are used as supports. You can build monolithic pillars yourself. To do this, a cushion of sand and gravel 15-20 cm high is laid in a prepared pit. To erect the above-ground part of the support, formwork is constructed from wooden boards over the pits in accordance with the required dimensions of the pillars. Formwork boards and interior walls the pits are covered with roofing felt or polyethylene to provide waterproofing.
Then a reinforcing frame made of rods with a cross section of 1-1.2 cm is placed in the pit. The rods are connected to each other by segments of the same reinforcement. You can use special clamps made of knitting wire for these purposes. The distance between the reinforcing mesh and the walls of the support should not be less than 3 cm. This will allow the frame to be completely filled with concrete.
The height of the reinforcing skeleton depends on the use or refusal of a reinforcing beam (grillage). If installation of the element is required, then the length of the reinforcement must extend above the upper base of the support. Otherwise, the reinforcing skeleton is located 3 cm below the formwork. To fasten the first strapping, embedded pins are mounted on top of the column.
 The pillars are filled with ordinary concrete of a grade not lower than M-200.
 After reinforcement, the supports are concreted. For this, ready-made concrete of at least grade 200-300 is used. For independent preparation of concrete mixtures, the M400 brand of cement is more suitable, mixed with 1-1.2 mm sand, gravel and water in a ratio of 1: 3: 5: 0.4, respectively. The mixture is laid in layers, each of which is carefully compacted.
When constructing a foundation on supports with a shoe (extension at the bottom), a hole is dug in the shape of this extension, a cushion of sand and gravel is filled in, and concrete is poured. After strengthening the pouring, the pillar formwork is formed. Then the above described work is repeated. After the mixture has hardened, the formwork can be removed, the walls of the pillar can be treated with waterproofing, and the soil removed from the pit can be backfilled and compacted.
If a grillage is used, the last stage is to install it on supports. To do this, along the perimeter of the future foundation base formwork is mounted horizontally in a form to connect all the decks. A frame made of reinforcement is placed inside the formwork and secured to the outlets of the reinforcing skeleton of the pillars. The cement mortar is poured so that the surface of the grillage is located in the same horizontal plane.
Within a week, the concrete needs to strengthen and harden, after which the formwork is removed.
A pillar foundation is a universal option. Such a foundation is constructed without taking into account the type of soil, and it does not require serious waterproofing and insulation work. Therefore, they decide to build a columnar foundation without doubt, even without having the knowledge of a builder.
Unique foundation made of “rods”
To understand what a columnar foundation is, it is worth considering in detail its pros and cons, tasks and structure.
A column foundation is significantly different from a strip foundation, since it is not built along the entire perimeter of the building
Advantages and disadvantages of a columnar base
The undeniable advantages of a foundation made of support pillars consider:

The disadvantages of a columnar foundation are attributed to:

All the disadvantages of a foundation made of pillars can not be considered as something important if you build this structure taking into account its purpose.
Challenges of Pillar Construction
It is advisable to build a columnar foundation for such objects as:
- a house without a basement with walls made of lightweight materials;
- brick building, which for economic reasons cannot be erected on strip foundation and therefore it is built on pillars buried 2 meters into the ground;
- a building erected in an area with soil prone to heaving due to low temperatures and, as a result, negatively affecting any foundation other than a columnar one.
It is wise to place only small houses made of lightweight materials on poles, because the supports will not withstand the weight of other buildings
It is better to completely abandon the construction of a structure from support pillars in the following cases:
- the soil at the construction site is weak or mobile, which can cause an insufficiently stable foundation to overturn;
- the land on the site contains a large amount of peat, sedimentary rocks or clay saturated with water;
- the house is planned to be built from heavy raw materials, for example, bricks more than 5 cm thick or standard reinforced concrete slabs;
- finances and time for arranging the base are significantly reduced (when creating a columnar foundation, the base does not form by itself, as happens during the construction of a strip base);
- The soil on the site for building a house is characterized by a sharp difference in height (from 2 meters).
A columnar foundation can only be built on solid and level soil, since it is not ideally stable
View of a foundation made from individual supports
A columnar support structure for a house is a system of pillars placed in corners, areas where walls intersect and where load-bearing partitions or beams are located, which bear the weight of the entire building. In order for the pillars to function as a single structure and be as stable as possible, they are combined by means of a grillage - strapping beams.
The most commonly constructed columnar foundation is a structure made of monolithic reinforced concrete blocks.
The foundation can be made of concrete blocks, and the grillage can be made of wood
Typically, the pillars are placed leaving 2 to 2.5 meters of empty space between them. But in some cases, builders go beyond the traditional option of arranging supports.
When the pillars are installed in the ground every 2–2.5 meters, the grillage is created as a standard reinforced lintel. At the same time, the veranda, porch and terrace attached to the house are not combined into a single ensemble.
For places like a porch, separate bases are organized, separated by an expansion joint. This is a necessary measure, because the weight additional premises always differs from the weight of the house, which is why the shrinkage of these buildings cannot be the same.
Usually the pillars are placed at a distance of 2–2.5 m from each other
The distance between the pillars is large (from 2.5 to 3 meters), referring to the significant power of the strapping beams. The most reliable grillage is created in the form of a single or prefabricated beam. A simple design connecting the supports can be made of metal parts, for example, channels or profiles.
Variations of the pillar base
What the columnar foundation will be like is decided based on the amount of finances and the ability to independently engage in construction.
Block supports
A columnar foundation can be made up of concrete or reinforced concrete blocks, manufactured separately and installed directly when arranging the supporting structure for the building.
Each pillar of the structure can be assembled from separate blocks - a very reliable material
GOST states that the blocks that will be used for the construction of the foundation must be made from concrete of a grade not lower than M-100. As for the size of the blocks, private developers are accustomed to taking raw materials with parameters of 20*20*40 cm and a weight of 32 kg. Foundation blocks made of expanded clay concrete, a material that is resistant to thermal effects, are considered relatively light.
Large block structures made of reinforced concrete can only be laid by a construction crane, because their weight can even be equal to two tons. Such blocks are reinforced with special reinforcement with a diameter of 9 to 15 mm and are used exclusively for the construction of strip and slab foundations under huge brick buildings.
Most often, for independent construction of a columnar foundation, light small blocks are taken, since it is possible to build supports from large raw materials only with the use of technology
The best depth for fixing a pillar of blocks in the ground is from 50 cm to 1 meter. If the type of soil and the weight of the building dictate other requirements, then it is wiser not to build block foundation, and the base is made of asbestos-cement pipes filled with concrete. Laying blocks to a depth of more than 1 meter is too difficult.
Brick pillars
Having decided to build a columnar foundation of brick, you need to purchase only red solid ceramic building raw materials. This material meets all the necessary requirements: it is waterproof, extremely durable and frost-resistant.
This characteristic of brick, such as frost resistance, is considered extremely important. The higher the indicator of immunity to low temperature, the longer the construction raw material lasts. For example, frost resistance 70 indicates that the brick will deteriorate no sooner than after 70 years.
To build the foundation, it is customary to use red solid ceramic brick, because it is the most durable
Bricks can be used to construct both a shallow and recessed columnar foundation. The depth of the first version of the foundation varies between 40 and 70 cm. And the buried foundation is always installed below the freezing level of the soil by 30–50 cm.
It is decided to locate the supporting structure at a considerable distance from the ground surface when the soil is construction site heaving, and the groundwater level is variable.
To make the foundation reliable, the brick supports of a columnar foundation need to be created in 2 bricks
The main foundation pillars (supports located in the corners of external walls and at the intersection of internal partitions) are usually made of 2 or 2.5 bricks. In other cases, the pillars are allowed to be made of one and a half bricks and placed at a distance of one and a half or two meters from each other.
"Legs" made of wood
The base of wooden “legs” is the most economical option. Logs suitable for the foundation can be easily cut down and processed on your own.
It is customary to build a columnar foundation of wooden supports for a house for living during the summer or a tiny structure made of wood.
Wooden poles are intended only for the lightest temporary structures, as they can break under excessive pressure
The best raw material for creating wooden supports is pine, oak or larch wood.“Rods” are cut from the butt part of a log with a diameter of 2 to 40 cm. When placed in holes, the wood posts are secured on the sides with bricks, stones or a compacted embankment of crushed stone.
Sometimes wooden supports fixed in place with concrete mortar. In this case, the pillars are immersed in liquid concrete by 10 cm. Another good fixation for wooden supports can be a cross made of two plates 0.8 meters long, arranged in a crosswise position.
To secure the post to the crosspiece, a spike is cut out in its lower part. It is inserted into a groove made in the central area of the cross. Then the pole is fixed on a kind of platform with scarves.
To securely fasten the pole in the ground, use a cross and jibs.
Wooden supports must be protected in a special way from rotting. First, they are covered with clay to form a layer 1 cm thick, then burned with hot coals. The last task is performed slowly, making sure that literally 1.5 cm of wood is charred. The burned pillars are treated with heated bitumen or tar and dried.
Under the outer walls, wooden supports are immersed in the ground to a depth of 70 to 120 cm. And the pillars to support the partitions inside the house are placed at a depth of 50 cm.
Main pillars wooden foundation should be immersed to a depth of 70–120 cm
Monolith
It is preferable to construct buildings with 2 or 3 floors on a columnar monolithic foundation. Such a foundation will not sag even under significant pressure.
A columnar monolithic foundation can serve for more than 100 years without problems. Each pillar of this support structure is capable of supporting an object weighing 100 tons.
Monolithic foundation is considered the most popular design compared to other columnar foundations
A monolithic base of pillars is created from concrete, reinforced with metal rods and poured into special forms - pipes or formwork. This foundation turns out to be unusually durable, as it is completely devoid of seams.
Do-it-yourself columnar foundation: step-by-step instructions
The construction of a columnar structure for a house begins only after calculations have been completed and the construction site has been prepared.
Necessary calculations
A calculation is needed to find out how many pillars are needed and what size they should be.
Before computational actions, it is necessary to test the soil for construction site- drill a well with a depth of 60 cm below the level at which it is planned to install the foundation pillars. If soil is found under the load-bearing soil, saturated with water and therefore weak, it is better to cancel the decision to build a columnar foundation. Posts under load are unlikely to be able to stand still in unstable soil.
The first well on a construction site should be a test well - to check the condition of the soil
Determination of soil load
After making sure that a columnar foundation can be built on the site, you should find out what pressure the earth will experience. To do this, you need to determine the weight of the future house.
When calculating what the pressure on the ground will be after building a house, you should add the weight of the foundation to the weight of the structure. To do this, it is necessary to determine the approximate volume of the structure and multiply the resulting figure by the specific gravity of the material. For example, for reinforced concrete this figure is 2500 kg/m³.
Table: approximate specific gravity values for building elements
| Constructions | Specific gravity, kg/m² |
| Walls | |
| Brick walls (half a brick thick) | 200–250 |
| Walls made of foam concrete or aerated concrete blocks 30 cm thick | 180 |
| Walls made of logs with a diameter of 24 cm | 135 |
| Walls made of timber 15 cm thick | 120 |
| Frame insulated walls 15 cm thick | 50 |
| Floors | |
| Basement and between floors on wooden beams (insulated with material with a density of up to 200 kg/m³) | 100 |
| Attics on wooden beams (insulated with material with a density of up to 200 kg/m³) | 150 |
| Concrete hollow core slabs | 350 |
| Monolithic (made of reinforced concrete) | 500 |
| Operational load for basement and interfloor slabs | 210 | 105 |
| Roof including rafters, sheathing and roofing material | |
| With a roof made of sheet steel, metal tiles or corrugated sheets | 30 |
| With roofing felt in 2 layers | 40 |
| With slate roof | 50 |
| With a roof made of natural ceramic tiles | 80 | 100 | 50 | 190 |
*When the roof slope is inclined more than 60 degrees, the snow load is reduced to zero.
Total area of pillar bases
As soon as it becomes known how much the future house will weigh, they find out the minimum required total area of the bases of all pillars. To determine this parameter, use the formula S = 1.3 * P/R 0. The number 1, 3 denotes the safety factor, P is the total weight of the building in kg (including the foundation), and R 0 is design resistance load-bearing soil in kg/cm².
Table: approximate values of load-bearing soil resistance at a depth of 1.5 meters
An example of determining the number of foundation pillars
Let's try to calculate how many round supports will be needed to construct a columnar foundation for a small frame-panel house with dimensions of 5x6 meters. At the same time, we take into account that the height of the first floor is 2.7 m, and the same parameter at the pediment is 2.5 m. We also do not forget to use data such as roofing material (slate), type of load-bearing soil (loam) and freezing depth ( 1.3 m).
The frame house can be installed on 10 pillars
The weight of the building is calculated as follows:
- The area of all walls is determined, taking into account the pediments (72 m²) and their mass (72 × 50 = 3600 kg).
- The total area and mass of floors are found. Since the house has a basement and intermediate floors, their area is 60 m² and their weight is 6000 kg (60 × 100 = 6000 kg).
- The operating load is also present on the 1st and on attic floor. Its value will be equal to 12600 kg (60 × 210 = 12600 kg).
- The roof area in our example is about 46 m². Its weight with a slate roof is 2300 kg (46 × 50 = 2300 kg).
- We take the snow load equal to zero, since the angle of inclination of the roof slopes is greater than 60˚.
- Let's determine the preliminary mass of the foundation. To do this, we conditionally select the diameter of future pillars and their number. Let's say we have a drill with a diameter of 400 mm, let's take this value. The number of pillars is preliminarily taken based on the condition - one pillar per 2 meters of the perimeter of the foundation. We get 22/2 = 11 pieces. Now we calculate the volume of one column 2 meters high (buried 0.2 m below the freezing depth + 0.5 meters above the ground): π × 0.2² × 2 = 0.24 m³. The mass of one pillar is 600 kg (0.24 × 2500 = 600 kg), and the mass of the entire foundation is 6600 kg (600 × 11 = 6600 kg).
- We sum up all the obtained values and determine the total weight of the house: P = 31100 kg.
- The minimum required total area of the bases of all pillars will be equal to 11550 cm² (S = 1.3 × 31100/3.5 = 11550 cm²).
- The base area of one column with a diameter of 400 mm will be equal to 1250 cm². Therefore, our foundation must have at least 10 pillars (11550/1250 = 10).
If you reduce the diameter of the base supports, their number will increase. For example, armed with a drill that creates holes measuring 30 cm, you will need to install at least 16 pillars.
Preparation for construction
Before pouring a columnar foundation on a site, you need to take care of the following:
- Clear the site of debris and remove the fertile soil layer 30 cm thick.
- Coarse or medium sand found under the removed soil should be taken as the basis for the foundation, and clay soil, which is found no less frequently than sandy soil, should be strengthened by covering it with a layer of two materials - sand and gravel.
- Level the area for construction, eliminating bumps and holes, and check its horizontalness using a level placed on a two-meter flat board.
The evenness of the prepared area is checked with a rack
- Bring construction materials to the site and install cast-offs around the perimeter of the future structure (pillars at a distance of 2 m from the building and boards nailed to them with marks for the size of holes and supports). The correctness of the center lines must be monitored by measuring distances with a tape measure. In addition, you need to check whether the corners of the foundation in the shape of a rectangle or square are straight.
- Lay out a plan for the future house on the site, that is, mark its parameters using pegs.
- Create holes for installing pillars (if necessary, you can use a drill to make holes for wooden supports, and if installing reinforced concrete pillars, you should arm yourself with a shovel).
- Fill the bottom of the holes with gravel and sand and moisten. The finished “pillows” need to be compacted and covered with polyethylene or roofing felt.
The bottom of the drilled holes is reinforced with hard material, for example, Proce gravel
Creating formwork for pillars
An excellent option for formwork for supports under a house can be a temporary structure made from planed on one side (the planed part is installed facing the concrete) boards of any type of wood, with a thickness of 25 to 40 mm, a width of 12 to 15 cm and a humidity of no more than 25%.
Instead of boards, when constructing formwork, you can use particle boards, waterproof plywood or metal sheets. However, it is preferable to choose boards, since they adhere less to the concrete mortar.
Wooden columnar foundation formwork is a standard option
The temporary auxiliary structure must be installed close to the walls of the dug well and perpendicular to the base. It is recommended to check the correctness of the completed task with a plumb line.
If boards were chosen as the material for constructing the formwork, then it must be borne in mind that they must be thoroughly moistened with water. If you ignore this condition, you can get weak pillars, because dry wood absorbs moisture like a sponge, and because of this, it worsens the properties of concrete.
Roofing felt formwork is an innovation
An auxiliary structure during the construction of a columnar foundation can also be permanent formwork made of roofing felt. This material simultaneously performs several tasks: it serves as a form for pouring concrete and protects the supports from moisture.
Formwork made from roofing felt is a good solution if the soil in the created well is dense and non-crumbling.
To make an auxiliary structure from roofing felt, proceed as follows:

Features of pouring the foundation
If a home craftsman is a supporter of the traditional method of pouring a foundation, then to accomplish this mission he must do the following:

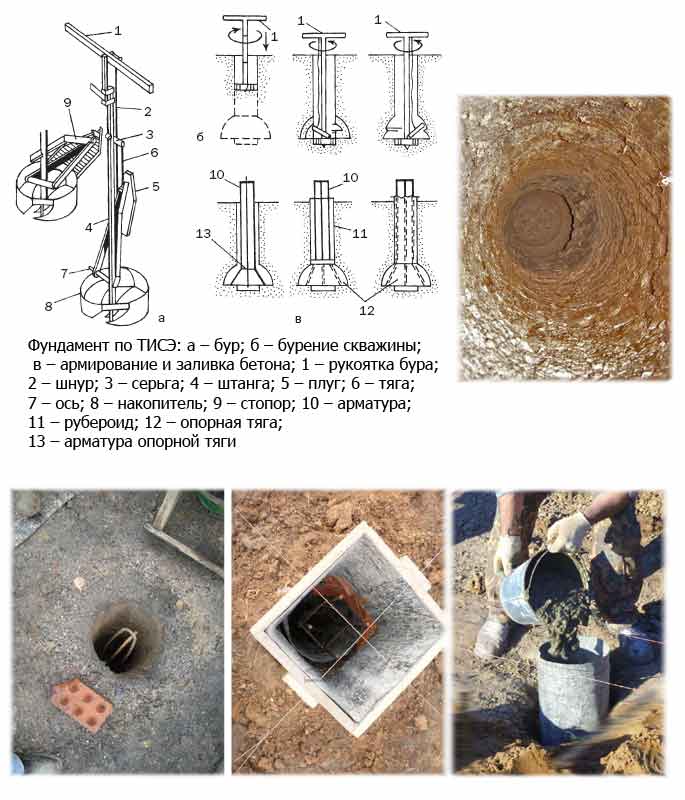
Anyone who is not averse to alternative methods of constructing a foundation for a house can make a foundation using a TISE drill. The tool will allow you to create a columnar structure with a widening at the base, which will provide a unique opportunity to support a heavier building on supports or reduce the number of pillars.
A column with widening (using TISE technology) is formed in stages:
Video: example of constructing a columnar foundation using TISE technology
Even one person can cope with the construction of a columnar foundation. For this work, you do not need to look for equipment, hired workers, or a large amount of materials.