We install overhead garage doors with our own hands
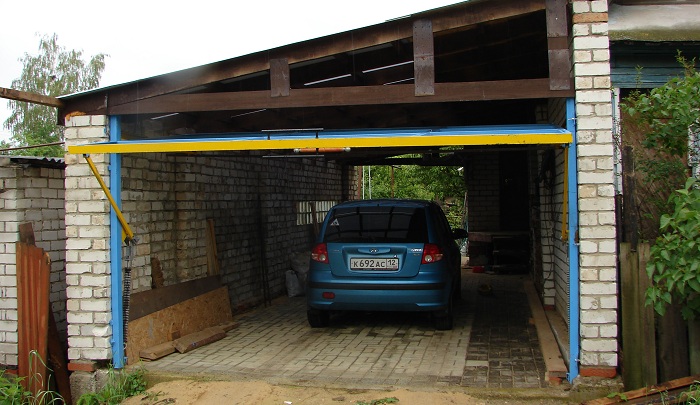
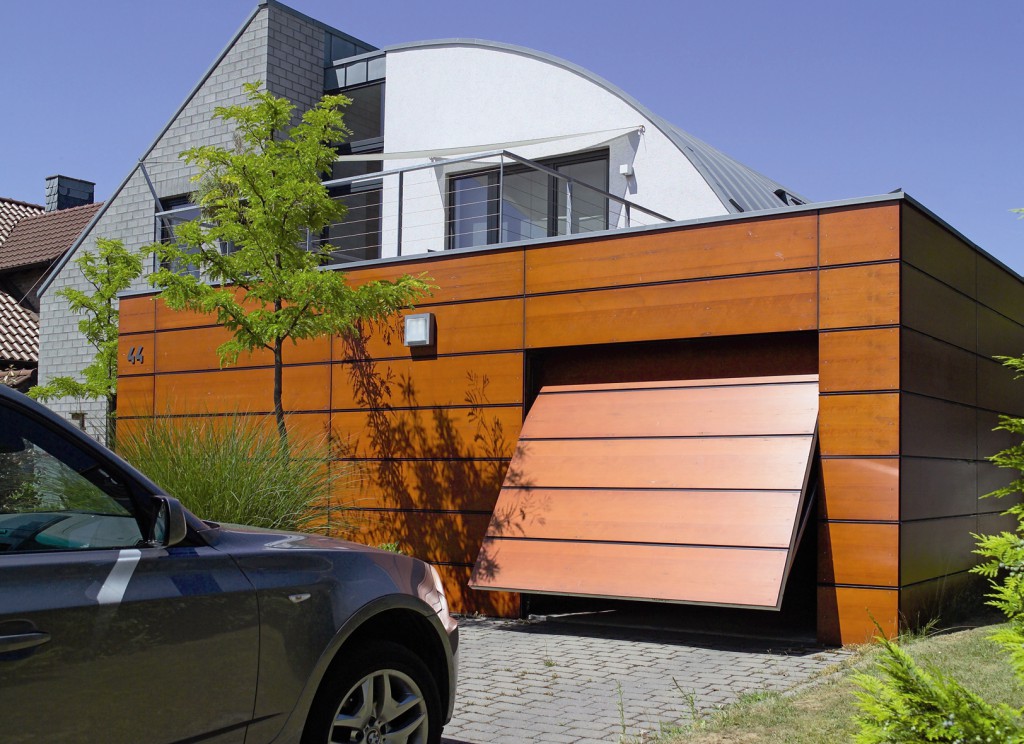
Up-and-over gates are the most convenient, reliable, practical, but quite expensive type of enclosing structure for a garage. In the open position, they take a horizontal position and move forward slightly, forming a small canopy over the entrance.
Their pros and cons, as well as self-installation, will be discussed in this article.
Advantages and disadvantages of this type of gate
The up-and-over design has several clear advantages over other types of garage doors:
- durable solid fabric provides reliable protection against unauthorized entry and burglary;
- characterized by high resistance to corrosion and other negative effects of the external environment (subject to compliance with manufacturing technology and recommendations for the selection of materials);
- does not require space to open;
- when open, does not take up useful space;
- involves finishing with different facing materials, allows decoration with any inserts and panels;
- can be insulated with special polystyrene foam panels;
- can be opened manually or equipped with automatic system opening;
- Suitable for installation in single and double garages.
The disadvantages of up-and-over gates are mainly associated with some limitations and features of the design itself, which are expressed in the following:
- it can only be installed in rectangular openings;
- when open, reduces the height of the opening (approximately 20 cm).
- The one-piece door leaf makes it impossible to repair individual sections - in case of damage it is required complete replacement the entire element;
- the gates are equipped with a spring mechanism, which is designed for a certain mass of the structure, therefore, when performing thermal insulation, the weight of the insulation should be taken into account: if the mass of the insulated gate increases significantly, it is necessary to install counterweights;
- There may be gaps between the leaf and the frame, which can be eliminated using a rubber seal, but it is recommended to install such gates only in unheated garages.
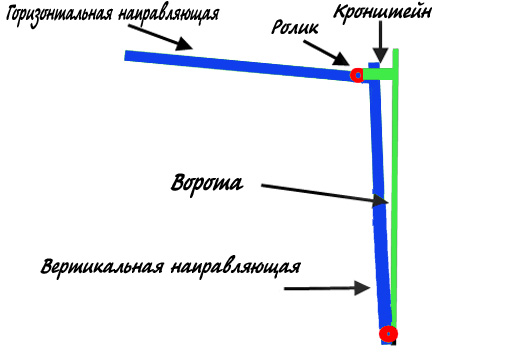
Gate operating principle
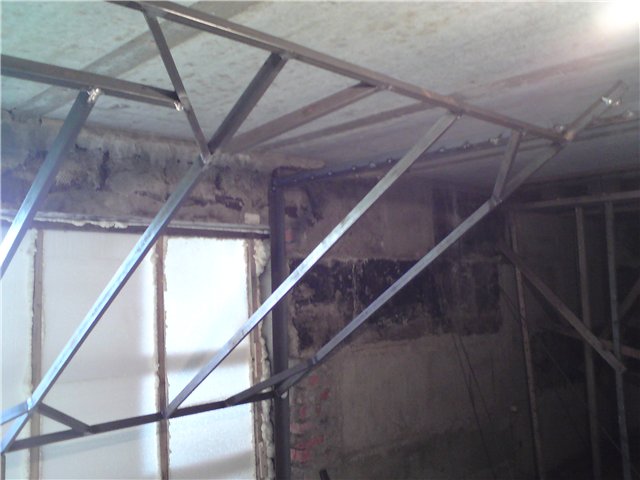
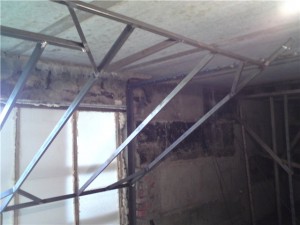
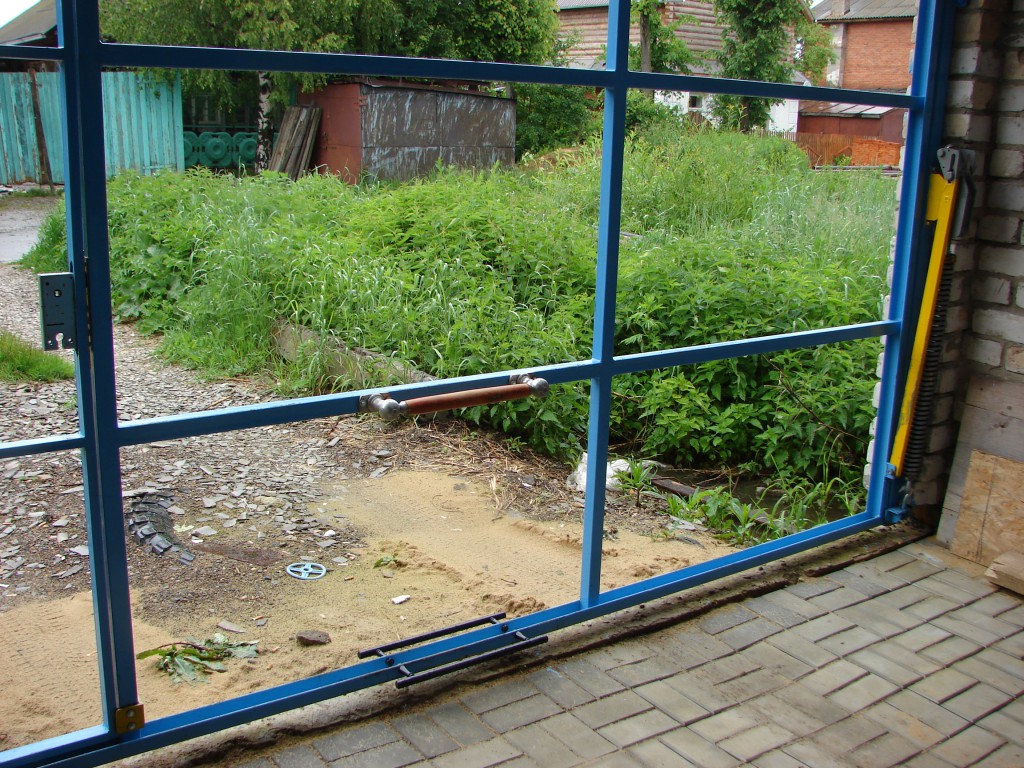
The design of up-and-over (panel) gates is quite different simple device. It consists of frames, canvas and guides along which it rotates around its axis, moving from vertical to horizontal position and back.
The basis is a steel frame, which is fixed in the garage opening or behind it and is the leading part when the gate moves. For its manufacture, rectangular pipes are usually used.
When the gate is opened, a roller mechanism and lifting arms are activated, with the help of which the gate leaf moves along the guides and is then fixed under the garage ceiling. The lower part of the canvas rises up and forms a canopy over the garage opening. The compensation springs stretch when the gate is closed, but remain free when the gate is open.
Gate in open position
The opening mechanism for this type of gate is of two types:
- Articulated lever- a simple, reliable and most popular mechanism that ensures simple movement of the shield and prevents it from blocking. Mandatory requirements: careful adjustment of spring tension and high precision installation of guides.
- On counterweights– this mechanism consists of a cable attached to the lower corners of the frame and passing through the block, as well as a counterweight mounted on the opposite edge of the winch. This mechanism is recommended for use for massive gates with a lot of weight.
Control of panel garage doors can be manual or using an electric drive (usually with a remote control).
Selection of materials
Materials for up-and-over garage doors should be selected depending on the mechanism and leaf used. For the simplest gates that you can make with your own hands, you will need (all measurements are given in centimeters):
- wooden blocks: for a box with a section of 12x8, for a ceiling - 10x10;
- metal pins;
- corner: for frame - 3.5x3.5x0.4, for rails - 4x4x0.4 cm;
- channel bracket 8x4.3x0.5;
- spring with an internal diameter of 3 cm;
- metal rod with a cross-section of 0.8 (for the tension regulator);
- electric drive (if gate automation is provided);
- canvas.
As a canvas, you can use a board made of boards covered with metal, a solid canvas or a sandwich panel.
For self-made gates the best option is a board panel covered with galvanized iron and coated with a protective compound. For thermal insulation, you can use polystyrene foam, polystyrene foam or insulation in mats, and to improve the appearance, you can veneer the finished gate wood panels or plastic.
Self-assembled gates
Necessary tools for work
For self-installation up-and-over garage doors will require a traditional set of tools:
- level;
- hammer;
- pencil;
- drill;
- spanners;
- screwdrivers;
- drill;
- Bulgarian;
- welding machine.
The first step in installing a gate is designing it. For this it is necessary measure the opening and draw up a sketch yourself or select a ready-made drawing.
Drawing of up and over gates
After this, materials and tools are purchased and the actual work of making the gate begins:
- A box is assembled from bars, which are fastened together with squares or metal plates.
- The box is fixed in the opening and secured with pins, the bottom is buried approximately 2 cm into the floor screed.
- The gate leaf is assembled: the frame is sheathed with a shield and covered with sheet metal.
- A mechanism support is made from a corner, two holes with a diameter of 1 cm are drilled in one shelf for fixing to the longitudinal posts, and three more are drilled in the other for fastening the spring bracket. To attach the channel bracket, used as a support for the spring, 3 holes are drilled in one of the shelves.
- The bracket and the spring are connected using an adjustment plate made from a strip of iron. The outer coils of the spring are used as hooks, and a tension regulator made of a rod is attached to the bottom. On one side a ring is formed, on the other a thread is cut.
- The hinge unit at the bottom is made from a corner with a hole (0.85 cm) and welded to the frame between the lower rib and the middle of the hole for the lifting mechanism lever at a distance of 12 cm.
- A plate with a hole for the tension regulator is welded to the end of the lever.
- Rails are made for the movement of the shield: 2 corners are made, and the edges of their shelves are welded so that the internal space between their tops is 5 cm.
- One end of such a rail is welded to a plate with holes. There should be a gap of 8 cm between the center line of the guide and the lower edge of the crossbar. The channel pieces are welded to the other edges of the rails at a distance of 14-15 cm. The channel is attached to the ceiling beam with a bolt.
After assembly is completed, the structure is painted to give it an aesthetic appearance; it is recommended to paint hard-to-reach places before assembly.

- It is recommended to use welding to assemble parts, which will reduce the need for fastening and drilling holes;
- the height of the gate opening should not be less than 2.2 meters, and the distance from the top of the opening to the ceiling should be 0.35-0.5 meters;
- if the rise is low, the drum should be located at the rear;
- there should be a groove in the lower profile of the canvas into which the seal is installed;
- the weight of the canvas is a very important parameter, its optimal value is 100 kg;
- as a drive you can install a reversible self-locking winch (220 V, 350 W, traction force - 125 kg);
- To install automation, you can use a car alarm.
For ease of use, the canvas can be made with inserts made of translucent materials, which will increase the amount of light, and also be equipped with locking devices and security systems that protect against pinching or prevent break-ins.
Homemade up-and-over gates are the most economical opportunity to close a garage opening without limiting the functionality, ease of use and originality of their design.
The video shows a detailed story about making your own up-and-over garage doors:
Overhead garage doors are popular among garage owners. Any owner of a garage box with construction skills can make such a design independently. The design of overhead gates is more complex than hanging gates, but do not be afraid that construction will take a lot of time. If you have a welding machine, you can make a gate in a couple of days.
Design characteristics
Lift gates characterized by the following advantages:
- This is a safe design. Such gates are difficult to break into, because they are made of a single sheet of metal. If you make the frame correctly, it is almost impossible to break the gate.
- It’s good if you buy galvanized metal, it is resistant to corrosion, and such gates will last longer than those covered with ordinary iron.
- Lifting gates will not take up much space. By parking your car in a garage, you will have more room to maneuver.
Lifting gates are not ideal; the design has not only advantages, but also disadvantages. The gates are heavy, but you can eliminate this drawback if you choose the right materials for construction.
The manufacture of overhead gates will require more materials, but in the end you will get a reliable design. Therefore, the cost and effort are worth it.
Please note that this type of gate can only be installed in a rectangular plane. If the entrance to the garage is made in the form of an arch, then such overhead gates cannot be installed. There is another way: you install a decorative arch and fit the hanging gate into a rectangle.
- Remember that after installation it will be difficult to drive close to the garage without opening the gate. You need a reserve of free space of at least 1.5 m. After installing the lifting structure, the height of the garage with the gate open will become 20 cm less.
- The gate shield is a one-piece design. If repairs are required, you will have to remove the entire plane.
Do-it-yourself lifting garage doors: stages of work
Make a rigid frame for the gate; it will be securely fixed in the garage wall. The side profile is used as guides; the structure moves along it. Garage owners install not only vertical or ceiling guides, but also other types of structures.
- The gate looks like a single piece. To make it, garage owners use wood, but you need to keep in mind that gates made from this material will be heavy. In addition, a wooden structure is easier to crack, and the weather also affects the wood, shortening the life of the structure.
- Having made the canvas, decorate it with forging elements. Available in stores decorative materials, which manufacturers produce for finishing gates. Buy suitable insulation and place it between the sheets.
- Pay attention to the rigidity of the structure; the reliability of the gate operation depends on this indicator. When choosing, give preference to lightweight materials, because heavy gates often jam and warp.
- To move the sash, you need to install a mechanism consisting of springs, rollers and levers. The gate rises along guides; compensating springs make lifting the gate easier. The sash rises upward, and the compensating springs are compressed as they rise. When the door is closed they stretch.
- Installing a solid leaf is far from the only design of overhead gates. There are products consisting of several sections, but making them on your own is much more difficult than building single-leaf sections.
- The gate, consisting of several sections, perfectly protects the garage. Experts recommend installing them in built-in heated premises that are under security. The principle of operation for all designs is similar.
It is better to make the mechanism for lifting gates with an electric drive. If you decide to use this option, make the sash from lightweight materials. It is better to install an electric drive if the garage is located in a protected area.
Installation of hanging gates
When buying components, pay attention to the alloy. Products must be made of metal High Quality. Installation is carried out in several stages. First you need to secure a limit bar at the bottom of the structure. You will also need a profile for edging. If necessary, replace it with a high-quality seal. The profile prevents moisture from entering the structure and reliably protects the gate from corrosion.
Try to install the sash in such a way that there are no gaps. Since it is difficult to fit the structural elements to each other, install special pads.

Gate installation
- Install the structure so that the corners of the gate fit snugly against the plane of the wall. When making the frame, use strong corners. If you bought a 25th corner for the canvas, then use a 75th for the frame. The 100th corner is suitable for the frame if you decide to use the 50th corner for the canvas.
- Measure the garage opening and diagonal. Make the mounting surface perfectly flat. Prepare the site for welding work. Make markings and weld the corners, clean the seams with a grinder. Make two frames, one for the front and one for the back. Take the frames, install them on both sides of the opening, and connect them with a metal bar. You will get a rigid structure without cracks.
- The lower part of the corner should not rest on the ground, but on a concrete beam. To do this, dig a hole and pour concrete into it. Place the channel in it, carefully pressing it into the concrete. Use building level, the concrete strip should be parallel to the surface. When the concrete is dry, weld the side posts to the channel.
- Measure the diagonal, assemble the frame of the canvas. Use in your work profile pipe, or a corner. Weld jumpers between the side posts; they will give the structure the required rigidity. Attach the guides to the ceiling, paying attention to horizontality.
- Adjust the structural elements to each other. Use shims and swivel joints for adjustment. Weld sheet metal on the outside, put insulation, and weld the structure. Degrease and prime the metal surface, paint it. Place the blade in the guides, adjust the springs and install the fittings.
See how you can make a lifting garage door with your own hands (video)
Bottom line
Overhead gates are not difficult to install. Before starting work, it is worth making a drawing. If you do the work correctly and carefully adjust the elements, the hanging gates will last for many years.
Nowadays, many types of garage doors have been created that are distinguished by their convenience and reliability. The most ergonomic and comfortable to use among the available options are considered to be traditional lifting (folding) structures, which, when opened, effectively disappear into the ceiling.
Types of lifting structures - which ones can you make yourself?
Overhead garage doors are most often manufactured in two main versions. They can be sectional or rotary. Gates of the first type are structures assembled from several plastic, wooden or steel panels up to half a meter high. The connection of individual elements into a common structure is carried out using hinges. Moving parts (couplings, rollers) are made of plastic or metal. But gate guides are always made of stainless steel. The inside of lift-and-turn structures is insulated with polyurethane foam. This ensures high-quality thermal insulation of the garage.
Pivot garage doors are characterized by decent strength characteristics, simplicity and safety of operation. The disadvantage of these designs is that it is almost impossible to make them yourself. If you plan to equip your motorhome with such gates, you will have to purchase them as a set of elements in a specialized store. You can install the factory kit yourself, following the manufacturer's instructions.
You can make your own up and over gates. Their design, which we will discuss in detail in the next section, is simple and durable. The key advantage of such folding systems is high level garage protection. They cannot be hacked without noise. In addition, turning structures provide truly convenient exit. They also do not take up extra space in front of the garage, which is very important for many motorists.
Disadvantages of rotary systems:
- “eat up” about 25 cm of the opening height (only when they are in the open position);
- the need to use high-quality (and therefore expensive) materials;
- large mass of gates.
Another disadvantage of the rotary design is that if the damage is significant, it is impossible to repair the system. The gate will have to be completely dismantled and then reassembled.
Design and principle of operation of folding gates
Structurally, the described systems, which many garage owners make with their own hands, are made in the form of the most durable and reliable support frame and a canvas covering the entrance opening. A diagram of such structures is shown below.
Folding gates can theoretically be built without guides. But experts do not advise doing this, so as not to reduce the operational reliability of the structure. The door leaf is made in one piece. If you have extra wood on your farm, you can actually assemble the entrance panel from it. But it is better to make the canvas from profiled sheets. This material is relatively inexpensive. And the fabric made from it provides excellent optimal protection from strangers. If the motorhome is used year-round, the corrugated sheets must be insulated with polyurethane foam.
Remember one of the most popular fairy tales from the Middle East, Ali Baba and the 40 Thieves? I could probably have forgotten it, but every time I see a gate with a lifting and turning mechanism in front of me, I just want to repeat after the hero of the mentioned work: “Sim-sim, open!” Indeed, a similar solid wall, which “magically” disappears after the corresponding automation is triggered.
About this miracle modern technologies I want to talk further in the article.
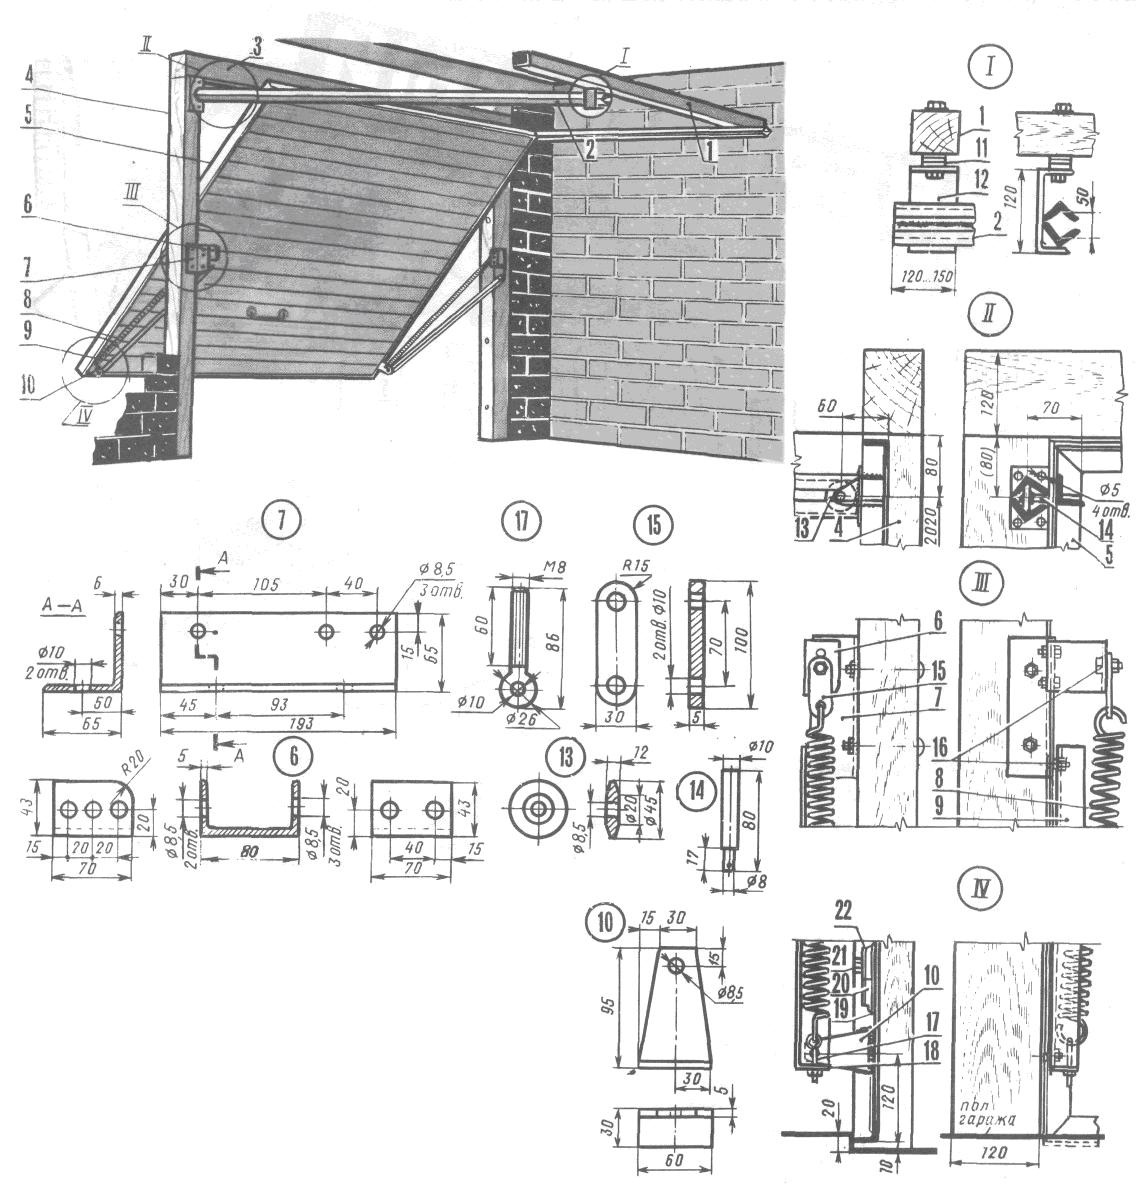
Device
The “magic” lies, first of all, in the structural features of the structure itself:
Scheme
| Designation on the drawing | Description |
| 1 | Horizontally located guide rail beam |
| 2 | Guide rail |
| 3 | Horizontally positioned gate frame beam |
| 4 | Vertically positioned gate frame post |
| 5 | Gate frame |
| 6 | Spring fixing bracket |
| 7 | Hinged angle |
| 8 | Spring mechanism |
| 9 | Lifting lever |
| 10 | Lever bracket |
| 11 | Two adjusting washers |
| 12 | Metal U-shaped beam |
| 13 | Video clip |
| 14 | Roller axis |
| 15 | Washer plate performing an adjusting function |
| 16 | Hinges |
| 17 | Spring tension control mechanism |
| 18 | Plate of the mechanism that regulates the spring tension force |
| 19 | Sheet steel |
| 20 | Shield cloth |
| 21 | Furniture type bolt with nut |
| 22 | Metal plate |
Principle of operation
The drawings look threatening, and it was not easy for me to understand them right away.
Therefore, I want to simplify the description of the design of overhead gates to four main elements:
- The door leaf, as a rule, is a multi-layer insulated panel with a system of rollers and. This is the most visible part of the entire structure;
Advice: when choosing up-and-over garage doors, pay attention to the appearance of their door leaf, since it is this that will further form the aesthetic component of the entire building, occupying most of its façade.
- Guides determine the position of the canvas in space, moving it from vertical to horizontal and back. Because of this, the gates in question are also called sliding gates with a 90-degree turn;
- The balancing system guarantees the stability of the shield when it is suspended. Thanks to it, moving the canvas can be easily done even with your own hands in the event of a power outage;
- The electromechanical drive is responsible for automating the movement of the shield.
Character traits
Due to the device described above, the garages under consideration can “boast” the following advantages:
- Space saving. When closed, the canvas essentially plays the role of a wall, and when open it hides under the ceiling. In both cases, it takes up virtually no usable space;
Advice: just do not place your vehicle close to the closed panel of the lift-and-turn structure, since during the opening process its lower edge moves forward a little and can hit the car.
In this case, sectional gates are more convenient, which go up in parts without turning, but they, on the other hand, lose in reliability from burglary.
- Very high degree of burglary protection. When closed, the structure in question is a solid solid wall, usually made of. What could be more reliable? There is essentially nothing to hack here;
- Excellent insulating properties. As I noted above, the canvas consists of at least three layers, the middle of which is insulation. As a result, neither cold nor extraneous sounds from the street will be able to penetrate into your garage;
- Simplicity and ease of use. Do-it-yourself swing-and-turn gates can be easily opened and closed thanks to a well-functioning balancing system, and if there are no problems with electricity, then the whole process is carried out automatically due to the operation of an electromechanical drive.
Flaws
Every item in this world has not only pros, but also cons, and swing-out gates are no exception in this sense:
- Quite a high price compared to other types of garage doors. But personally, for example, I understood perfectly well what I was paying money for, because it was a multi-layer insulated fabric, an electromechanical drive, and a stainless steel frame. So this is all relative, just if you want to save money, then it is better to refuse to install the equipment described, but if you want to get reliable and easy-to-use protection for the garage, then it is better to forget about saving;
- Labor intensive installation. Again, if you want to equip the interior of your car in accordance with all modern technological trends, then be so kind as to “roll up your sleeves” and spend some effort on the installation process, or hire specialists for this. The result is still worth all the effort.
Example of a gate whose width is 310 cm
Additional services such as insulation, door installation and the application of non-standard colors can also increase the cost.
Conclusion
Pivot and lift gates will allow you to turn your garage into a fabulous cave from an oriental fairy tale, into which only you can enter. True, instead of magic words in this case, a remote control will be used, although if desired, sound activation can also be done for a complete analogy. In any case, your car will now be warm and safe.
If after reading of this material If you have any additional questions on the topic, ask them in the comments.
Self-production overhead garage doors are carried out in accordance with pre-developed drawings.
It is necessary to make a sectional structure, which is equipped with a rotary-lifting system mounted on an L-shaped frame and equipped with a curved guide. Up-and-over gates will have two independent leaves.
Drawings of up-and-over garage doors
Design drawings must comply with the requirements of GOST 3174-2003. These requirements regulate the scope of production metal gates, which will be made in accordance with the safety requirements of EN 13241-1.
These standards include several aspects that provide the following guarantees:
- The use of materials with fire-resistant and fire-fighting characteristics.
- Reliability and stability of the structure under wind and mechanical loads.
- Compliance with installation rules.
It is possible to independently install such a structure only by strictly adhering to the requirements of GOST and drawing diagrams.
They can make the task of creating a drawing easier standard projects, in which minor changes are made regarding a specific situation, for example, characteristics of materials, overall dimensions.
The initial task when drawing up a drawing is determining the dimensions of the future structure, namely width and height. In this case, it is necessary to focus on the dimensions of the car, so that when it enters there is 30 cm of free space on each side.
It is not practical to make a structure more than 5 meters wide, in most cases this figure is 2.5–3 meters. It should also be taken into account that the distance from the perpendicular wall to the gate frame must be at least 80 cm.
The height is also selected based on the dimensions of the car, usually it varies between 2–2.2 meters. The main element of the structure will be the frame framing the garage opening, the entrance and a pair of doors.
The frame structure will be made from a 65 mm metal corner; a 50 mm steel profile will be suitable for the frame and sashes. The elements are sheathed with sheet iron 3 mm thick, and therefore external reinforced hinges should be used.
Calculate required amount materials can be based on the data presented in the drawing, focusing on the dimensions of the structure. 
Up-and-over garage doors - do it yourself
The work will be carried out in several stages, at each of which it is expected to produce one of the structural elements:
- frame welding;
- creating a frame with sashes;
- gate installation;
- installation of a locking mechanism.
Frame making
Initially the frame is made. You can complete the task using the following materials:
- steel corners – 65 mm;
- metal strip – width 30 mm, thickness 4 mm;
- steel reinforcing rod - it is used to fix the frame in the opening.
The work will be carried out using special tools, such as a welding machine and a grinder. In addition, you will need a tape measure with a level and a square.
Using a grinder, you need to cut a corner. Only 8 segments are required: 4 of them are identical in width to the gate opening, and the rest will have a length comparable to the height of the opening.
The corners are welded together to form a frame, and the joint can be overlapped or butt jointed. The outer segment of the frame is carefully sanded so that the doors fit as tightly as possible.
Creating a wireframe
The formation of the frame is also carried out using a corner, but a metal profile is also perfect.
It is necessary to make 8 segments - 4 for each of the sashes. They should be 15 mm smaller in height than the frame, thanks to this gap they will easily fit into the opening.
Four of the resulting segments will be horizontal; their width is 35 cm less than half the frame.
The next step is welding the frame, which is enhanced by horizontal stripes, performing the function of spacers and necessary to prevent distortion of the geometry.
Important! The reinforcing structural element should be attached in the middle segment of the frame.
The material for the manufacture of sashes is sheet metal 2 mm thick. It is assumed that 2 panels will be cut 4 cm above the opening. The width on one side is 2 cm larger, and on the other - the same distance smaller.
The canvas is welded to the frame using a special technology. Note that on the upper and lower sides it extends 2 cm beyond the body of the frame of one sash, and its width must be made 1 cm smaller.
Thanks to this, the other sash will be in close contact with the canvas, which should be welded so that it extends 4 cm beyond the frame.
It must be taken into account that sheet metal has an unreliable structure, and therefore it is recommended to strengthen the corners and core by welding. Only after this, in increments of 15 cm, do they begin to weld the entire sheet.
When the work is completed, the welding in the corners is cut off, since in the future it may cause deformation of the entire structure.
Reliability of fastening is ensured by special reinforced hinges; for this, the lower segment is welded to the frame, and the upper part is fastened to the sash.
The adhesion can be strengthened by welding metal strips and reinforcement onto the hinges. You need to take a strip up to 7 mm thick and, bending it, weld it with the sash and the upper part of the hinge, after which the reinforcement tab is welded on the inside.
Gate installation
The process of manufacturing garage doors can be considered complete; it is time for installation. Initially, it is necessary to install the gate frame - both the outer and inner sides.
Attention! The installation of the structure in the opening is carried out at the stage of construction of the garage, when approximately 50 cm of the main wall is ready.
The frames are connected to each other using metal strips 4 cm wide. When welding them to the structure, a step of 60 cm should be observed.
After this, it is necessary to complete the laying of the front garage wall, while the bricks should fill the space that has arisen between the frames. When carrying out masonry, you should simultaneously install the frame.
This is done by welding the reinforcement. It is necessary to attach a beam to the upper frame segment, which serves as a ceiling and is made of concrete or metal.
Lift-and-swing mechanisms
The gate will operate thanks to a rotating mechanism with a forced operating principle. The trajectory of movement will be set using special guides, thanks to which the canvas changes its position, moving from the horizontal to the vertical plane.
Pivot lift gates will open thanks to ceiling guides and a special mechanism. It is important to pay attention to the springs that need to be adjusted, thereby achieving lifting of the canvas with minimal effort and without slipping.
The alignment of the guides is carried out strictly in the horizontal plane. To level the position, spacers are used, which are mounted in the gap formed between the frame and the beam.
Particular attention should be paid to the locking system, namely the type of lifting mechanism that will be used for the gate.
If you give preference to a lever-hinged system, you can be sure of its reliability, since in this case the blocking of the shield is eliminated, and the movement of the doors is carried out along the simplest trajectory.
Here it is important to carefully adjust the springs and set the guides so that they are parallel to each other and at the same time in a vertical plane, since otherwise the shield will get stuck.
Can be used with lifting mechanism on counterweights: its design consists of a cable fixed in the lower segment of the frame and passed through a block. The counterweight must be secured to the opposite edge of the winch.
Important! Such a mechanism will place a significant load on the gate frame.
Use of additional materials
 You can make the operating process much more convenient, and the design itself easier, by using composite translucent materials. Thanks to this, the volume of sunlight entering the interior space will increase.
Grounding and protection are provided using specialized locking devices that can also prevent hacking. A necessary accessory is a limit bar that protects the gate stops from aggressive environmental influences.
Compensating linings needed to close gaps will also be useful, and a rubber edging profile will make the structure as stable as possible.
It is important to follow manufacturing technology and use only high-quality materials so that the design is sufficiently reliable and durable. Up-and-over garage doors are a modern and efficient solution that saves space.
The doors that open upwards allow you to install a garage in limited space, and the automation system makes it possible to remotely control the opening and closing process. Thanks to these advantages, bi-leaf overhead garage doors are popular among car enthusiasts.
Self-production of overhead garage doors is carried out in accordance with pre-developed drawings. It is necessary to make a sectional Rating: 0