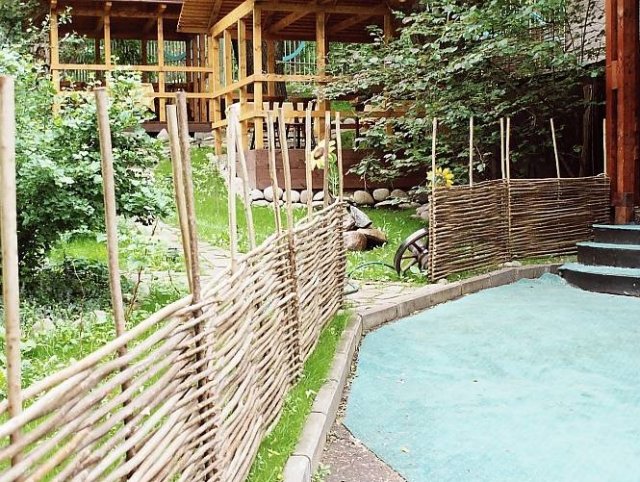
In areas where many types of trees grow, you can find fences made in the form of a palisade, fence or wattle fence. Wicker fences appeared a long time ago. And in our modern age, wicker fences are quite rare, although such a fence looks very original and beautiful.
Wicker fence made from branches
The easiest way to make a fence is from twigs of alder, willow, birch and hazel, since this material is thin and manageable. You can find wickerwork made of cattails or reeds. This wicker fabric is original, beautiful and environmentally friendly. It is easy to build and is very inexpensive. However, this one will last decorative fence the braid doesn’t last long, and its protection against the penetration of others is weak.
Rods for weaving a fence should be prepared early in spring or late in autumn. The collected branches should be well dried and stored in bunches before starting work. 15 minutes before starting work on making wickerwork, the rods must be soaked in water. This will give the vine greater flexibility and plasticity. You can use wooden stakes or metal rods as the basis for a wicker fence. You can weave branches both horizontally and vertically.
If you want to paint such a fence, the rods should first be cut and then painted. Such wattle can be coated with a solution of potassium permanganate, iron sulfate, stain or matte varnish. If you prefer unpainted tyn, then you do not need to remove the bark from the twigs.
The wicker can be made from PVC rods. Such a plastic wicker fence will be more durable compared to a product made from natural branches.
Austrian wicker fence
Not long ago another species appeared wooden fence– Austrian braided vertical and horizontal. The technique for making such a wooden fence is similar to weaving a fence from branches, but instead of thin rods, boards are used here. The weaving itself can also be vertical or horizontal.
Arranging the area around country house or a cottage, one of the main questions that owners ask is what kind of fence to protect their property with? A fairly economical, but at the same time aesthetic solution is a wicker fence made of boards. The so-called “Austrian wickerwork” can be used not only as a fence around a cottage, but also for zoning a garden around a country house, as well as for decoration brick fence, as a separate element of it.
Woven from boards, it looks harmonious, interesting and not as difficult to construct as it might seem at first glance. With such a fence, any usual dacha can receive the status of a country house (or cottage, underline as appropriate). Let's take a closer look at how to make a wicker fence from boards with your own hands and what materials will be used.
What will you need for this?
Anyone can build a wicker fence, but you need to use more than just boards.
To build a wicker fence, you will need the following materials:
- Planed boards measuring 2.5x10x6000. You can use thinner ones, for example, 2 cm thick. Be sure to consult with the seller about the types of wood offered and their properties.
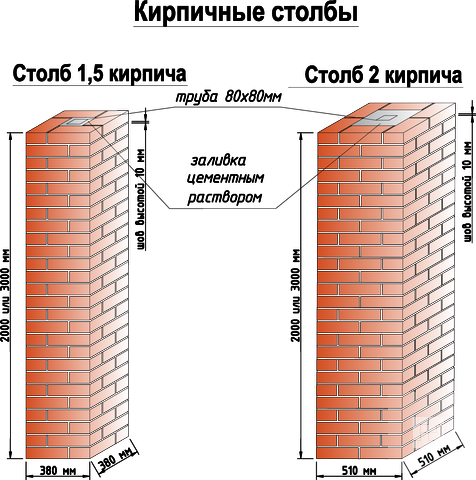
- Support pillars - wooden, concrete or metal. In the case of the latter, it is recommended profile pipes 40x40 mm with a wall thickness of 2 mm.
When choosing the size of a post, you should take into account that its width should allow the boards to bend without breaking.
- Self-tapping screws for woodworking or nails for fastening.
- Antiseptic substance and moisture protection varnish to treat the boards before installation.
- Material that will take up space between the soil and the fence boards. It may become stone or brickwork, as well as ordinary galvanized mesh.
The distance to the ground will additionally protect the lower part of the fence, woven from boards, from moisture, and the material, which is less susceptible to destruction, will also protect from the entry of strange cats and dogs into the territory.
- Cement, sand, and crushed stone for installing pillars.
Territory marking
It is especially important to install the posts for the future fence exactly in one line, and also make them the same in height. Woven from boards, it requires special care in this.
How to build a straight wicker fence from boards is described below:
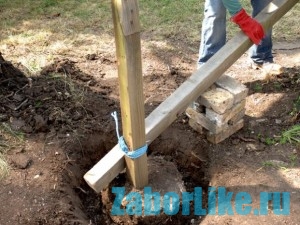
- It is necessary to calculate the same distance, “step” between the columns. Usually a step is taken from two and a half to three meters, depending on the length of the board, it is necessary that the step be shorter, since the ends of the board during weaving should be adjacent to the columns as shown in the photo.
They can either be hidden behind a decorative board or left in this form - the difference is not fundamental.
For greater stability of a fence woven from boards, the “step” between the posts should be reduced. If you make the distance more than three meters, a sail effect will be created, which can cause it to sway violently in the wind.
- At the site of the proposed supports, pegs should be driven into the ground, and then a cord should be stretched between them.
- Immediately calculate the place for the “intermediate” pillar (or more than one, depending on the planned structure) - the place where the middle bend of the boards is.
Among other things, when marking the area, it would be a good idea to clear the ground of bushes, anthills and other possible “hazards” to the integrity of the fence. This will reduce the likelihood of sudden failure of the structure and the need to replace its part damaged by insects.
Construction of supports
After calculations and markings, you can finally begin installing support posts for a fence made from wicker boards. It is better to immediately coat the metal bases of the fence with a primer when you are building a wicker fence from boards, and paint it to avoid corrosion.
You will need to install covers on top of the hollow posts, this will help prevent moisture from getting into them. Wooden posts should be cut obliquely from the top, then moisture will flow down them better and will be less likely to linger, having a detrimental effect on the wood.
To install supports for a wicker fence, you need:
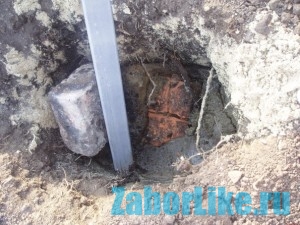
- Use a drill to make holes in the ground with a diameter of 25 cm and a depth of at least one meter.
At this stage, inconvenience may arise if there were also pillars of the previous fence at the installation site - construction debris remaining in the ground can significantly interfere.
If the soil is hard and the work progresses with difficulty, you can take a drill with a smaller diameter (for example, 16 cm), use it to make a hole and pour water inside. After 2-4 hours, when the ground is well saturated with moisture, it will be easier to prepare the foundation for a future fence made of wicker boards.
- Place columns in the holes and level them.
Tools such as a plumb line or level will help you align the posts vertically. Such work is made much easier if you have a laser plane builder - a convenient device that allows you to measure angles, calculate areas, etc.
- Fill one third of the hole with crushed stone and check the position of the pillars.
- Having leveled the support, compact the crushed stone.
- Pour and lay concrete.
- Align the columns in height - in turn, place on each pair of supports, for example, a gypsum profile and a level on top of it.
This is approximately what the metal support will look like during installation.
The posts on the gates should be somewhat thicker (preferably at least 60x60x3 mm). For greater strength of the gate, the supports framing them should be fastened together - weld a channel (U-shaped metal profile) between them or concrete a reinforced concrete beam at the bottom, including the support pillars. It would be good if you could connect the gate frame at the top as well, for greater reliability.
Weaving technology and finishing touches
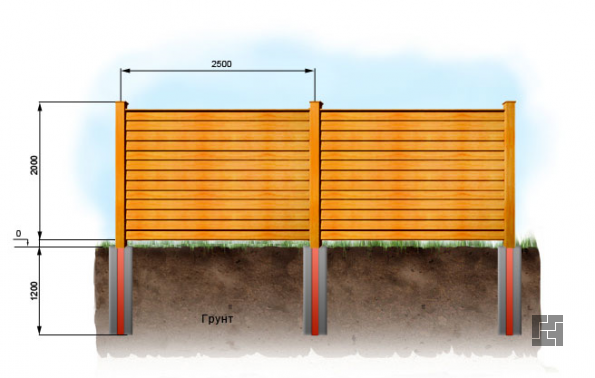
A wicker fence made of boards has two types of weaving - horizontal and vertical. Regardless of the weaving, the bottom line of the wicker fence should be at a height of 15 cm. To prevent the boards from sliding down, a limiter is installed on the posts - a metal pin or a corner if the support is made of metal; if the pillars are wooden, then you can nail a block onto required level. The resulting space is later filled with stone or brick. You can instead fix galvanized mesh in the gaps.
The very bottom of the fence must be impregnated with bitumen solution - it is also used to protect against dampness.
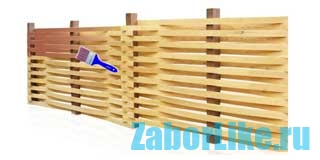
It is very important to thoroughly dry and treat the boards with an antiseptic before weaving. This will help protect the wood from fungus and rotting. Fence boards can be painted using a brush or roller, both before installation and after the fence is completely assembled.
The height of the fence can be chosen arbitrarily, depending on how you want your fence to look.
Read more about horizontal weaving.
- Between support pillars you need to install one or two intermediate ones. For this purpose, not too wide boards installed vertically are suitable, which will divide the span into equal parts.
- The boards are woven into the fence from above, gradually lowering each next one.
The picture clearly shows how a fence of this type of weaving is installed
- The fence, fully assembled, will remain intact thanks to the tension of the curved boards. But you can also, just to be sure, attach each of the boards to the supports using nails or self-tapping screws.
- The last, topmost board is often not woven in, but simply nailed to the support posts. They, in turn, can be hidden after weaving with decorative inserts (they can be left in plain sight, as shown in the photo above).
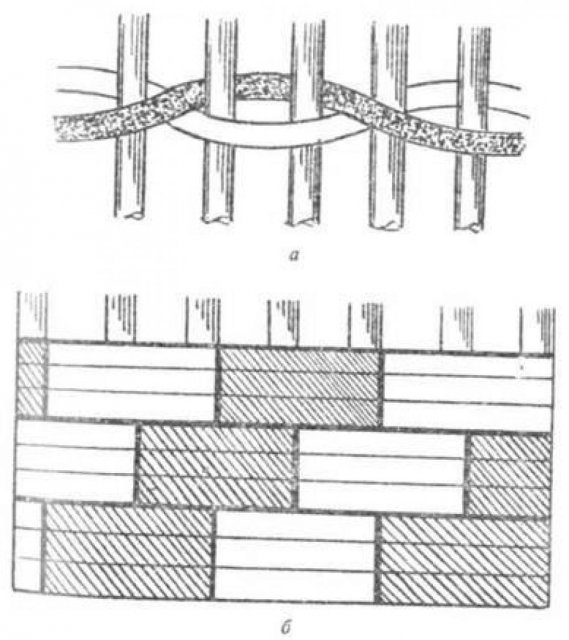
During vertical weaving, horizontal logs are installed - boards that serve as the frame, in this case, of a fence. Next, from pillar to post, flexible boards are woven in, which are also secured to the supports.
There are no significant differences in the type of fence weaving, so when choosing, you should proceed mainly from your aesthetic preferences.
The finished fence should be painted at least once every two to three years to renew the protective layer on it. You can leave it in its natural color and just varnish it or paint it in a checkerboard pattern - further decoration is entirely at your discretion!
If you carry out preventive application of an antiseptic substance twice a year - in spring and autumn - your fence will be able to serve you longer.
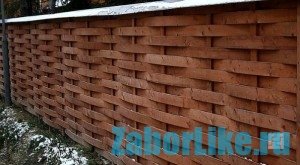
Wicker fence made of boards - original and stylish
A wicker fence is an original enclosing structure that finds its application in summer cottages. Previously, wattle, or tyn, was made only from vines and thin branches that could be woven. Modern craftsmen prefer to make such a fence from boards. In addition to decorative functions, wicker construction has several more advantages:
- Possibility of manufacturing from old boards that have retained their strength;
- Expensive look with low manufacturing costs;
- Simple installation, possible even for an inexperienced technician;
- The design is completely natural and environmentally friendly.
Materials and tools for creating a fence from boards
To build a wicker fence you need planed boards and poles made of wooden beams, metal pipes, concrete or brick. The strength of the finished product will depend on the tension of the woven wood. As for the base material, the optimal blanks will be canvases measuring 150 x 20 mm with a length of 2100 mm.
It is recommended to take support beams with a cross-section of 100 x 100 mm. The length of the supports is determined by the height of the fence. The depth of immersion of the columns into the ground during concreting is also taken into account. Vertical bars for tying are taken with a length equal to the length of the support bars. One vertical beam is required for each canvas.

Also useful in your work:
- Self-tapping screws;
- Screwdriver;
- Bitumen for processing supports;
- Drill for digging holes;
- Level or plumb line;
- Sand, concrete, crushed stone;
- Antiseptic and paint to protect the material;
- Band/circular saw for working with wood.
Before starting work, all wooden blanks must be coated with an antiseptic and primer. These products will protect the material from damage by insects and fungi.
Constructing a fence from boards with your own hands: step-by-step instructions
Before starting construction, the owner must decide on the direction of fastening, i.e. whether the fence elements will be placed horizontally or vertically. Properly making a wicker fence from boards with your own hands involves going through several stages:
- Marking;
- Installation of the supporting part;
- Creation of braiding and final installation;
- Final protective measures.
Regardless of experience in construction, the manufacture of fences always begins with marking the territory.

Marking begins with corner posts
When creating a future board fence, it is important to take into account some nuances:
- The spans between the pillars are made 3 meters. For thin supports, the distance is reduced to 2 - 2.5 m.
- The width of the step is calculated so that each bar at both ends extends slightly beyond the posts.
If work is carried out on heaving soil, to extend the operation of the structure, it is necessary to equip drainage system, “pillow” and foundation.
Installation of the load-bearing part
After marking the points for the pillars, the construction of the frame begins. It is made from different supports - concrete, wood, brick or metal. The most beautiful look is plank weaving built into a brick fence. Wooden and iron supports do not require pouring a foundation; you can simply dig holes for them and provide them with a gravel bed.
- Pull the cord along the marking line.
- Concreting the load-bearing parts. A heavy structure with wide spans can quickly become loose in strong gusts of wind.
- Prime and paint the iron posts, cover the top with caps. To prevent rotting of the lower part wooden supports It is advisable to treat it with bitumen or special impregnation. The top needs to be cut at an angle so that moisture from precipitation has less effect on the end.
- Leave a distance of 12–15 cm between the soil and the bottom of the fence. During the work, you can use limiters that will not allow the structure to sink to the ground. To do this, timber is nailed to the wooden posts, and a corner is attached to the metal supports.
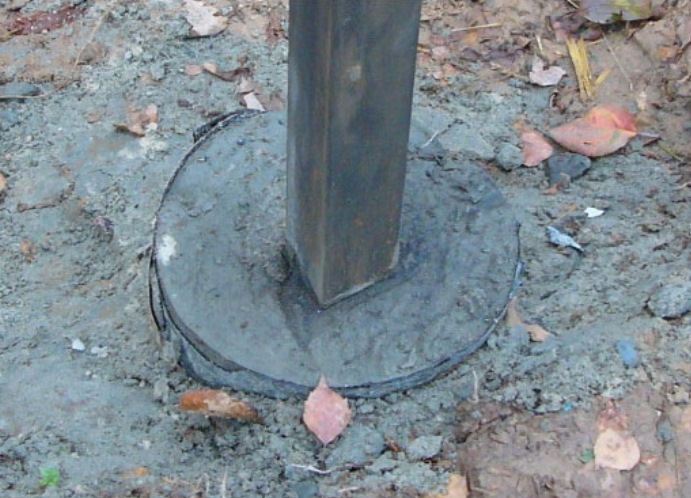
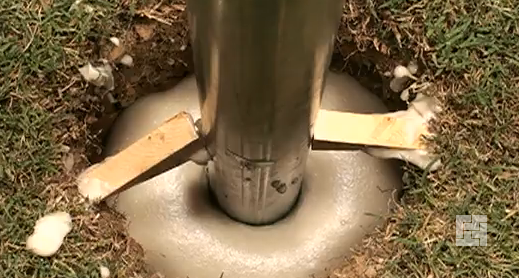
 Visual process of installing a metal support pole and pouring concrete
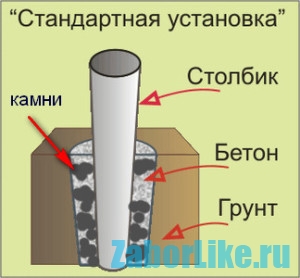
 Installation diagram of supporting wooden posts
The installation of the supporting part is carried out in holes with a diameter of 25 cm and a depth of 1 m. The vertical position of the columns is constantly controlled by a level. Each hole is sprinkled with a little sand and crushed stone until 1/3 of the depth is filled. The layer is carefully compacted. The work is completed by concreting the supports.
Iron pillars must be protected with decorative inserts. While creating brick pillars First, the pipes are installed, then they are lined with bricks.
Weaving features
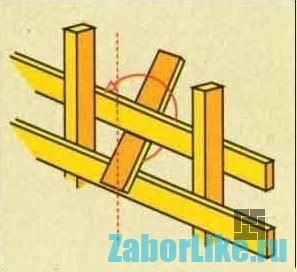
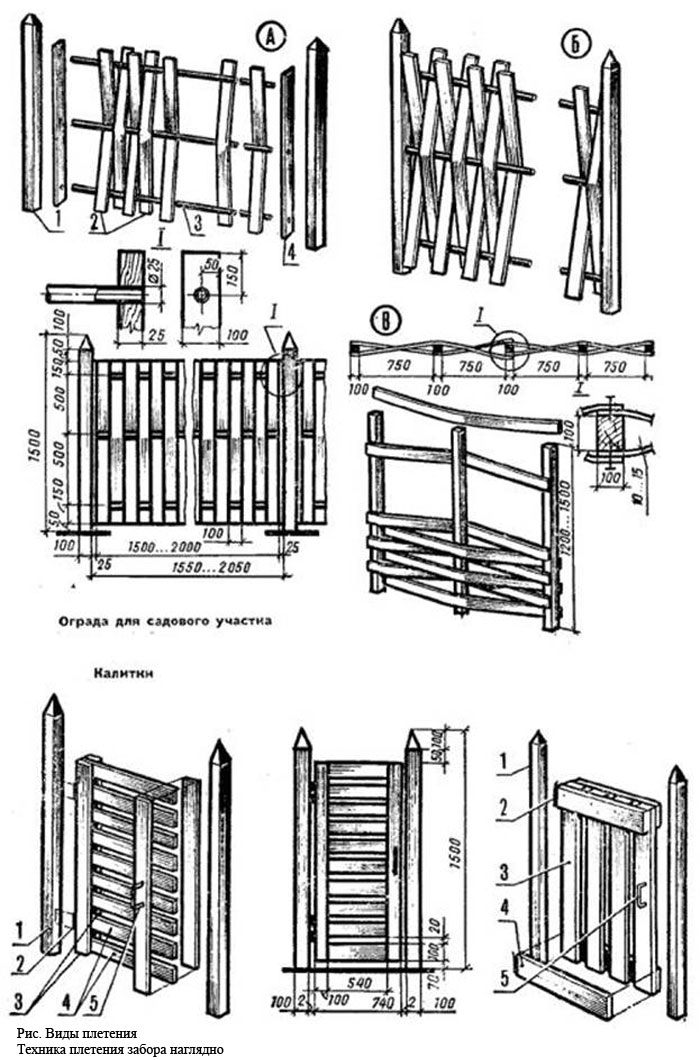
Scheme of fence weaving technology
Weaving boards when creating a fence begins from the bottom. The first web is passed through a beam with a bend. Its ends should be placed overlapping on the support posts. The horizontal position of the first board is checked with a level, then it is attached to the posts with self-tapping screws. Additionally, the board is screwed to a vertical bar.
The next sheet is placed on top of the first one, bent in the opposite direction and secured with self-tapping screws. This is done with all boards. The assembled wattle fence must be supported by bent material. The topmost board is nailed to the supports on the street side. No weaving is done; the excess is carefully trimmed.
When the fence elements are arranged vertically, the first two boards are placed strictly horizontally. The work is carried out from the pillar, and the boards are additionally fastened with nails or screws.
Final works
The finished weaving from boards can be painted or treated with colored varnish. If antifungal impregnation was not carried out before the start of all work, the wood is lubricated after the construction of the fence. After this, the boards are covered with a protective layer using drying oil, varnish, enamel paint and other products intended for outdoor use.
After 2 - 3 years, the painting of the fence is refreshed. Protective and decorative layers are applied to the surface of the wood with a brush or roller. So the fence will always have beautiful view and will last for several decades. The choice of any topcoat should be made from products intended for exterior finishing. Frost-resistant compounds will take care of protecting the fence for 3 to 4 years.
If the owner paints a wicker fence made of boards with oil paint or opens it with varnish interior works, the coating will peel off next year when the fence sits for the winter. You can additionally protect the wood using a canopy placed on top of the fence. It will protect the structure from the effects of precipitation.
 To protect the fence from precipitation, you can install a canopy on the top
 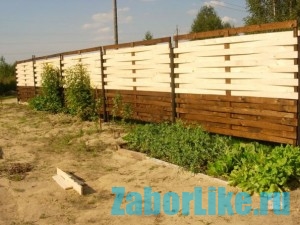 For final finishing, it is necessary to impregnate the material with protective compounds, tint it, and treat it with drying oil.
As you can see, making a wicker fence with your own hands from boards is not a difficult task. But this option allows you to assemble an unusual fence in a short time, appearance which will be visually valued much more expensive than the owner actually spent on the material.
If you love and know how to arrange a backyard or country cottage area with your own hands, you can make an exclusive fence - a wicker fence made of boards. At first glance, it will seem like a joke - how can you “weave” boards, since they are large and hard? In fact, such fences have been known for a long time. For example, in Europe they are very popular. In our country, such stylish fences are still quite rare - and this is another reason to make such a fence with your own hands. Moreover, the work is not particularly difficult, but the result will be impressive.
Materials and tools
Required Tools
Already from the presented photo it is clear what principle of weaving boards underlies the design of the fence. In fact, it is no different from the usual fence made of thin branches, which is often installed in dachas to separate the garden from the yard. Initially, you need to decide what type of support pillars will be used for construction:

Beam for support post
- Wooden beam(square or round), side no less than 10x10 cm, diameter - at least 10 cm. Pros - goes well with boards, the fence looks more presentable. Wooden beams require careful water-repellent treatment of the lower part and the upper end surface in order to protect them from premature destruction under the influence of moisture.

- Concrete pillar with a diameter (square side) of at least 7 cm. The cheapest option. Ready-made reinforced concrete pillars can be purchased at any construction warehouse.
Very important! You cannot take ready-made hollow concrete pipes. The fact is that the boards will create quite noticeable forces on the supporting pillars, and such a pipe will simply burst. Therefore, only a solid reinforced concrete pole!
- Metal pipe. According to design calculations, a pipe with a diameter of 5 cm with a wall of 1 cm or more is sufficient. But on such thin support pillars, the weaving will not look as beautiful as possible. Therefore, if you are not limited in funds, buy thicker pipes. Regarding durability, very careful surface treatment against corrosion is required: cleaning, degreasing, painting with special frost-resistant paints. In addition, it is necessary to tightly weld at least the upper end so that not a drop of rain or even moist air gets into the cavity of the pipe.
Brick support pillars
- A wicker fence on supporting pillars made of bricks looks very nice (then the lower gap must also be finished with a brick wall). To do this, you need to concrete a metal or concrete pipe and lay brick around it using the ligation method. And after installing the pillars, start weaving.
In addition to support posts (the number of which is calculated along the perimeter of the fence - more on this later), planed boards and nails (preferably self-tapping screws) are also needed. To install the pillars - cement, sand and gravel. Well, the usual carpentry tools: saw, axe, plane, sander. And also everything you need to complete concrete works. You can do without a concrete mixer - the required amount of concrete can be mixed with a construction mixer or manually.
Before installing the fence, the boards must be prepared - the surface must be cleaned, sanded and thoroughly treated with stain containing additives to prevent rotting, burning, fungi and insects. The simplest option is hot drying oil and a concentrated salt solution against insects. Or take a ready-made primer: for example, “Dufa” on water based or "Senezh".
Video: How to properly process a wooden fence
Calculations
Before you start construction wicker fence, you should calculate the required amount of material. You need to start with an accurate measurement of the perimeter of the fence.
Make the corner markings of the fence according to all the rules, although there is no need to build a full-fledged foundation for construction. In this case, it will be necessary to place pillars in the corners of the site, and also to highlight the gate and wicket area (it is better to combine them).
It is necessary to proceed not only from the specified requirements, but also from the distance between the corner posts on the two sides of the site. Having measured it, you need to divide this distance into equal parts, and since the width and length can be different, you need to select a step by selection that will be harmonious for both sides. For the part where the gate will stand, the number of pillars is calculated from the gate to the corner. It is desirable that the step differs little from the size on the other sides.
The pitch must be calculated in such a way that when laying the boards, their ends can be extended beyond the supporting pillars by at least 10 cm. That is, the boards should be 50-60 cm longer than the span: 20 cm for the pillars + 30-40 cm for the bends ( the thicker the vertical board, the greater the margin needed).
The boards are calculated taking into account the following points:
- How thick will your fence be? Gaps between boards from 3 to 15 cm are allowed.
- From the width of the board itself. Fences with boards 15-20 cm wide look most harmonious.
![]()
We will briefly describe the technology of weaving a board fence in the form of a list of rules.
- The bottom line should be no lower than 10 cm (or better - 15 cm) from the ground level. This way, when it rains, the boards will not be contaminated by drops. Therefore, it is necessary to make limiters on the pillars that will not allow the canvas to slide and make mistakes during work. The limiters should protrude to the sides by at least 10-15 cm. This can be a block on wooden tables, a welded corner on metal ones. For concrete pillars, there is nothing better than to make a small step on both sides.
If the area is uneven, then you need to either level the perimeter for the fence, or step the placement of the posts so that the boards are placed horizontally and parallel to the ground.
- The supports must be concreted to the depth of soil freezing in your region - from 60 to 80 cm.
- Weaving should begin from the bottom board, which rests on the stops.
- The top board is not woven, but is nailed evenly to the pillars on the street side.
- It is recommended to install protective decorative tips on the top of the posts.
- When the fence fabric is ready, the lower gap must be filled with a brick wall or masonry.
Preparatory work: marking, installation of pillars
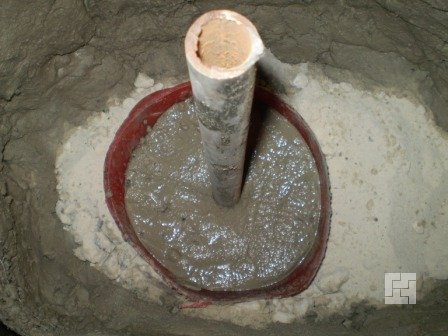
Concreting a pillar with the addition of gravel and bricks
We have already mentioned markup. Next, holes are dug to a depth of at least 70 cm, about 45 cm wide. Pre-prepared pillars (wooden - treated with impregnation against wetting or hot bitumen) are concreted with the addition of gravel and broken bricks.
You can continue installing the fence only after the concrete has hardened, otherwise the posts will be torn out during weaving. Concrete gains full strength no earlier than after 3 weeks.
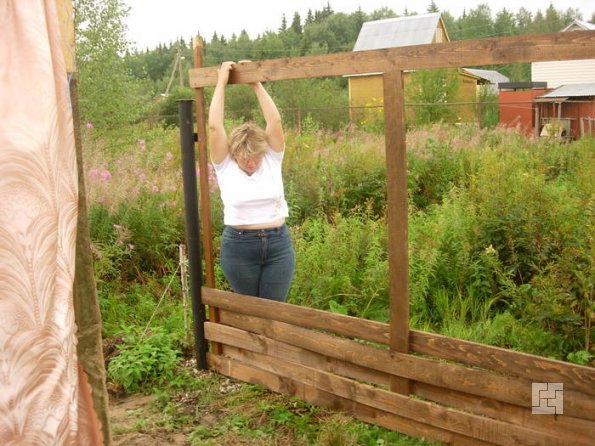
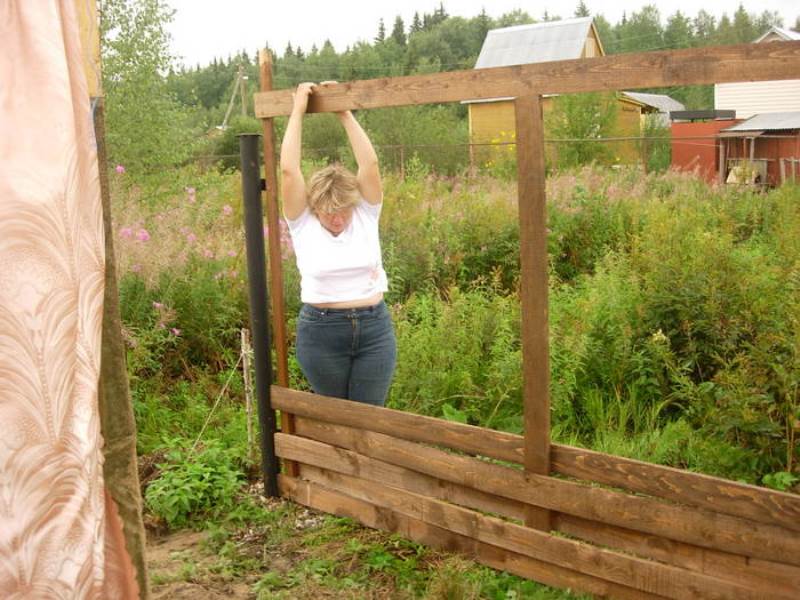
Installation should begin from the bottom, bending board by board
Installation should begin from the bottom, bending board by board. It is difficult for one person to cope with this - an assistant is needed. Boards can be fastened to support pillars with nails (only galvanized ones!), and on concrete and metal pillars - with special self-tapping screws with pre-drilled holes. Work must be done along the entire perimeter: first lay out the first row of boards everywhere, then the second, etc. You just need to nail the top one and trim off the excess.
Finishing

Finishing - impregnated with protective compounds, tinted, treated with drying oil
This is a mandatory step for wood, otherwise the boards will quickly become unusable. It is best to do the first stage of this work before installation - impregnate with protective compounds, tint, and treat with drying oil. Finishing is done on the finished fence. This can be painting with oil paint using a wide brush or air paint. Or varnish in 2 layers. During these works, the lower walled part must be protected from splashes and drops.
Important! When choosing a topcoat, ask for a composition intended for exterior finishing, that is, frost-resistant. It will serve properly for 3-4 years. Regular oil paint or varnish interior decoration will crumble after the first winter.

To protect the tree from precipitation, you can install a canopy on the top
To protect the tree from precipitation, you can install a canopy on the top.
Colorful fencing in rustic style can be made from flexible branches of willow, grapevine, rowan, aspen, birch, willow, hazel, reeds or even plastic. A wicker fence can also be created from peeled veneer, MDF panels or thin planed boards. You will find the solution to the question of how to make a wicker fence with your own hands in this article.
Arrangement of support pillars
1. Both wooden and more durable metal poles can be used as supports. To create a massive fence made of woven veneer or boards, they are buried 1.0-1.2 m into the ground. Holes for such supports can be dug manually with a shovel or made using a simple drill.Advice. Drilling into heavy clay soil is not easy. To simplify the process, you can do the following: first drill shallow holes of small diameter and pour water into them for a couple of hours. Drilling holes will become much easier.
2. You should not mount pillars on top of old ones: drilling soil filled with a layer of crushed stone or brick will be difficult. It is better to make a retreat of 0.5 m from the previous supports.
Preparing pits for supports
3. When creating a small fence, you can simply wedge the ends of the posts into in the form of stakes and drive them into the ground. To protect the tree from rotting, it is better to insert them into plastic or metal tubes.

Supports for a small fence
4. That part of the support that will be in the ground and more exposed to moisture should be treated bitumen, diesel fuel, used engine oil or any antiseptic. Wooden pillars you can simply burn at the stake.
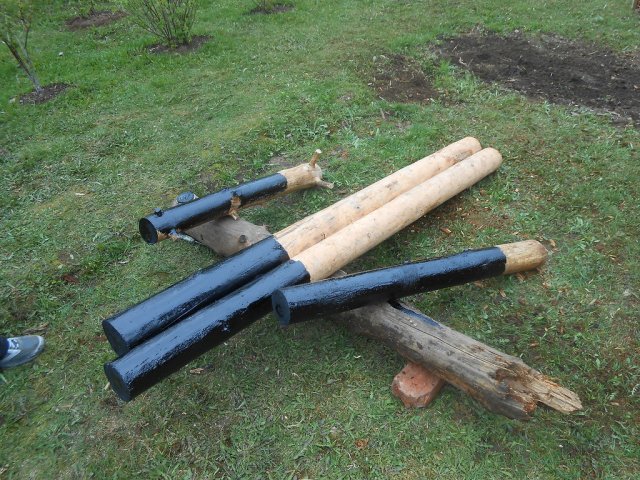
The lower ends of the pillars are treated with bitumen or antiseptic
Advice. Thin fence branches can rot quite quickly when exposed to moisture. To increase the service life of the fence, a small drainage: Dig a trench and then fill it with rocks, gravel and sand. Melt and rain water will flow through them into the ground without lingering on the surface, which will help protect the structure from premature destruction.
5. Supports should be placed a little more often than in a conventional fence (on average every 1.2 m). The distance between them depends on the thickness and weight of the branches braided into the fence. In order for the structure to look aesthetically pleasing, this distance must be the same along the entire length of the fence.
6. In order for the weaving to be more dense and durable, between thicker support posts every 40 cm are being placed intermediate columns from wooden stakes or metal rods. They may have a smaller diameter, but must be sufficiently stable and support the weight of the structure.
7. At the beginning and end of the fence you need to install 2-3 additional posts, which will act as a “lock” to secure the rods.
The distance between intermediate posts is no more than 40 cm
Fence weaving
1. For fencing, it is advisable to use only freshly cut shoots, harvested in early spring at the beginning of March or late autumn at the end of September. However, you can also give the rods the required flexibility and pliability and make it easier to remove the bark using hot water. To do this, they are soaked in it for several days.2. For fast clearing branches of bark it is better to build the so-called pincher: a structure consisting of two nails or metal rods driven into a log, the upper ends of which are bent by 10-15°. It can also be made from a strong thick tree branch.
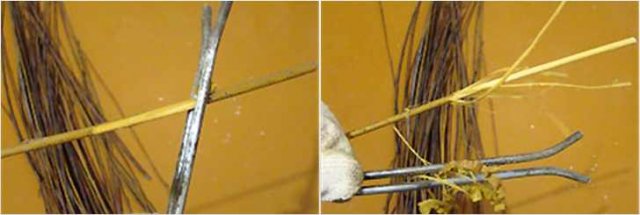
Pinch made of two metal rods
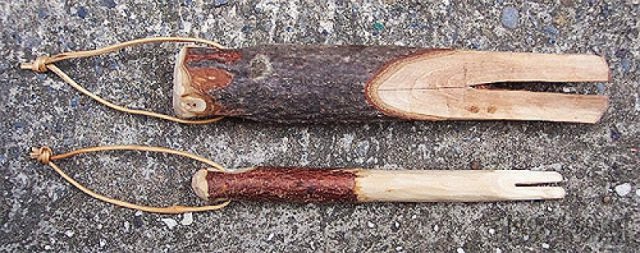
Wooden pinch
3. The branches should not be too thin: flexible shoots 2-3 cm in diameter are used for the fence. Thinner branches are located bunches. To make the fence look neat, it is advisable to select branches of the same size.

Weaving with bunches of branches
Fencing made of thin willow branches woven into a bunch
4. It is better to use as lower slats the thickest strong rods. It is better to attach them to support posts using self-tapping screws. After every 3-4 rows, the branches should be compacted by tapping them with a hammer.
Advice. To prevent the bottom of the fence from rotting, you should not lay the branches directly on the ground: you should retreat 10-15 cm from it.
5. In the simplest checkerboard weaving, the branches are wrapped around 1-2 supporting posts.

The simplest chess weaving
Weaving through two supports
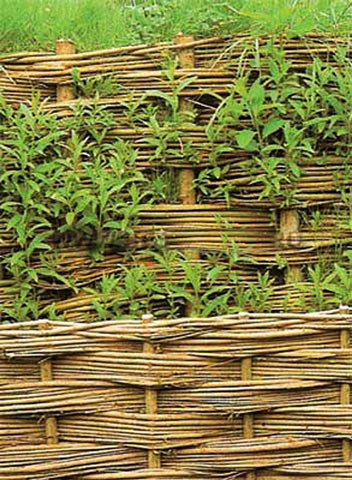
6. More complex designs can only be created from very flexible material: vines, reeds or willow branches. In this case, you can use more complex types of weaving.

Grapevine wattle
7. To increase the strength of the structure, it is better to fasten the branches every 7-8 passes wire. To prevent the twist from being too conspicuous, you should not do it at the very top, but be sure to cover it with another 2-3 rows of rods. The wire can also be passed through the entire span by securing it to support posts.
8. It is better to place the ends of the branches on the inside of the fence. The outer rods located at the end of the fence are trimmed. To make the ends of the branches less noticeable and not conspicuous, the rods are cut off slightly obliquely.

The protruding ends of the branches are trimmed
9. Branches that are too thick are difficult to bend. In this case, they can be positioned horizontally. To do this, you should first attach 3-4 horizontal lintels.

Branches can also be positioned horizontally
10. Color the branches you can use potassium permanganate or copper sulfate. To protect against moisture, decorative wicker is coated with any antiseptic, varnish or stain.

Fence weaving options
Fence made of wicker boards
A fence made of woven veneer or thin boards looks very stylish. Boards that are too long are cut so that they are enough for two spans. So, with a distance between the support posts of 2.5 m, boards measuring 5.15 m will be needed (where 0.15 m will be spent on fastening).For horizontal weaving Intermediate supports are installed between the pillars, along which the boards are passed. Their ends screwed to the main supports self-tapping screws or fastened with galvanized nails.

Horizontal weaving from boards
For vertical weaving between the main supports it is necessary to secure several horizontal jumpers.

Vertical weaving of a fence
Video: DIY wicker fence