Cellar or basement?
Reliably storing supplies throughout the winter is an important task for garden owners, so arranging space for potatoes and other vegetables must be done according to all the rules. In order to prevent the potatoes from sprouting and the lids on the jars from rusting, you will have to not only dig a hole. Ventilation, as well as waterproofing and interior finishing must meet certain requirements.
The main point from which all the differences between a cellar and a basement arise is the purpose of each structure. The basement is partially heated, so it is used as workshops, storage or other utility rooms, as well as garages, as can be seen in the photo. The structure, which is located under the house and is called a cellar, performs a different function, being a storage for:
- vegetables and fruits;
- jars of jam and pickles;
- homemade wine;
- barrels with sauerkraut, cucumbers or tomatoes.
It is necessary to maintain the appropriate temperature inside the cellar; ventilated drawers, shelves and racks are installed here, the successful placement of which is often photographed. The construction of a cellar, unlike a basement, requires less space, and its decoration can be quite simple and uncomplicated.
Is it possible to make a cellar in the basement?
If there is a cool basement under the floor of the house and the temperature in it remains relatively low even in the summer, you can allocate part of it to make storage for vegetables. This option is quite acceptable. But there’s no way to create a basement in the cellar, and you won’t even be able to find photos of such “transformations.”
To build a cellar under the house with your own hands in the basement area, you need to separate a smaller part of it with a wooden partition. Inside you will need to install shelving, make separate lighting and ventilation. To keep the cellar cool, you should install a thermal insulation layer. It is important that heated air does not enter inside, and the temperature is maintained at a level slightly above zero degrees, which is considered the optimal mode for the cellar. It is better if the storage facility has an individual descent and complete autonomy from the main basement. Finishing the cellar should include treating the walls with one of the following compounds:
- antifungal;
- slaked lime;
- copper sulfate.
For thermal insulation, choose polystyrene foam or glass insulation. In numerous photos posted on this site, you can see that the front trim is made from fiberboard or plywood sheets. To prevent soil from the cellar from entering the house, a layer of expanded clay, pebbles, or straw is placed on its floor.
Advantages of a cellar located under the house
There are many positive aspects that speak in favor of installing a vegetable storage facility directly under the house. First of all, there is no need to allocate a separate place for construction, which is especially important for small garden plots. In winter, you don’t need to dress specially to get a jar of cucumbers or a few potatoes for borscht.
If the groundwater level is high, there is no need to install a separate drainage system, which will require additional material investments. And only one pit will need to be made. It should be noted, however, that if the water level in the ground is high, it is not recommended to create a cellar located under the house, since it will be too damp, and during the period of snow melting, water will most likely appear in the vegetable storage. Although good waterproofing and underground drainage can correct the situation.
Construction of a cellar during the construction of a house
Responsible owners are concerned about the question of how to build a cellar located under the floor of the house correctly, so that no problems arise later, and its photo can be shown to friends. There can be only one answer here - it is necessary to carefully approach all stages of construction, from excavation work to the installation of shelving. This structure must be erected at the stage of laying the foundation, since subsequently dismantling the floor and digging a deep and wide hole under it will be difficult and impractical. During the construction process you will need:
- dig a pit;
- build walls;
- perform waterproofing and, if necessary, thermal insulation;
- install the ceiling and hatch;
- make cellar ventilation under the house;
- fill the floor with sand or pour concrete;
- finish the internal surfaces;
- install drawers and shelves;
- build a ladder.
To prevent a “surprise” in the form of leaking water from accidentally appearing in the cellar during a flood or heavy, prolonged rainfall, before starting to dig a pit, you will need to find out at what level the groundwater lies. You can look into the nearest wells, and if there are none, drill a well at least 2.5 meters deep and wait a couple of days to see whether water appears in it or not.
The depth of the cellar is determined depending on the groundwater level (GWL), taking into account the requirements for its minimum depth of 1.8 meters. At shallower depths:
- it will be inconvenient to stay and move in the storage;
- the air temperature will rise 7–8 degrees higher, which will affect the preservation of vegetables.
The ideal option is the distance from the groundwater horizon during a flood to the cellar floor - at least a meter. For lower values, enhanced waterproofing of the walls and floor of the building or the construction of a separate semi-underground cellar will be required. Photos of similar buildings can be seen here. The optimal depth of the cellar under the house is considered to be 1.9–2.25 meters.
The storage area for vegetables must be at least five square meters. The dimensions of the pit are determined taking into account the thickness of the walls (25–30 cm) and the cavities intended for applying waterproofing and installation on the outside of the clay castle. The walls of the cellar are made from:
- monolithic reinforced concrete;
- red brick;
- cinder blocks;
- logs
After installing a sand cushion (up to 20 cm high), laying a layer of crushed stone (10 cm thick) and a reinforced wire mesh (0.6 cm in diameter), the floor in the cellar is filled with concrete. In this case, it is necessary to maintain the slope of the base towards the technical pit intended for collecting condensate or in case of groundwater.
Then the installation of heat, steam and waterproofing of the floor and hatch is carried out. This will avoid the appearance of excessive condensation on the ceiling, the penetration of cool air and a specific smell into the house. A simple cellar decoration involves covering the walls with wood materials such as slab or clapboard. Look at the photo to see what it looks like in reality. To avoid the appearance of mold and rotting processes, they are treated with compounds containing an antiseptic.
An interesting fact is that finishing a cellar can be expensive and exclusive. For example, in the photo of wine cellars you can see that they are lined with natural expensive materials and decorated with exclusive elements. Inside there are chairs, tasting and chess tables, and audio systems. And all this, if desired, can be done directly under your home.
Waterproofing
If water penetrates into the cellar, you do not have the slightest chance of saving the harvest. But water will not be able to get inside the storage facility if its walls and floor are well insulated, and all cracks and seams are hermetically sealed.
Roofing felt glued to hot bitumen is traditionally used as waterproofing. The inside of the walls and floor can also be treated with penetrating waterproofing mastics and coating mixtures that have good adhesion. Special additives are added to modern waterproofing compounds and masonry mortars to increase moisture resistance and help create a durable layer that prevents breakouts or punctures. When choosing waterproofing, it is recommended to give preference to coating materials.
In the case of groundwater lying close to the surface of the earth, it is necessary to install a high-quality drainage system that will remove moisture not only from the cellar, but also from the entire house.
Ventilation
Installing the best waterproofing will not save your home vegetable storage from the presence of increased moisture in the absence of ventilation. The resulting condensation has a negative effect on vegetables and fruits in boxes, nets and containers. To get rid of it, you will need properly executed supply and exhaust ventilation of the cellar, the installation of which should be given special attention. Signs that ventilation is inadequate include:
- stale, heavy air;
- the appearance of mold and mildew;
- feeling of dankness and dampness.
Ventilation is installed from two sections of pipes, which are located in opposite corners of the cellar. One of them, the exhaust one, is installed under the ceiling, and the other, the supply one, half a meter from the floor. Both pipes should go out to the street at the same level, but it is allowed for the top of the supply pipe to be lower.
For forced ventilation, an electric fan is installed in the exhaust pipe. Additionally, quicklime helps remove unnecessary moisture; a bucket of it is placed in one of the corners of the building.
The cellar under the house is very convenient to use and pleases its owners in the winter season. In numerous photos posted on the Internet, you can see excellent examples of such premises. But for its proper functioning, a number of requirements must be met, including the installation of reliable waterproofing and ventilation. With the right approach, this is not a very difficult task, so you shouldn’t just place vegetables underground; it would be wiser to dig a full-fledged cellar.
As you know, our people are strong in hindsight. This statement fully applies to the situation when they first build a house, operate it, and then suddenly begin to realize that they were in vain not thinking about the basement.
And in fact, the basement under the house is a multifunctional room that allows you not only to store winter supplies, but also to store many seasonal items, garden tools, watering hoses, etc.

Of course, when the house is already built, you can’t dream of a large basement, since any excavation of the soil inside the existing foundation is extremely undesirable.
 If this is a light summer house, standing almost on the ground, then the problem is not difficult to solve, but if the house is solid with heavy walls and roof, the problem becomes more complicated. In addition, it is not possible to dig a hole for a basement under every house. For example, if the foundation is a monolithic slab, then nothing will work.
The main advantage of this method of building a basement is the ability to do all the work yourself.
Among the disadvantages are the following:

- The need to carry out all work manually due to the impossibility of using technology.
- Soil is removed through living quarters, which is not very convenient for both workers and household members.
- Not everyone can correctly install ventilation and foundation, which in the future can make it difficult to use the basement for its intended purpose, as well as lead to dampness in it.
If it is possible to make a basement during the project, you should prefer this option. The room will be much larger in area and better equipped.
There are always plenty of questions related to the arrangement of the basements of private houses, even when the construction of the basement is carried out simultaneously with the construction of the house. It is even more difficult to put a basement under a house when the building is rented out for people to live in.
Why is a basement under a residential building necessary?
The idea of building a basement under a house arises, as a rule, in cases where the reasons that prevented the arrangement of the basement during the construction of the house disappear or are eliminated, or it is simply impossible to do without a basement.
Most often, owners agree to build a basement under the house:
- Water has drained from local aquifers close to the ground surface. The groundwater level allows you to make a basement or cellar without regard to the possibility of flooding of the premises;
- There is simply nowhere to store the harvest, the existing cellar is small, and there is no way to expand or expand it, so you need to make a basement under part of the house;
- The forces of heaving and the level of soil freezing are quite high; a completed basement will partially insulate the foundation and reduce the threat of destruction of the structure of the base of the house.
Important! In any case, the construction of a basement will be complicated by the need to do a huge amount of excavation work with your own hands.
The best option would be to make a basement under part of the house, for example, on the side of the utility or auxiliary premises of the house. Digging a pit from a living room will require moving a large amount of excavated soil and dirt; it is quite difficult to do this without consequences for the situation inside the house.
The second, no less interesting way to build a basement is to make it with a separate entrance from the street. In this case, the residents of the house will be completely free from the problems associated with digging a pit.
Where and how to make a basement
For conventional strip foundation structures, building a basement does not pose any particular problem, except that most construction and finishing operations will have to be done in extremely inconvenient cramped conditions. In this case, the main thing is to make a foundation pit for the basement with wall dimensions that are at least a meter and a half short of the strip foundation.
The situation is much more complicated with shallow or slab foundation structures. In the first case, there is no point in making the basement shallow, and going deep into the ground below the level of the supporting surface of the foundation strip is dangerous; this can lead to the concrete foundation of the house falling into the basement pit.

For slab foundation structures, problems with how to properly make a foundation pit practically do not arise if, after arranging the basement, the specific pressure on the soil does not exceed its bearing capacity. The construction of any building is carried out with a certain margin of pressure on the ground, but a twofold decrease in the supporting surface of the slab after the construction of the basement can lead to a fracture of the slab mass.
Therefore, before deciding where and how to make a basement under the house with your own hands, it is worth consulting with experienced specialists in the field of foundation construction.

We are building a basement, how to make a basement at minimal cost
In addition to the safety of building a basement, every owner wants to create a basement under the house with minimal effort, labor and materials. But in this case, saving on concrete or metal is inappropriate when it comes to the safety of the entire house.
The easiest and cheapest way to make a basement is if the house structure already has a semi-basement, for example, a brick caisson with pumping equipment for a well. In this case, all that remains is to expand it and make the walls of normal height.
The arrangement of any basement is carried out in four stages:
- Initially, the position of the future basement under the building is determined, all elements are drawn on a scale sketch in order to understand where the entrance will be and how difficult it is to make such an entrance;
- A hole is dug - a pit according to the size of the future basement;
- The walls are laid out of brick or cast from concrete, the floor slab is concreted;
- The ceiling is being installed, which must be done in the basement without fail. Otherwise, water vapor will break through the ceiling.
In addition to the correct choice of the layout of the basement under the building, you will need to think about how to make a convenient staircase design along which you can go down to the basement. The simplest way is to make a stepped staircase from two steel spans. Such a staircase can be quite easily made from a tubular profile and sheet metal with your own hands and installed in the basement.

How to make a foundation pit for a basement
Today there are two ways to dig a pit under a house. Both options are widely used for arranging underground rooms and galleries.
The first method involves horizontal excavation. Before starting work, it is necessary to make a hole with a cross-section of 80x80 cm to the depth of the future basement. If there is no groundwater under the building, then you can do without a pit, otherwise you will need to make a small niche in the ground floor into which to insert a drainage pump to pump out groundwater. If the pit remains dry for three days, the pump can be removed.

To make the process of digging a pit relatively safe, you need to install a ventilation pipe and lighting into the hole. To remove soil, you can make a winch or invite an assistant; the second option is more expensive, but more reliable. It will take at least a week to dig a pit with your own hands.
The second method involves radically accelerating the digging process. To do this, the floors and insulation on the first or basement floor are removed, and the future basement is marked. The soil is drilled out with an electric drill to the required depth, after which the hole is cleaned out with shovels. In this way, a foundation pit for a basement can be made in 12-15 hours of work.
Important! The open method of digging a pit is safer and simpler; in addition, concrete work, wall finishing and laying the basement ceiling are greatly simplified.
Arrangement of a stone basement box
Regardless of whether there is water in the pit of the future basement or not, bottom drainage must be done. You can save money on an inexpensive drainage scheme, especially if the strip foundation has its own drainage system, but it is better to play it safe and lay a drainage pipe around the perimeter of the finished pit, pour crushed stone, sand, lay waterproofing and reinforcing mesh. Only then pour the concrete slab. If this is not done immediately, then when water appears, the pressure on the bottom of the concrete box will be so great that moisture will seep through the microcracks along with the liquid clay.

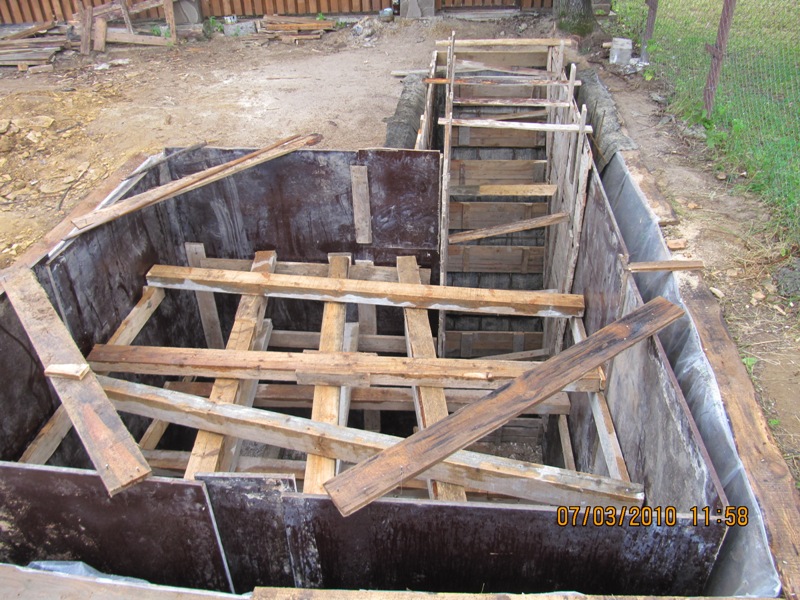
Experts recommend equipping the basement under the house in the form of a monolithic concrete box. Often, before casting a concrete box, the ground walls of the pit are lined with ceramic bricks, onto which roll waterproofing is welded. Next comes the installation of a reinforcing frame made of a rod with a diameter of 10-12 mm. First, you need to install the vertical bars and tie them to the outlet of the reinforcement from the floor slab. After this, horizontal reinforcement threads are laid out, which are tied at the corners using L-shaped bent rods 70-80 cm long.
It is better to immediately make the formwork for casting the walls with shield spacers. This reinforcement allows you to simultaneously take the required amount of concrete from the automixer. To make the formwork frame, a beam with a cross section of 100x50 mm and a regular inch board are suitable.
Pouring concrete mortar in parts is very time-consuming and inconvenient. In this case, the concrete mass unloaded into the formwork must be punched with an electric vibrator, achieving maximum compaction quality.
Two words about radon
Experts recommend making a basement not only because of the high strength and good waterproofing of the walls. Concrete is quite effective at preventing radon from penetrating into the basement. In rocky soils with low groundwater levels, owners prefer to lay out the basement with ordinary red brick, which offers virtually no resistance to radon.
Considering the deadly danger of radon and the extremely ineffective removal from basements using conventional supply and exhaust ventilation, it is still better to make the basement box in the form of a monolithic concrete casting.
Ceiling assembly
Making a ceiling slab is considered one of the most difficult stages of construction. Initially, supply and exhaust ventilation pipes are installed on the walls of the concrete basement box and wiring for lighting is installed in special hoses.

Fasteners are driven into the walls for mounting a metal staircase. After this, the location of the entrance is determined and a steel or wooden door or hatch frame is installed.
Next, you need to make a steel reinforcing frame for the floor slab; for this, a standard reinforcing bar with a diameter of 12 mm is used. One of the ways to make a slab involves rolling a continuous row of asbestos-cement pipes onto concrete walls; after laying the reinforcement and formwork, the entire structure is filled with a layer of concrete 120-150 mm thick.
An easier way to make a slab is to cast it on the walls in parts, in separate slabs up to 50 cm wide. For this, adjustable reusable metal formwork and four rack jacks are used. After completion of the work, the joints between the slabs must be filled with concrete mortar.
Conclusion
The technique for constructing a basement under a finished house is not particularly different from the technology for constructing a conventional basement. The only obstacle in the work, due to which the construction time is at least doubled, is the inability to fully use special equipment. In addition, a large amount of manual labor significantly increases the cost of work. Today, a team of builders will charge at least 5 thousand dollars for the construction of a concrete basement under a residential building, while the usual option is built for 2-2.5 thousand dollars.
In our country, suburban housing has, which are usually used for gardens and vegetable gardens. A spacious and dry cellar in the house is necessary to preserve the harvest. An office space for this purpose can be equipped in a garage or shed. It is also possible to build a separate structure. The final decision on the location of the cellar should be made based on the results of a study of the house and land.
For which specialists from design organizations are involved. In order to save money, you can do it yourself and conduct research on the soils and hydrogeological conditions of the area yourself. A good result is obtained by interviewing neighbors and inspecting their cellars or basements.
When studying site conditions, you should pay attention to the following points:
- soil composition, depth of soil layers, tendency to accumulate moisture and heaving;
- groundwater level and the height of its rise during snow melting or intense precipitation;
- average depth of soil freezing.
This data will be necessary in the process of choosing the most optimal type of cellar for the given conditions and the method of its construction. Specialists use the obtained data in the process of design, calculation and estimate work. The best option for the homeowner is, without a doubt, a cellar under the house with an entrance from the interior. It is better to lay such a structure at the construction stage. The option of constructing a buried structure during the reconstruction process is also possible, but it is quite troublesome and time-consuming.
 Small cellar
 Basics of cellar design
A country house with a basement equipped for storing supplies is being built taking into account the requirements of SNiP 31-02-2001 and SNiP 2.08.01-89, as well as RSN 70-88. Regulatory documents define the geometric dimensions of residential and office premises. When equipping cellars, special attention is paid to the issue of waterproofing the walls and floors of buried storage facilities, as well as the necessary air exchange.
The main task that is solved during the construction of this room is to ensure a relative constant temperature at 8-12 °C with low air humidity.
During the design work it is necessary to provide. In the vast majority of cases, a vertical duct with an external exhaust pipe is sufficient. This method of air exchange does not require complex equipment or any operating costs.
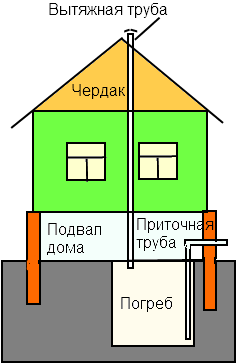 Cellar ventilation diagram
 A cellar in a private house is designed taking into account the overall size of the building. When making calculations, the following points should be taken into account:
- It is recommended to locate the storage facility near the geometric center of the building at an equal distance from the outer contour of the foundation.
- The depth of the cellar is selected taking into account the groundwater level and the degree of seasonal fluctuations.
- In the process of design activities, such a factor as soil composition must be taken into account.
The central placement of the cellar minimizes the impact of temperature fluctuations due to the cooling of soil masses and their freezing during the onset of cold weather. It is good if the entrance to the service premises is directly from the house - this will significantly reduce heat loss. For the convenience of residents, it is recommended to install a stationary staircase with a flight inclination of no more than 45 ° and a step width of at least 200-250 mm.
 Drawing and diagram of the construction of the simplest cellar under the house
 Cellars are classified, first of all, according to the degree of their deepening, which, in turn, depends on the level of groundwater fluctuations:
- Underground structures are built when water layers are lower than 3-3.5 m or under houses located on a hill.
- A semi-buried cellar is erected when the depth of soil water is no more than 0.8-1.2 m from the surface.
- Above-ground storage facilities are constructed in areas where there is no possibility or use of underground or semi-underground premises due to the high probability of flooding.
Read also
Installation of a boiler room in the house
The choice of a specific type of cellar should be based on objective data and the results of long-term observations.
 Cellars can be made in different designs
 How to make a cellar in your home with your own hands
Preparation for the construction of an underground storage facility under a residential building
At the stage of laying the foundation, it is necessary to mark the pit and dig it. Excavation work is carried out in compliance with rules and safety measures. The total depth of the pit should be about 2.7-3 m, and the diameter should be at least 2.5 m. The round shape for a buried structure is optimal and ensures its maximum strength. On the other hand, rounding a wall requires quite high qualifications from the mason.
Another option is the construction of monolithic walls made of concrete reinforced with steel or composite rods. This technology can ensure maximum resistance of underground structures to external mechanical loads. To make a cellar in a house correctly, you should evaluate your financial capabilities and practical skills in performing construction operations.

The choice of a specific technology for the construction of an underground structure will allow an assessment of the required amount of building materials. To build load-bearing walls we need red brick. The amount of material is calculated based on the minimum thickness of the wall, as they say among professional masons, one and a half bricks. When choosing a brick, special attention should be paid to its quality.
In this video you can see how to build cellar walls with your own hands from bricks
For underground structures, the use of bricks of heterogeneous composition, having deep cracks or inclusions is unacceptable. Construction material must be stored in proper conditions. Prolonged exposure of bricks to high humidity conditions can lead to a deterioration in its qualities and properties. When purchasing materials, you should ask the seller for certificates of conformity.
The walls of an underground storage facility must be built on a reliable foundation. Typically, the role of the base is performed by a reinforced reinforced concrete belt at the bottom of the structure. It is quite possible to build a cellar in a house with your own hands, especially if you strictly follow the construction technology.
Waterproofing floors and walls
Buried structures require high-quality protection from moisture penetration through building structures. The most likely ways for water to enter a cellar or basement are:
- the presence of through gaps;
- violations of technology during bricklaying;
- penetration of moisture through capillaries in an array of building materials;
- the formation of condensation on walls or other surfaces due to temperature changes or insufficient air exchange.
Typically, waterproofing of walls, floors and ceilings is done using roofing felt. It is recommended to lay this roll material in two layers. The overlap of the sheets should be at least 10-12 cm, and each subsequent row should be laid perpendicular to the previous one. Under the waterproofing it is necessary to pour a gravel-sand cushion with a thickness of at least 100-150 mm.
 Scheme of the cellar waterproofing device
 It is possible to correctly build a cellar under a house with high-quality waterproofing of the walls during the process of laying the foundation.
In this case, the work will not be interfered with by other structures and elements of the building. During the construction of walls, bitumen mastic is applied to their outer surface, onto which, in turn, roofing material is glued. When performing this operation, the sheets are arranged vertically with an overlap of 8-10 cm.

The floors in the cellar are poured with mandatory reinforcement with a two-layer steel coarse mesh. The screed is filled with a cement-sand mixture with the addition of a fine fraction of crushed stone as a filler. The mixture is prepared on site by hand or using a concrete mixer. It is possible to order concrete from a specialized enterprise with delivery to the work site by vehicle with the appropriate equipment.
 Scheme of correct filling of the floor in the cellar
 Overlapping device
As soon as the load-bearing structures of the walls and floor are ready, you can begin to build the ceiling above the cellar. Taking into account the fact that the structure is of a recessed type, the best material for the floor would be a reinforced concrete slab. The calculation of the required number is carried out taking into account the length and width of the structure. When laying floor slabs, heavy construction equipment is used - a crane on a vehicle chassis.
Read also
House roof heating system
 Cellar floor plan
 Another method allows you to do without lifting mechanisms. Building a cellar in a house using this technology involves casting a floor slab directly on site. Wooden formwork for these purposes is made from boards with a thickness of at least 40-50 mm. It is strengthened by horizontal beams and vertical posts that rest on the floor.

Construction of stairs and entrance equipment
A visit to the cellar located under the house can be organized in two ways: through a hatch in the ceiling of the cellar or along a normal staircase. Calculation of a straight flight with a step length of 20 cm and a height of 250-300 mm shows that its horizontal length with a slope of 45 ° will be equal to the height. A doorway is installed in one of the walls, in front of which a rectangular platform is arranged.
 Simple wooden staircase
 A flight of stairs is installed along the outer surface of this wall, resting on one side on it, and on the other on an additional partition. The steps of the stairs can be cast from concrete and reinforced with a mesh of rolled steel or made from a metal profile. The use of wood is undesirable due to the high probability of damage by fungi or other pests.
 Drawing of a complex concrete staircase leading to the cellar
 A doorway with a door leaf that opens outward due to the relatively small size of the cellar is installed in the wall opening. Doors must have seals to prevent heat loss and temperature fluctuations. The process of making a staircase and installing it is quite complex.

Ventilation in the basement or cellar
To organize high-quality air exchange, it is necessary to install two vertical pipes. One of them serves as an exhaust hood, and the other is necessary for the flow of fresh air. Air is taken from under the ceiling and supplied closer to the floor. In order to create maximum draft, the duct should be installed above the roof ridge. Natural ventilation of the cellar is made with minimal cost and investment.

The air ducts in the upper part are covered with metal mushrooms to prevent the ingress of precipitation. As air ducts, you can use steel or asbestos-cement pipes with an internal diameter of over 150 mm. The deflectors are made of galvanized steel sheet, 0.55 mm thick, and are fixed to the end of the pipe using a clamp and support posts.
The inside of the cellar must be plastered and treated with a special antibacterial primer. Instead, ordinary slaked lime can be used, which provides the necessary protection against the formation of colonies of pathogenic fungi on the walls. Experts do not recommend covering basement walls with clapboard or wood-based composite materials. In the gap between the wall and the facing panels, air stagnates with the formation of condensation.
To begin with, it is worth distinguishing between the concepts of basement, cellar and ground floor. The first room is part of the foundation; it is completely below ground level and is often adapted for the placement of communications. The ground floor is also called the “semi-basement”. This is a special room that rests on a foundation and is only partially buried in the soil. It is often equipped for garages and storage rooms. A cellar (underfloor) can be either a separately constructed building or the basement itself. It is usually used to store household equipment, preparations and vegetables for the winter. Basements have no windows, no natural light enters them, and thanks to the thermal insulation properties of the soil, the same temperature is maintained at any time of the year. After construction, they are rarely finished; they are left in rough form, since unnecessary work is associated with additional expenses. In many private houses, basements occupy an impressive area, which sooner or later the owners think about converting. As you know, nothing is impossible, so let’s find out in detail what work needs to be done to “domesticate” this room.
How to make your basement comfortable
A basement will only become comfortable if all work on its construction and finishing is carried out in accordance with generally accepted standards. Then you won’t have to go out every year in a “death battle” with mold, remove frost from jars of pickles in winter and sort frozen vegetables. To make the premises suitable for habitation, several stages of work must be completed:
- Carrying out heating, ventilation systems and electrical wiring. Unfortunately, you won’t be able to stay indoors for a long time without batteries, even in the summer; if there are no outlets, the use of equipment is impossible, and neither guests nor owners will want to breathe stagnant air;
- Finishing. In this case, we are talking about the use of especially durable heat and waterproofing materials that will help reduce the percentage of humidity and stabilize the temperature;
- Selection of furnishings and room design.
If no mistakes were made during construction and finishing, then the room will be no different from an ordinary living room in a house.
We plan at the design stage
Those who are building a house face many questions: from the number of floors of the house to the need to arrange a basement in it. The latter will significantly increase the cost of the work, but additional space will never be superfluous either at the dacha or in the cottage. In addition, basements strengthen the foundation, which is especially important in those regions where outbreaks of increased seismic activity are observed. Any construction must begin with a soil survey. Its composition on the site and the depth of groundwater will matter. Depending on these two indicators, the type of foundation is selected, and, accordingly, the features of the basement:
- Monolithic (tiled);
- Tape.
The second type is suitable for deep-lying waters and soil that ensures the stability of the building. Monolithic is a solid slab. It is used for more monumental structures in places where the groundwater level rises above the critical level - 2 m, and the soil is loose and consists mainly of sand. Construction traditionally begins from the basement. The first is to dig a pit, lay the foundation, and arrange a blind area. There are two main technologies for building a basement:
- With the preparation of the pit;
- With preliminary pouring of strip walls (reinforced concrete).
Availability of basements
The entrance to the basement should also be present on the building design. There are only three options for its location:
- From the street;
- From home;
- Combined option.
In the first case, the basement will be considered as a completely independent room. Often closets are equipped with such an entrance, because gardening equipment is inconvenient to constantly carry through living rooms, staining the floors with earth. The entrance from the house is equipped for constant access to food supplies or to the living space. Doors can be wooden or metal. If the exit leads to the street, then it is better to choose a more durable and strong material. Metal will cope with this task better than wood. The second is chosen for interior doors, which are installed at the exit to the house. By type of execution they are classified into:
- Deaf;
- Panel;
- Paneled;
- Stained glass.
The latter must be purchased from heavy-duty glass. If the basement has not been renovated for living, then to avoid dampness or cold from the “dungeon”, choose double doors or combined with cladding. In some basements there are two exits at once: one to the residential part of the house, and the second directly to the street. In the first case, an interior door is used, and in the second, an entrance door.
How to finish
Before you start decorating, you will have to go through a difficult stage of rough work. It is not so pleasant, but without proper finishing the room will not have ventilation, communications and heating. The base of the future flooring, or screed, as builders call it, is created first. In a monolithic foundation, concrete is impregnated with special solutions, which, upon contact with moisture, crystallize and tightly “seal” the floor. If a tape-type base has been laid, then a real “layer cake” made from materials is laid on it:
- Sand cushion;
- Roofing felt layer;
- Reinforcing mesh.
And only the screed is laid on top. After the rough stage of working with the floor is completed, it can be safely covered with laminate, linoleum, parquet or ceramic tiles. The choice of material depends on the room design project. If the basement will be used for living, then a heating system will be provided between the flooring and the screed, which will ensure regular heating.
The walls are primed several times before final finishing. Two or three layers of antiseptic composition will not only improve the “adhesion” between the surface and the material, but will also reduce the risk of the formation of fungi and mold. In the future cellar or pantry, the walls are simply plastered or lined with wood panels and moisture-resistant plasterboard. The latter can be painted in the desired color if necessary. It is better to use mineral-cement plaster, as it is more resistant to moisture than its lime and gypsum counterparts. The wood will have to be treated with special solutions that will stop the processes of decay and the spread of fungus. In residential premises, insulation is carried out with mineral wool, and on top of the plaster the walls are finished with PVC panels, wallpaper, wood, plasterboard, or simply painted.
The ceiling in the basement plays an important role, especially if the room is being restored, and was previously used to carry out numerous communications. The hanging option will help you cleverly “hide” all this splendor from pipes and wires, but at the same time leave constant access to them if necessary. Unfortunately, this method is not suitable for basements with low ceilings, because its frame will “eat up” too many precious centimeters. In this case, it is better to resort to moisture-resistant drywall. In high basements, you can make a multi-level ceiling from this material, which will become the highlight of the interior. In simpler versions, the surface is primed and plastered.
The corners and all joints of surfaces in the basement must be coated with the waterproofing solution, which is used to impregnate the base to create the screed. This way you can protect the room from dampness and mold.
Lighting
The wiring in the basement must be well insulated, as high humidity can play a cruel joke on the owners. If we are talking about a pantry or cellar, then even ordinary light bulbs will not fit here. It is necessary to choose special ones with a high level of moisture protection. This also applies to sockets: their design includes special caps that prevent liquid from getting inside. In residential basements, the lack of windows will have to be compensated for by numerous lighting fixtures, which are located at different levels. If your ceiling has several “steps,” then the point light sources built into them will become an interior element of the room, emphasizing its style. A chandelier or several equidistant from each other must be hung at the top if there are two (or more) combined platforms in the room. Sconces are attached to the walls, lamps are placed on tables, and floor lamps are placed on the floor.
A fireplace will bring a special flavor to the basement room. Its installation will be expensive, since due to the nature of the room you will have to hire a professional. The average person will not be able to cope with the task with his own hands. It is difficult to consider a fireplace as a source of light, but it is definitely a “source” of warmth and comfort in the atmosphere of the room.
Ventilation
Regardless of what needs the basement will be used for, air exchange must be established during construction. Even if the finishing of the room was done correctly, with the walls impregnated with special solutions, if air circulation is disrupted, moisture will stagnate. Unfortunately, this is fraught with the appearance of fungus and mold. Spores of the latter can enter the lungs along with the inhaled air, multiply there and provoke a number of chronic diseases, some of which are fatal. Ventilation systems in the basement are classified into two types:
- Artificial;
- Natural.
The latter are suitable only for “cold” basements, which no one plans to equip for living quarters. Natural ventilation is a simple pipe system that connects a room with the street. The air circulates freely in them. Artificial or forced ventilation systems pump fresh air into the room from the street, and pull stale air out of it. Modern split systems are able to regulate the level of humidity and temperature within the regime set on the control panel. Such “smart” ventilation will eliminate many problems and become a universal “climate control” in the basement of a private house.
How to keep warm
To get a high-quality insulated basement, act in two directions:
- Conducting a heating system;
- Insulation of the “box” of the room: walls, ceiling and floor.
Heating systems will artificially increase the temperature and pump in heat. The task of insulation materials is to hold it for as long as possible. The quality of finishing and heating system directly affects the microclimate in the basement.
Basement options
The basement is adapted to a variety of needs depending on the needs of the owners. In most homes, this room has impressive dimensions, which makes dreams of spacious areas for play, entertainment or work come true. Most often they create from the basement:
- Gym;
- Wine cellar with tasting area;
- A miniature bar for gatherings with friends;
- Swimming pool or sauna;
- Workshop for work;
- Laundry room for washing and ironing things. Relevant if the family is large;
- Billiard room combined with a darts and table tennis area;
- Games room;
- A greenhouse for growing vegetables or mushrooms. A kind of small household that doesn’t care about winter;
- A music studio with good sound insulation;
- Additional room for guests;
- Library and miniature reading room.
Place to rest
A place to relax in a spacious basement usually includes several functional areas:
- Reading corner;
- Bar counter for those who want to have a glass or two of wine;
- A platform for active games, and if dimensions allow, then even a miniature dance floor;
- Movie viewing area.
In small rooms you will have to limit yourself to one or two most important areas. The decoration of the basement room can be complemented by a cozy fireplace and firewood. They look especially colorful in rooms decorated in the now popular chalet style. The furnishings of the room have references to a holiday home, which is lost in the Alps, far from the bustling world. The chalet loves the abundance of wood, animal skins (imitation), brown-honey color scheme. Of course, the Alpine style is difficult to implement without the presence of panoramic windows with views of the mountains, but they are compensated for by false panels and an abundance of lamps of simple shapes. The fireplace is an integral part of the chalet. It is decorated with stonework or brick, and the fire doors are decorated with intricate ligature or ornaments, which are reflected in wall decoration and textiles. Please note that there should not be too many patterns; monotony prevails in the chalet.
In cottage houses, the basement is often equipped with a full-fledged mini-cinema. Films are viewed both on a modern large-format “plasma” of impressive dimensions, and on a white wall using a projector. The last option fits organically into the retro style. Seating can be arranged in several ways:
- Single chairs arranged in rows;
- Full-sized chairs with common armrests, like in real cinemas;
- Several sofas placed one after another.
The latter option allows, if necessary, to use the room for other recreation, therefore it is considered universal. A simple but sophisticated loft is suitable for a stylish cinema.
A small basement can be converted into an individual room “for books”. The racks are installed solid: from the ceiling to the floor. A cozy place for reading or working is created in the corner. A soft sofa with a couple of pillows, a table and a couple of poufs for guests is enough. If you decide to place all your book treasures in the basement, then pay special attention to the fight against humidity. Over time, the paper may “bloom” in the bad sense of the word, and you risk losing your entire library.
Playroom for children
A residential basement is a gift for owners of a home “kindergarten”. If you arrange it tastefully, it will be difficult to pull the kids out of there. One area is allocated for creative activities: there are tables with chairs and a rack with kits for drawing, modeling, wood carving, modeling or creating crafts. Another area is designed for active games: table hockey, tennis, twister, trampoline, ball pool, rock climbing, children's darts. The third zone will be equipped as a resting place for children and an observation post for parents. On another site they usually embody a fairy tale for girls: with miniature castles, artificial trees and other attributes of the “kingdom of dreams.” Boys are given the opportunity to entertain themselves with construction kits and car racing on special tracks.
Gym
Spacious home basements are ideal for organizing a personal gym. For residents of cramped apartments, this dream remains unfulfilled, but owners of country houses are given a unique opportunity to realize it in their homes. The room is sparsely decorated, without skimping on mirrors. Just like in a real gym, there should be a lot of them, so that a person can see not only the result of working on the body, but also problem areas that still have to be worked on. When installing exercise equipment, maintain the recommended distance between them to avoid injury hazards.
