An element of a door frame, a functional design that is designed to hide the joint between different floor coverings and differences between unequal floor levels, as well as to improve the interior, is called an interior threshold. This part is usually installed near the entrance door to an apartment or house, between rooms, at the entrance to the kitchen, bathroom, or in the hallway. Some owners place anti-slip profiles on the steps of the stairs. The article will discuss how to install interior thresholds.
Interior thresholds are an interior detail that is most susceptible to loads and mechanical stress, since it protrudes several millimeters above the surface of the rest of the floor covering. Therefore, the choice must be taken responsibly.

Advantages and disadvantages of interior thresholds
Advantages of interior thresholds.
- A massive wooden door absorbs noise, and the threshold also copes with this task. To achieve greater effect, you need to choose a threshold box that is equipped with a rubber seal.
- Protection from dust and drafts entering the room.
- In case of a small flood in the bathroom, the threshold creates an obstacle to the overflow of water; in case of significant flooding, this design will be useless. To prevent the threshold from becoming unusable after a flood, a stone structure should be used. To prevent high humidity in the bathroom, you can opt for a box without a seal.
- When preparing food, the threshold will protect other rooms from the penetration of burning and smoke from the kitchen.
Disadvantages of thresholds.
- Classic thresholds protrude above the floor surface and often cause falls, especially for children who forget to step over them.

- Some floor coverings, such as laminate or linoleum, look more harmonious without any thresholds in the opening.
Materials for the manufacture of interior thresholds
Before you begin to install the structure, you need to decide on the choice of material from which the thresholds will be made. The choice is huge.
- Metal interior thresholds. Metal is the most commonly used material for the manufacture of interior thresholds. They can be brass, aluminum, steel, bronze and even stainless steel. Each material has its own distinctive features, but all of them can be used outdoors, as they are weather resistant. These metals are difficult to oxidize, which means they will not rust or collapse underfoot.

- Steel. Thresholds made of this material are quite durable and resistant to any type of mechanical impact; painted or anodized elements are available for sale.
- Stainless steel. The products are rarely used for installation on the floor surface; they are more often used for finishing walls and furniture, since they have a silver color and a glossy or matte finish.
- Bronze. This is an expensive material, the thresholds from which are made only on individual orders; they are not commercially available. Thresholds are made from aluminum in a “bronze” look; they are available to everyone.
- Brass. Durable, golden-colored thresholds are made from this expensive and quite valuable material.
- Aluminum. Reliable and lightweight products are made from an alloy of various metals, in which aluminum predominates. They have an unlimited service life and an affordable price.
To add color to metal thresholds, they are usually painted, laminated, or anodized. A profile made of steel and aluminum is coated with plain paint or imitated wood. In addition, the aluminum profile is laminated, that is, covered with a durable film that copies the appearance of stone, wood and other natural materials. Anodized thresholds come in three colors: silver, gold and bronze. The painting procedure is carried out by passing a current through water in which particles of the dye are diluted and the product itself is located.
- Wooden interior thresholds. This is the most common option. It is recommended to use oak. Since it is the most durable and wear-resistant type of wood. Oak thresholds are suitable for any floor covering, but are quite expensive, require systematic maintenance in the form of painting or varnishing, and are short-lived.

- Plastic interior thresholds. Plastic products are an average option in terms of durability between metal and wood; they are attractive due to their neat appearance, variety of colors and affordable cost. But over time, they require replacement, as they can burst as a result of intense mechanical stress.
- Interior thresholds made of laminate. Most often they are used in combination with a similar material covering the floor surface. It is capable of gradually deforming in conditions of high humidity.
- Concrete interior thresholds. This non-shrinking material is used to make a threshold when exiting to a balcony or from a house. Various substances are added to concrete to make it flexible and durable.
Types of interior thresholds
- Flat or overhead thresholds are a metal or plastic plate that can have a variety of shapes; it closes the gap between different types of flooring (tiles and linoleum, carpet and laminate). It is attached from above, which is why the plate is called an overhead plate.
- Multi-level or transition thresholds are designed to hide the transition from one floor covering to another if they are located at different heights (from 3 to 15 mm). Most often, such elements have a rounded shape or a turned corner configuration.
- Corner thresholds, among which aluminum is the most reliable, are used to trim the upper corners of the steps. Thresholds come in various lengths, widths and colors, which makes it easy to choose the right option. Most often, they have a perforated surface, which provides better traction with shoes and does not allow a person to slip on the steps.

- Flexible thresholds are made from hypoallergenic and safe plastic, which becomes elastic when exposed to high temperatures, and after cooling hardens, acquiring the desired configuration. This material is quite strong and resistant to mechanical stress and has moisture-proof properties. Such thresholds cover joints and mask differences in floor coverings. They are used to go around columns, pedestals and podiums, to decorate niches in walls and arches, and to protect the most vulnerable places from moisture.
- T-shaped universal thresholds have different widths, colors, good flexibility, which will allow you to create radial transitions between coverings, and hidden installation of profiles; they are completely smooth and practically imperceptible underfoot.
- Thresholds with open fastening are most often made of metal, less often of plastic. They require the presence of holes for attaching the profile to the floor surface, which are drilled every 15 cm and have a cone shape so that the heads of the screws do not protrude above the surface of the threshold and do not cause discomfort to the feet. Even a novice repairman can handle the installation.
- Thresholds with hidden fastening are plates or corners without holes for screws; their fastening system is hidden under the threshold itself; it independently adjusts to the possible difference, if it does not exceed 15 mm.
- The latest idea is the anti-threshold, guillotine or “smart threshold”, which is a U-shaped aluminum profile with a spring device and a rubber seal inserted into the end of the door block from below so that it is not visible when the door is open. At this time, it is recessed inside the canvas. When the door is opened, the guillotine automatically silently moves down and closes the gap between the floor and the door. This design provides noise and heat insulation, absence of drafts, and self-leveling on uneven floors. In addition, the threshold does not interfere with free movement around the room, its design is safe and easy to use and install, affordable, and can be used in combination with any doors. The guillotine is not suitable for hollow doors, since it must be cut to a depth of at least 20 mm, and the additional carpentry work for installation is perhaps the only drawback.
Removing floor thresholds
- Before laying a new covering on the floor surface and hiding its joints under the threshold, you should dismantle the old thresholds.
- For this procedure you will need to use a crowbar, a hammer and a hacksaw. First of all, you need to saw off the edges of the threshold and knock out its middle. The work must be done very carefully, otherwise there is a risk of damaging the door leaf - it may become askew.
- The remains of the old threshold are loosened by placing a crowbar under them. If necessary, the crowbar is driven deeper with a hammer. Loose pieces of the threshold can be easily removed from under the door frame.
Do-it-yourself installation of interior thresholds
There are several ways to attach interior thresholds. But they all start with an accurate measurement of the length of the joint that needs to be covered. After that, the resulting value is marked on the threshold and the excess is cut off with a grinder or hacksaw.
- Installation of thresholds with open fastening quite simple to implement. For this purpose, profiles with existing holes drilled at the same distance are used. You need to attach the threshold to the floor and mark the places where the screws will be inserted. Drill holes of the required size according to the markings, attach the threshold and secure it with screws. It is important not to make too large holes, otherwise the screws will eventually become loose and fall out. If the gap between the coatings is wide, it is closed with a suitable threshold. Self-tapping screws with decorative caps will not stand out too much against the background of the profile.

If the junction of two floor coverings is at different levels (from 3 mm to 2 cm), you can use a wide threshold, which is attached at an angle, or a transition (multi-level) profile.
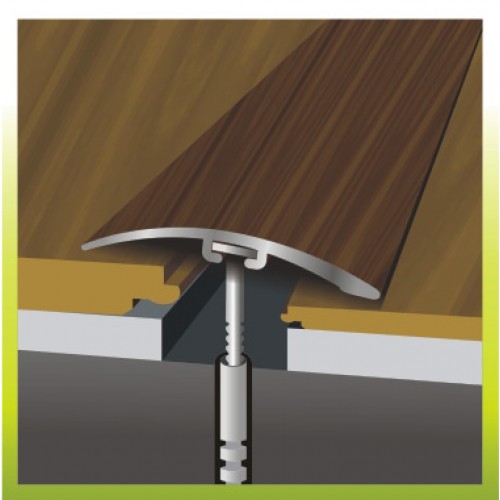
- For aesthetic reasons, consumers much more often choose interior thresholds with hidden fastening system. These can be strips with internal floating holes for screw heads or a special profile that consists of two parts: a T-shaped threshold and a rail.

- To attach the plank, you must first drill holes in the floor according to the markings and insert plastic dowels into them. The self-tapping screws are carefully threaded through the caps into the holes on the plank, after which it is turned over so that the fasteners fit into the dowels. You need to put a little pressure on the bar and fix it by lightly tapping it through a layer of paper with a hammer.
- To attach the T-shaped threshold, the required number of holes are also drilled in the floor into which dowels are inserted, after which the strip is attached to the floor using self-tapping screws, and the upper decorative profile is glued or snapped on top.

- Increased attention will need to be paid to installation thresholds in the bathroom, since most often the floor in this room is tiled. There are special thresholds for sale for such finishing material; they do not allow moisture to penetrate into adjacent rooms. Also an excellent option would be to use a guillotine threshold.
- to install interior door threshold on concrete floor, you will need a hammer drill to drill holes for the dowels. First, markings are also applied to the floor, after which the final installation of the threshold is carried out by tightening it with self-tapping screws.
Installing an interior door threshold video
In addition to aesthetics, decorative interior thresholds also carry a functional load. Installing interior thresholds not only gives the floor a finished look, but also prevents the accumulation of dirt and moisture from getting between the coverings, and also protects the edges of linoleum and carpet from bending and fraying.
It would seem, what could be steps in the apartment , and why are they actually needed? It turns out that they are necessary, because they allow you to differentiate the floor levels of rooms, creating certain accents on the functional areas of the room. Some steps between rooms have become almost classics of country houses, regardless of the style of the interior. This design solution has long had a lot of fans, since differentiation of the floor level helps to find an unusual solution for interior design and diversify the living space.
This floor looks extremely impressive in a free and spacious room. Openness is best emphasized by 2-3 steps between or between the hall and the living room. As for the existing differences in floor levels, which the steps hide, giving the room an aesthetic appearance, very often they are formed during an expansion, some kind of reconstruction or combination of living space. In houses, such differences can occur when the basement is installed only under part of the building or when it is located on a hillside.
How many steps to make
 Undoubtedly, this is a rather important question. Arrangement only one stage is not always reasonable, as it can lead to many traumatic situations, since it is often quite difficult to see one step. In addition, it does not look like a finished object and is something awkward and random. It is widely believed that two steps difficult to overcome, which is why they usually arrange three steps. Five steps is already too much, since the distance between the floor levels will be too large (about a meter). In addition, the construction of five steps will “steal” too much free space in the room.
Three steps are the best option, since it is quite easy to overcome a distance of 45-50 cm, and the entire structure will not lose its aesthetic appearance. Of course, the number of steps should also be determined by the difference between the floor levels. If the distance between floor levels is 35 cm, then the number of steps will be two, regardless of your wishes. It is worth noting that the staircase, although small, takes up quite a lot of space. So, 3 steps will “steal” at least 60 cm of your floor in a straight line. In addition, there should be free space immediately in front and behind it at a distance of approximately two steps. It is necessary to follow this rule in order to avoid bumping into furniture just after descending from the steps.
Ladder is an additional element of the interior, and it should not be conspicuous or dominate. Moreover, a structure that is too large will take up a lot of free space, which is completely unnecessary. When installing a staircase structure, you should correlate it with the door opening next to it. So, it must be clearly correlated with the door opening towards it, otherwise unnecessary interference may be created. As for the swing door, it is necessary to leave free a distance equal to the width of the door, that is, about 80 cm. In addition, do not forget that a person must still fit in front of the door. For safety reasons, it is also necessary to provide a sufficient amount of free space for him, otherwise he risks simply falling down the stairs.
Visual effects using steps
 Differentiating floor levels in different rooms makes the living space more interesting and attractive. In this case, the following rule applies: utility and utility rooms are located at a higher level. This allows you to visually increase the height of the ceilings in the adjacent room, for example, in the living room. In the open space of the room, the difference in floor level, when it is lowered or raised, helps to emphasize the allocation of functional areas.
So, the fireplace corner can be placed in a niche located slightly below the floor level in the entire room. The area of the fireplace corner will be determined by the ledge made. The location of the kitchen table on the rise allows you to highlight the dining area, which does not require walls or. The absence of a wall does not prevent this space from being perceived as a dining area.
A desk located at the level of three steps, shelves with books, an armchair and a computer make it clear to us that a library or workplace is located in this area. In addition, the staircase can serve as a separator between the living room and the private parts of the apartment or house.
Floor ledges can be a starting point for the implementation of original and interesting design solutions. So, on the steps themselves you can equip a seating area or a small flower garden. The placement of a large tabletop on both sides of the steps is an extremely functional and interesting solution, since on one side it can serve as a dining table on the kitchen side and a bar counter in the living room, which is located one level below.
Disadvantages of building steps in a residential area
 As already mentioned, the construction small staircase in a living room
- This is an original and functional solution that has many supporters, but it also has many opponents. Firstly, not everyone is eager to climb the steps between rooms several dozen times during the day (or even more). Not everyone is ready to storm the steps between the kitchen and living room with a cup of hot coffee or tea. This is especially difficult for an elderly person, not to mention a baby who can only crawl. For him, the staircase structure will be just another source of danger.
As already mentioned, the construction small staircase in a living room
- This is an original and functional solution that has many supporters, but it also has many opponents. Firstly, not everyone is eager to climb the steps between rooms several dozen times during the day (or even more). Not everyone is ready to storm the steps between the kitchen and living room with a cup of hot coffee or tea. This is especially difficult for an elderly person, not to mention a baby who can only crawl. For him, the staircase structure will be just another source of danger.
However, in addition to the possible difficulties associated with overcoming steps, there may be other negative consequences of constructing steps. Thus, the space formed and zoned with the help of a staircase is subsequently much more difficult to change than a standard interior. Functional areas separated by steps will remain so, because, for example, it is unlikely that it will be possible to increase the size of the kitchen, which is due to the difference in floor levels. The presence of ledges in the floor will not allow you to swap the TV corner and, for example, the library, since the ledges determine the space allocated for a certain area.
Thus, those who like frequent rearrangements and repairs are not recommended to create. The psychological aspect should not be discounted either. Not everyone will like to sit in the living room with someone looking down on them from the kitchen. So, construction stairs in the interior – an original design solution, which, however, requires a serious and responsible approach. But if you nevertheless decide to acquire several steps in the interior space, then, with the right approach, you will acquire a functional, practical and aesthetic element of the interior.
Design by "STEAM REMSERVICE"  Here the podium is an expressive architectural element made of expanded clay concrete, on which there is a living room with a small dining room. Its end is finished with contrasting black porcelain tiles of the Micron series from REVIGRES (Portugal, 41/m2) and equipped with LED lamps from WALLWASHER (Germany, 50/pcs.)
In the minds of most people, the podium is associated with a fashion show, and the structure itself appears large and long. Is it possible to have a podium in an apartment? What is a podium anyway?
 "VITUS"
If the podium is made high (more than 30 cm), it is advisable to provide fences, otherwise it will be uncomfortable and unsafe to be on it. In an architectural sense, a podium is a raised part of the floor. It is distinguished from an ordinary step by its larger surface area. If only an adult’s foot can fit on a step 25-30 cm wide and 20-25 cm high, then large furniture is often placed on the podium: tables, chairs and even beds measuring 200-200 cm. Moreover, an entire kitchen or dining room can be located on the podium .
If the level difference exceeds 30 cm, you should arrange two or three steps or several tiers, which are wide platforms (more than 30 cm) located at different heights.
All podiums are conventionally divided into technically necessary and decorative. The former are used as an element of camouflage of utility lines and building structures. The latter are made exclusively according to the architect’s plan or the desire of the apartment owner and serve to give a new expressive look to the interior.
Technically necessary podiums are installed during the renovation of apartments, if communications cannot be hidden in the walls, and the height of the ceilings and the load-bearing capacity of the ceiling do not allow raising the entire floor level. The need to hide pipes arises for various reasons. For example, when moving or installing additional equipment in the bathroom or kitchen. After all, according to the laws of hydraulics, when organizing a sewer drain, it is necessary to lay pipes with a slope of at least two degrees. Only in this case will the waste flow by gravity into the sewer canal. Thus, the shower stall, whirlpool bath or toilet must be located on an elevation if they are located away from the sewer riser. The same thing is often done when organizing an island kitchen, which by definition is located away from the walls, or when moving a sink, washing machine or dishwasher to a corner far from the riser.
The height of the technical podium depends on the diameter and slope of the pipes, as well as the distance to the entrance to the sewer: the further the equipment is, the higher the podium must be made. For each linear meter there is an increase of 3-5 cm. Thus, when removed by 3 m, in the case of using a sewer pipe with a diameter of 5 cm, a drop of more than 15 cm will be required. Unlike sewer pipes, water pipes are laid without a slope and have a significantly smaller cross-section, therefore, they do not have much influence on the height of the structure. Sometimes, depending on the design decision, the technical podium can be artificially raised by 10-15 cm.
In addition to laying pipes, the reason for installing a technical podium can be the insulation of the loggia. Many apartment owners prefer to add the not-so-extra loggia area to the living space. By law, this procedure requires lengthy and expensive approval, but this does not stop anyone, and the owners agree to remove the window sill and move the heating radiators. We will not comment on this, this is a purely personal matter, but we note that insulating the floor on the loggia in this case is mandatory. The new floor is usually higher than the floor of the adjacent room, that is, a podium is formed. Sometimes it is promoted indoors for design purposes.
Decorative podiums, as mentioned above, serve to zoning and transforming space. Their use is especially effective in studio apartments, where there are no clear boundaries between the kitchen and dining room, dining room and living room, living room and bedroom. Often the kitchen-dining room is raised above the living room. And there are some tricks here. For example, a table on the border of these zones from the dining room side will be perceived as a dining table, and from the living room side as a bar counter, especially if high chairs are placed near it.
The podium allows you to place accents in the interior and visually increase the size of the room. In some cases, there is a small seating area with chairs and a table. (Often, raising the floor corresponds to lowering the ceiling, which makes this corner of the apartment - with the right lighting and selection of furniture - very cozy.) In other cases, a winter garden is set up on an elevated platform or home theater equipment is installed, of course making sure that the lower border of the screen and high-frequency front speakers were at the level of the eyes and ears of a sitting person.
The decorative covering of the podium can coincide with the floor covering only if the structure has an interesting shape. In addition, the upper zone may differ from the lower one in the shade of the furniture. For example, furniture made of dark wood is placed downstairs, and light wood is placed upstairs.
Three-in-one podiums . Structures up to 60 cm in height are usually designed in an apartment for practical purposes. They house various storage systems: top-loading chests, drawers that slide out from the end, and entire horizontal wardrobes into which winter items are stored for the summer and vice versa. Sometimes a high podium turns into a kind of stage or a piece of furniture - a sofa or bed for hosts or guests. There are projects where such an elevation serves as a work desk during the day and a sleeping place at night. There are no barriers to imagination, especially if you want to have many functional areas when there is not enough space in a small apartment. A less exotic option is to build a structure with a built-in grille and a mattress that replaces an expensive bed. You can even make a sofa out of the podium and organize a chill-out, upholstering it with soft carpet, decorating it with pillows, and for softness, placing foam rubber under the cover.
It is impossible to describe all the possible uses of the podium, and photographs will tell about it better than words. We only note that it makes sense to design decorative podiums only if the ceiling height is sufficient (at least 2.7 m).
Frame podium design:

2 - screed;
3 - soundproofing tape;
4 - chipboard gasket;
5 - beam 100 50 mm;
6 - sound insulation made of glass wool;
7 - waterproofing film;
8 - waterproof plywood 12 mm;
9 - glue;
10 - piece parquet.
The pitch of the timber frame is 400-500 mm; seams 5-10 mm wide were left between the plywood sheets
Monolithic podium design:
 "LEGE-ARTIS"1 - floor slab;
2 - coating waterproofing;
3 - adhesive waterproofing;
4 - expanded clay concrete; 5 - tile adhesive;
6 - ceramic tiles;
7 - point lamp
Design diagram of a frame podium with lighting:
 "LEGE-ARTIS"
1 - neon lamp;
2 - parquet board;
3 - substrate;
4 - two glued layers of waterproof plywood (12 mm);
5 - glassine;
6 - sound insulation made of expanded clay;
7 - beam 150 50 mm;
8 - sealing tape;
9 - screed;
10 - floor slab
Design
By design, podiums are divided into monolithic and frame. The first ones are made using wet technology using concrete or cement-sand screed backfilled with expanded clay. The latter are a wooden or metal frame, on which slab material (plywood, OSB boards, gypsum fiber board) or a rough board is laid in 1-2 layers, serving as a subfloor.
The advantages of a monolithic podium include rigidity and durability of the structure, resistance to moisture, relative ease of manufacture and the possibility of facing with tiles or mosaics. This is why it is perhaps the preferred option for wet areas. The disadvantages of a monolithic structure follow from its very name. Firstly, there is no access to the walled-up communications, so it is necessary to make hatches to inspect the water supply fittings. Secondly, such a podium has a significant mass, which implies an excessive load on the floors. It is reduced by using light mixtures with filler.
When the height of the podium is more than 5 cm, expanded clay is used in its body to save money. It is poured into the interior of the structure, after which cement or cement-sand mortar is poured and a screed is made. Then the ends are plastered and the surfaces are lined with decorative materials using various technologies. The construction of the podium begins with waterproofing the floor or old screed, after which communications are laid and checked, and formwork is installed. To strengthen the structure, it is reinforced: a road mesh is laid inside or construction reinforcement is tied together. Note that a monolithic version of the podium is appropriate at a height of 10-15 cm. The cost of construction is about $30 per 1 m2.
Frame podiums are lightweight and more functional thanks to the voids in which you can arrange all kinds of storage systems and even hide an entire bed. The main problem faced when constructing such a structure is ensuring rigidity. In the simplest case, the frame podium is arranged on joists. They are made with a cross-section corresponding to the lifting height (for example, 10-15 cm), and are laid directly on the floor slab or pre-made screed. Another option is adjustable joists, which we wrote about in detail in an article devoted to installing subfloors on adjustable joists. Let us remind you that they allow you to raise the floor by 7-15 cm. The installation step is 40 cm - this distance is enough to ensure the required rigidity and prevent the floor from sagging. As the latter, thick sheets of waterproof plywood (16-18 mm), cement-bonded and OSB boards with a tongue-and-groove system at the ends or similar gypsum fiber products are used. For rigidity, they are laid in two layers staggered (with a shift of the upper elements relative to the lower ones). Large sheets and slabs are cut into smaller pieces (but not less than 60-60 cm) and seams are left between them to compensate for linear deformations and eliminate warping when the temperature and humidity conditions in the room change.
Another option for making a podium is based on a metal frame, on which rough flooring and finishing coating are mounted on top. This design is used for larger overall heights. For strength and maintaining the required rigidity, spatial connections (diagonal and transverse) are installed inside the volume.
 Architects L. Ryabov, A. Mits
Photo by K. Rudeshko
The most practical way to turn a podium into a closet is to install drawers at its ends  Architect N. Belyavskaya
Designer N. Smorgonskaya
Photo by G. Shablovsky
In order to simplify the installation of lamps and wiring, the podium was built on joists. Vetonite screed was poured on top of the plywood and porcelain tiles were laid  "VITUS"
The bar area is accentuated both by a high two-stage podium and a lower false ceiling with pendant lamps
To create storage systems or hidden pieces of furniture in high podiums (more than 30 cm), void niches are created. Supports are installed along their edges, on which beams are laid, and a subfloor and decorative coating are laid on top. Metal guides are mounted in the niches - various functional objects (bed, drawer) will slide or roll out along them.
Noise insulation . To ensure that the steps when walking on the frame podium are not too loud, sound-absorbing tape, for example, made of rubber or foamed polyethylene, is placed under the joists and supports. Sometimes insulation (mineral or glass wool) is placed between the joists, which muffles the sound of footsteps. If no human foot will “step” on the podium, noise-reducing material may not be used.
Wall offsets . When constructing a podium, you can make an indentation from the wall for decorative purposes. Either spotlights or a luminous edging are placed in such a gap. The lamps are covered with thick, impact-resistant glass on top. Or, for example, decorative pebbles or multi-colored sand can be poured into this space.
An indentation “for technical reasons” is necessary if the frame of the podium is wooden and, moreover, quite large. In this case, a so-called thermal seam 1 cm thick is laid between the wall and the structure. When a monolithic podium is made, a damping tape made of pressed polyethylene with a thickness of 3-4 mm and a width equal to the height of the structure is always laid between it and the wall. It is needed so that when the cement mortar matures and during the operation of the room, tension does not arise in the thickness of the material, which can lead to its cracking.
Finishing
On top, the podiums are covered with carpet, linoleum, parquet boards, solid boards, tiles and even painted. To create an additional accent, structures are often finished with materials different from the main floor or simply a different color. In addition, the end is usually highlighted separately. This is dictated not only by design refinements, but also by safety issues. If the step merges with the surrounding elements, the likelihood of falling will increase several times. The main part of the podium can be laid out with large-sized tiles, and the curved end with small-sized tiles or mosaics and vice versa. You can also additionally strengthen a wooden or metal plate on the end or main part (depending on the purpose of the room).
The podium is usually tiled in wet rooms, for example in the bathroom, kitchen or loggia. The design does not impose any special restrictions on the process: ceramic material can be used to decorate both frame and monolithic volumes. To do this, a waterproofing layer is placed under the tile. One example of a good waterproofing composition is Germolastik. It can withstand pressure from very heavy objects (up to 5 kg/cm2) and has adhesion to wood and cement. Tile adhesive is applied to the waterproofing, onto which the tiles are immediately laid. This construction solution greatly simplifies the production process and the structure itself, but requires high base rigidity. Usually, to be completely sure, a reinforced screed is made on top of the frame subfloor, on which the tiles are then laid. The situation is different with a monolithic podium when it is finished with parquet boards or parquet. Here it is necessary to lay sheets of plywood on a carefully leveled screed.
Lighting
Modern housing is rich in lighting scenarios. This is general and local light, all kinds of lighting. A wide variety of lamps are mounted on the ceiling, walls and floor. Catwalks are no exception. Light sources are often built into the ends of steps. These can be either spotlights or long fluorescent or neon lamps, protected by colored or frosted glass that diffuses light. In addition, the edge of the podium is locally illuminated with ceiling lamps. Installing lamps at the ends of the podiums is advantageous in that these sources will never be blocked by anything. Another option is to install a luminous cord under a reinforced visor, which is installed along the edge of the elevation. This design solution is not only decorative, but also useful, because it allows you to avoid injuries in the dark.
Let us remind you once again that when renovating an apartment with a planned relocation of a toilet, bathroom or kitchen, builders will not be able to do without installing one or more technical podiums. But only you can decide to create a decorative podium in your apartment.
The editors would like to thank the companies ARNET, VITUS, WELLAS, LEGE-ARTIS, and STEAM REMSERVICE for their assistance in preparing the material.
To hide the seam between different floor coverings, as well as possible differences in unequal floor levels, it is customary to use a functional design - an interior threshold. This small part is mounted between rooms, in the corridor, bathroom, as well as near the front door. At first glance, it may seem that installing an interior door threshold is a simple matter. In some places this is true, but if you do not take into account some of the nuances, you may experience minor difficulties. If you want to understand this issue in more detail, then this article is for your attention.

An interior threshold is an interior detail that is subject to heavy loads and constant mechanical stress. This is explained by the fact that it protrudes from the general floor level by several millimeters. Given this, it is important to pay special attention to the selection of this part. First, let's look at its features:
Advantages:
- Not only does a solid wooden door absorb noise, the threshold also copes with this task.
- By installing a threshold, less dust and drafts enter the room.
- If there is a flood in the bathroom, the threshold can prevent flooding of neighboring rooms. However, if there is significant flooding, this design will be useless.
- When food is being prepared in the kitchen, the threshold prevents smoke and fumes from entering the living rooms.
Flaws:
- Often, children, especially, fall from the threshold because it protrudes above the surface of the floor.
- If the screws are not screwed into the threshold properly, this may cause leg injuries.
As you can see, along with the advantages, there are not so many disadvantages of this item. Now you need to decide from what material it is better to purchase a threshold.

Today the market is flooded with a large number of building materials, this also applies to thresholds. We invite you to familiarize yourself with thresholds made from different materials:
- Stainless steel.
- Bronze.
- Brass.
- Aluminum.
- Plastic.
- Made from laminate.
The most popular material from which interior thresholds are most often made is metal. This category includes stainless steel, aluminum, bronze, etc. Due to their weather resistance, they can also be installed outdoors.

Thresholds made of this material are resistant to mechanical stress. You can find both painted and anodized products on sale.
Stainless steel

Due to their matte or glossy finish and silver color, stainless steel thresholds are rarely installed on the floor. Most often they are used in furniture or for wall decoration.
Bronze

This type of material will be very expensive. Plus, it’s difficult to find a bronze threshold on sale. Therefore it is worth ordering. But there is a good alternative. The aluminum threshold is manufactured “in bronze”. It is more affordable in price.
Brass
If you want a beautiful golden-colored threshold, then brass is an excellent material. This valuable material will be quite expensive, but the appearance will pay for all the costs.
Aluminum
Lightweight and reliable thresholds are made from an alloy of various metals found in aluminum. Their affordable price is in perfect harmony with long-term operation.
Thresholds made of aluminum or steel are often covered with plain paint or a successful imitation of wood. The aluminum profile is also laminated with a durable film. Due to this, the appearance of wood, stone, etc. is copied.

This is one of the common materials that is used for installation under interior doors. If you want to have a durable threshold, it is recommended to purchase an oak threshold.
Oak thresholds are expensive, plus they require systematic maintenance, namely painting and varnishing.
Plastic
Between metal and wood, the plastic threshold is average in terms of durability. This element has a wide range of colors. But its main drawback manifests itself under intense loads, as a result it can burst.
From laminate
If laminate is laid on the floor, then it is advisable to use a laminate threshold. However, in conditions of high humidity it can become deformed over time.

This material is usually used on the threshold of a balcony. It has no shrinkage and is durable.

Apart from the material used, this item also varies in appearance. This is very practical, because thanks to the variety of shapes, you can cover thresholds of different difficulties. Below are the main types of designs of this element.
Overhead or flat

They are plastic or metal plates of different shapes. They can be successfully used for various types of coverings, for example, laminate, carpet and linoleum.

This threshold is called an invoice, since its fastening is carried out from above.
Transitional or multi-level

If it is necessary to hide the transition from different floor coverings, then this type of threshold will properly complete the task. Transitional thresholds will cover the difference in height from 3 to 15 mm.

In shape, they are most often found round or have the shape of an unfolded angle.
Corner

Aluminum thresholds are most often used in this category. Often there is a difference between the rooms, creating a small step. In such cases, such a threshold will be an excellent solution. The surface of the corner element is most often perforated.
Corner thresholds are also installed on steps. And the perforated surface prevents shoes from slipping.

This type of threshold is made from safe and hypoallergenic plastic. Under the influence of high temperature it becomes elastic, due to which it acquires the desired configuration. This material is quite resistant to mechanical stress. Most often they are used to hide differences in the threshold, finishing columns, podiums and pedestals.
T-shaped

These products have different widths and colors. They are almost imperceptible underfoot, as they are absolutely smooth. They can hide radial transitions between one or another coating.

This type of threshold is mainly made of metal, and sometimes of plastic. They are equipped with holes for fastening to the floor. To hide the heads of the screws, the holes are cone-shaped. The holes themselves are spaced in 15 cm increments. This is the simplest type of threshold, which anyone can install.

This item does not have holes for mounting. The fastening element is hidden under the bottom of the structure itself. If the threshold difference does not exceed 15 mm, then this type of profile can be safely installed.

This is one of the latest developments, which is shaped like the letter P. It is made of aluminum with a spring device and a rubber seal. Installation is carried out at the end of the door block, so that when the door is open such a threshold is not visible. When the door closes, the guillotine automatically lowers down and completely closes the gap between the door and the floor.

This building provides high-quality thermal insulation and sound insulation. The main advantage is the complete absence of drafts. Plus, the threshold does not interfere with movement. A smart threshold can be combined with absolutely any door.
This type of threshold is not suitable for hollow doors, since it is inserted to a depth of at least 2 cm. Additional carpentry work will also be required.

So, we have decided on the types and materials from which the thresholds are made. Now let's look at the methods of their installation. It is worth noting that there are several technologies for attaching them. To a greater extent, it depends on the type of product design. The only thing that unites the beginning of installation work is the measuring process. You should take accurate measurements of the opening and use them to cut the threshold with a hacksaw or grinder.

This method is very simple. The plate is equipped with mounting holes. To attach it, you need to mark with a pencil marks for drilling holes in the floor. Don't make holes too deep. Otherwise, the self-tapping screw and dowel may become loose after a while. All you have to do is tighten the screws and put on the decorative caps.

Most often, preference is given to thresholds with a hidden fastening system, and in most cases for aesthetic reasons. In this case, strips with floating holes for the fastener head are used, which consist of rails and a T-shaped threshold. The mounting method is as follows:
- First of all, drill holes in the floor. You insert plastic dowels into them. Then carefully thread the screws by the head onto the bar. After that, all you have to do is point the screws into the traffic jams. Finally, you can lightly tap the bar, placing several layers of paper or thick cardboard.
- If the threshold is shaped like the letter T, then drill the required number of holes in the floor. Next, secure the plank to the floor with self-tapping screws, and the upper decorative part of the threshold is snapped or glued on top.

In this case, extreme care is required. In this room, most often the floors are ceramic tiles. Therefore, you will have to purchase a threshold that will not allow moisture to pass through. Just in this case, the ideal option would be a system - a smart threshold.

So, as you can see, the technology for installing a threshold with your own hands is quite simple. In addition to its functional load, it will give the floor a finished appearance. Therefore, you should not put off its installation until later, but rather do this work right away. If you know other important subtleties of performing this work, then leave reviews and comments at the end of this article.
Video
This video shows how to install an interior door threshold: