This circuit was taken from Radiohobby magazine No. 3 for 1999 and is a step-up voltage converter built on the principle of a blocking oscillator. Generation is carried out due to positive feedback that controls the operation of the key transistor. In this case, short-term high-voltage pulses are generated on the secondary winding of the transformer. When the converter is turned on, the fluorescent lamp has a high resistance, the voltage on its electrodes increases to 500 volts, but as soon as the lamp warms up, the voltage drops to 50 - 70 volts. Therefore, it is extremely important not to turn on the converter without a load, since the voltage on it can rise to 1000 volts, which can damage the transformer.

The figure shows two circuits, the top one is for a p-n-p structure transistor, the bottom one is for an n-p-n transistor. Naturally, when the structure of the transistor changes, the polarity of capacitor C1 also changes.
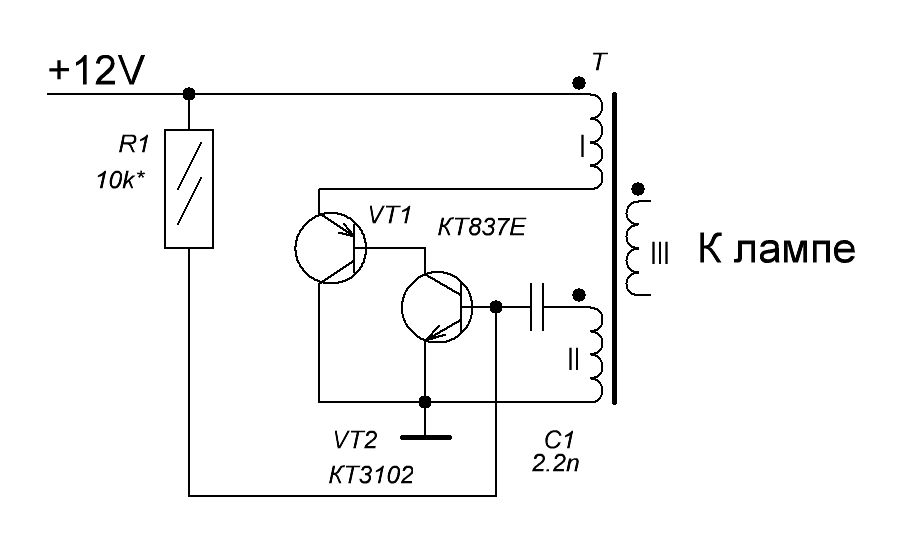
The transformer is manufactured on W-shaped ferrite 7x7 with magnetic permeability NM2000. The secondary winding is wound first, according to the diagram it is connected to the LDS. It contains 240 turns wound with PEV-0.23 wire. After which the winding is well insulated and the collector winding is wound on top of it - this is 22 turns wound with PEV-0.56 wire and the base winding, which contains 6 turns wound with PEV-0.23 wire. Naturally, the diameters of the wires can vary within small limits. The core required for the transformer being manufactured can be obtained from an old rotary telephone, for example TA-68. Then you must first remove all the old windings from its frame. Also, an W-shaped core of a suitable cross-section of the magnetic circuit can be taken from a computer power supply. Important! A gap is required between the halves of the W-shaped core - a gasket made of non-magnetic material. A sheet of thin paper, one layer of electrical tape, etc. will do. This is necessary so that the core does not become magnetized, otherwise the converter will stop working after a short time.
For the circuit to operate correctly, it is necessary to adjust the current consumed by the converter. To do this, you need to know the power of the LDS used. Let's say its power is 20 watts. Then the current consumed by the converter should be 20W/12V=1.66A. This current is set by selecting the base resistor R1.
Transistor T1 must be placed on the radiator. The area of the radiator is selected in such a way that after an hour of work you can safely hold on to it. Instead of transistors KT837F and KT805BM, you can use KT818 and KT819, respectively.
The functionality of the converter is checked as follows. If immediately after turning on the converter the lamp lights up dimly, and after a split second flares up at full strength, then everything is working normally. If the lamp continues to work dimly, then it is necessary to select R1, or even change the transistor. The wires from the transformer to the lamp must be as thick and short as possible, otherwise the lamp will light poorly or not light at all.
And now some photos.


Timofey Nosov
Converter 12-220 from a computer power supply to power LDS
The converter is also used to power “economical” base-type LDS; it was actually assembled for the purpose of autonomous, bright and economical lighting of the house, garage, and car interior. For myself, I decided not to assemble electronic ballast but to use a ready-made one, because... the hemorrhoids-result ratio was in favor of ready-made solutions (it’s like making an incandescent lamp on your knees in our age).
Brief comments on the diagram. This is a push-pull pulse converter assembled on a TL494 PWM controller (a complete domestic analogue of 1114EU4), which makes the circuit quite simple. At the output there are highly efficient rectifier diodes that double the voltage according to the Delon or Greinmacher circuit (I didn’t want to swear). The output, of course, is constant voltage. For electronic ballasts, constant voltage and switching polarity are not relevant, because in the ballast circuit there is a diode bridge at the input (although the diodes there are not as “fast” as in our converter).
The converter uses a ready-made high-frequency step-down transformer from the computer's power supply unit (PSU), but in our converter it will become, on the contrary, a step-up transformer. The step-down transformer can be taken from both AT and ATX power supplies. From my experience, the transformers differed only in size, but the location of the terminals was the same. A dead power supply unit (or a transformer from it) can be found in any computer repair shop.
You can wind the transformer yourself. Personally, my patience now is enough to manually wind no more than 20 turns, although in childhood I could wind a contour coil of 100 turns for a transistor receiver; the years take their toll.
So, we find a suitable ferrite ring (outer diameter approximately 20-30 mm). The turns ratio is approximately 1:1:20, where 1:1 is two halves of the primary winding (10+10 turns), and:20 is, respectively, a secondary winding of 200 turns. First, the secondary is wound - evenly 200 turns with a wire with a diameter of 0.3-0.4 mm. Then, evenly, two halves of the primary winding (we wind 10 turns, make a middle tap, then wind the remaining 10 turns in the same direction). For half-windings I use stranded, silver mounting wire with a diameter of 0.8 mm (you don’t have to force it and use another wire, but stranded and soft is better).
I offer another option for manufacturing (remaking) a transformer. You can purchase the so-called. electronic transformer for 12 volt halogen lamps for lighting ceilings and furniture (in lighting equipment stores it costs from 80 rubles). It contains a suitable transformer on the ring. You just need to remove the secondary winding, which consists of a dozen turns. And the half-windings can be wound differently - we fold a piece of wire (calculate the length) in half and wind it with the double folded wire; We cut the middle of the wire (the bend point) - we get the so-called. two ends (or two beginnings) of windings. To the end of one wire we solder the beginning of another - we get a common point of the half-windings. I assure you that such a transformer works for me. It should be noted that a computer transformer works great in an electronic transformer circuit.
For those who want theory of calculations - section Soft-Utilities and Program for calculating the transformer of a switching power supply V1.03 (838 Kb); Everything is clearly explained in it. Conversion frequency is about 100 kHz (for calculation of the operating frequency, see the documentation for TL494).
C1 is 1 nanofarad, or 1000 picofarad, or 0.001 microfarad (all options for capacitance values are equal); on the case the coding is 102; I set it to 152 - it works, but, I assume, at a lower frequency.
R1 and R2 – set the width of the output pulses. The circuit can be simplified and these elements not installed, while the 4th contact of TL494 is set to negative; I don’t see the need to rape transistors with wide pulses.
R3 (together with C1) sets the operating frequency. We reduce the resistance R1 - we increase the frequency. We increase the capacitance C1 - we reduce the frequency. And vice versa.
Transistors are high-power MOS (metal-oxide-semiconductor) field-effect transistors, which are characterized by shorter response times and simpler control circuits. IRFZ44N, IRFZ46N, IRFZ48N work equally well (the higher the number, the more powerful and expensive).
The converter uses HER307 diodes (304, 305, 306 are suitable). Domestic KD213 work great (more expensive, larger and less reliable).
The output capacitors can be of smaller capacity, but with an operating voltage of 200 V. Capacitors from the same computer power supply with a diameter of no more than 18 mm were used (or edit the printed circuit board design).
Install the chip on the panel; it will be easier to live this way.
Setup comes down to carefully installing the microcircuit into the panel. If it doesn’t work, check for the presence of 12 V supply voltage. Check R1 and R2, are they confused? Everything should work.
A radiator is not needed, because prolonged operation does not cause noticeable heating of the transistors. And if you want to install it on a radiator, then, be careful, do not short-circuit the flanges of the transistor housings through the radiator. Use insulating gaskets and bushing washers from a computer power supply. For the first start, a radiator will not hurt; at least the transistors will not immediately burn out in the event of installation errors or a short circuit at the output, or in the event of an “accidental” connection of a 220 V incandescent lamp.
The power supply of the circuit must be convincing, because The current consumption of one copy of the “economical” LDS from a sealed acid battery was 1.4 A at a voltage of 11.5 V; total 16 W (although the lamp packaging says 26 W).
Protection of the circuit from overload and reverse polarity can be implemented through a fuse and a diode at the input.
Be careful! The output of the circuit is high voltage and can cause a very serious shock. Then don't say you didn't warn me. Capacitors hold a charge for more than a day - tested on people. There are no discharge circuits at the output. Short-circuiting is not allowed; discharge either with a 220 V incandescent lamp or through a 1 mOhm resistor.
Two printed circuit board drawings were made for the converter, depending on the dimensions of the transformer. 
The circuit of such a converter is not new, but it was redone and as a result of the modification, the number of radio components used was sharply reduced.
The circuit diagram of the converter for an LDS lamp is a simple blocking oscillator based on a powerful bipolar transistor MJE13007; experience has shown that it does the best job, but it can be replaced with a more powerful one, such as MJE13009. Such transistors are often used in ATX computer power supplies. It is better to use a wire-wound tuning resistor for a couple of watts, its nominal value is 470 ohms, but it can deviate in one direction or another by 20% - this will not affect the operation of the converter.

An W-shaped ferrite transformer from the same computer power supply was used as a transformer. As a rule, such a transformer has 6 leads on the step-down winding side and one tap on the top. It is to this outlet that we connect the plus power supply. The first and last output of the step-down winding are respectively to the collector of the transistor and through a resistor to the base; there is no specific polarity here.

Next, we assemble the converter circuit for the lamp itself. The mains winding of the transformer usually has 3 or 2 terminals; we connect the outermost terminals to a fluorescent lamp. For a smooth start, you can connect a 400 volt 1 microfarad capacitor in series to the output, although it will work without it. The transistor needs to be mounted on a small heat sink.

We turn on the circuit and slowly rotate the trimming resistor until we achieve the maximum glow of the lamp - this is a base current limiting resistor that simultaneously regulates the frequency. A well-assembled converter does not make unnecessary sounds and has a wide range of supply voltages from 3.5 to 12 volts (optimal - 6 volts).
The proposed converter is easy to replicate, does not contain expensive and scarce parts, and is capable of powering a fluorescent lamp (LDL) with a power of up to 18 W. After a series of experiments, the option of two 6 W lamps was chosen - it turned out to be the most economical in terms of power consumption/brightness.
The converter is a classic blocking generator, assembled on a transistor VT3 and a transformer T1, which is also a step-up one. Two TS F6T5 six-watt fluorescent lamps are used as the transformer load. Diode VD1 protects the circuit from incorrect connection to the battery - polarity reversal.
The unit assembled on VT1VT2 transistors serves to visually monitor the condition of the battery - if the voltage on it drops below critical, the HL1 LED “Battery Discharged” will light up. In standby mode, the node consumes a current of about 1 mA, and when activated - 5 mA. If monitoring the battery status is not needed, then this unit (VT1, VT2, R1 - R5, C1, HL1) can be abandoned. This option will greatly simplify the converter circuit.
In the design you can use MLT resistors, R2 it is better (but not necessary) to take multi-turn SP5-3. C2 – K73-9, C1 – any. In place of VT1 and VT2, KT3102 or KT315 with any letter will work. VD1 must withstand the current consumed by the converter, which depends on the power of the lamp used. KT815, KT817 and KT819 were tested as VT3. The last one with the letter “G” turned out to be optimal, especially since it has a good voltage reserve, which will be useful if the lamp accidentally turns off.
The T1 pulse transformer is made on a B22 magnetic core made of 2000NM1 ferrite. The primary (I) winding contains 9 turns of PEV-2 0.45 mm wire. Secondary (II) - 10 turns of the same wire, but with a diameter of 0.3 mm. Both windings are wound simultaneously turn to turn. Winding III is wound last after two layers of paper insulation. For one lamp, the winding contains 180, and for two, connected in series, as shown in the diagram, 240-250 turns of PEV-2 wire with a diameter of 0.16 mm.
After winding, the entire coil is impregnated with paraffin and placed in a magnetic circuit. When assembling the magnetic circuit, you need to leave a gap of 0.2 mm between the cups - this is the thickness of a sheet of paper. When assembling the device, the phasing of windings I and II should be observed. If after the first turn on the circuit does not work, then the terminals of one of these windings must be swapped.
Next, by adjusting the value of resistor R6, an acceptable brightness of the lamps is achieved, taking into account that along with the brightness, the current consumed from the battery also increases. The author achieved sufficient brightness with a current consumption of 650 mA, and the current limit when adjusting R6 with stable operation of the generator is 0.2 - 1.2 A
Before turning on and during operation of the lamp, be sure to ensure good contact of the wires connecting the lamps to the transformer. Even a short-term loss of contact threatens breakdown of the transistor VT3 and the high-voltage winding T1.
In conclusion, I would like to draw your attention to the fact that the design can also operate lamps with burnt-out coils.
FOOD LDS
Fluorescent lamps are still used in lighting devices, and this converter is precisely used to power economical base-type LDS. Fluorescent lamps are currently recognized as the most effective light source. An ordinary incandescent lamp has an efficiency of about 10 Lumens/Watt, while an LDS efficiency reaches 100 Lumens/Watt. LDS consumes almost 7 times less electricity than an ordinary incandescent lamp, and also has 12 times longer operating time. Of course, every year they become more widespread super bright , even under LDS they have already begun to make them,
But their final superiority will not come soon. Moreover, you have to pay a lot of money for good bright LEDs, and many people, including me, have plenty of fluorescent lamps lying around. By assembling this circuit, we will get autonomous, bright and economical lighting for a house, garage, car interior or camping flashlight.

Those who expected to see microcontrollers with phase-pulse control and PWM modulation in this circuit must be disappointed - this is an ordinary vulgar blocking generator. Why? Because it has been repeated hundreds of times by different people and works great. There's no need to complicate things. Remember, brevity is the sister of talent. The converter circuit for LDS does not require expensive parts, and also allows the use of faulty lamps. A blocking generator is assembled on transistor T1 KT817. The 3 kOhm resistor sets the current and operating mode of the transistor. As a result of the operation of the generator, a pulsed high voltage appears on the upper winding, which is supplied to the LDS.
The base winding of a transformer wound on a ferrite core contains 20 turns of PEV-2 0.5 mm, the collector winding is 40 turns of the same wire, and the high-voltage winding is about 500.
A radiator is needed because... prolonged operation causes noticeable heating of the transistor. We use a piece of aluminum from a matchbox as it. The filaments of the lamp are shunted by a jumper and act as an electrode to which the voltage necessary to turn on the lamp is supplied. Cold ignition occurs with the help of a sharp increase in voltage on the LDS at start-up, without preheating the LDS electrodes.


Another version of the converter for LDS is a little more complicated, but also more stable. The diagram is copied from a Chinese camping lantern.


It is powered by 6 - 12V and consumes current up to 0.5A. It is better to replace the transistor with KT805 - for reliability. The setting consists of selecting the current and frequency to obtain maximum brightness of the LDS glow. Attention, there is a high voltage at the output of the circuit and it can cause a serious shock! Be careful when assembling the circuit. It seems interesting to use a line transformer from TVS TVs as a transformer, as it is implemented.
Valuable recommendations from Alexander: Among the disadvantages of the above circuits, it is worth noting the lack of smooth heating of the lamp filaments, which will reduce the service life, although lamps with a burnt-out filament can be used in such circuits, but the light from them is much less than from a new lamp, in such circuits the phosphor burns out quite quickly , low efficiency, a lot of energy is spent simply heating the transistor. If the LDS burns out or simply if the lamp contact comes off during operation of the converter, operation will occur at idle, without load, which can lead to overheating of the transistor and its failure, or, even worse, to a breakdown of the high-voltage winding of the transformer.The voltage on the high-voltage winding at idle can reach 1200 V, under load approximately 80-120 V, depending on the power of the LDS itself. To make the LDS start smoothly, it must be connected not directly to the high-voltage winding, but through a capacitor (its capacity is selected experimentally). The capacitor is placed only on the phase wire, and not on the zero wire! Don't get confused! After this, the LDS will start up more smoothly! At the same time, its brightness will decrease slightly. But this can all be fixed by selecting a resistor.
What can be done to prevent generator failure?
1 - Give feedback.
2 - The simplest thing: connect a neon lamp or a starter in parallel with the LDS itself through a 1 mOhm resistor (a little less is possible). The operation of the LDS neon itself will not be affected, but in emergency situations it may well play the role of a load and thereby save the blocking generator itself.
You can use a ready-made transformer in these circuits. In the 1st option, you can use a transformer from the standard EEL-19 brand (or similar) from a computer power supply. It is also possible to use a TVS transformer from black-and-white tube TVs. For the second scheme, network transformers from laser printers and network transformers from LCD monitors are quite suitable. In these cases, transformers can be used as is without rewinding.
The calculation of the current consumption of the converter can be carried out using the following approximate method: For example, an LB-20 lamp needs 1.66 A, therefore - 20 Watts/12 V = 1.66 A. Multiply by the efficiency of 90% - it should consume about 1.8 A.
One more thing: the first version of the blocking oscillator circuit allows the use of a smaller radiator - there will be less heating of the transistor than the second version of the LDS power supply circuit. In the first option, it is advisable to place a 0.01 µF - 0.022 µF capacitor between the base and emitter, thereby reducing the heating of the transistor. The most optimal power for such circuits is 9-11 W! But no more than 20W. It is undesirable to use resistors less than 0.5-1W. I do not recommend using KT817 in the circuit, since it is not intended for such operating currents; accordingly, in this circuit with low efficiency, it will drop even more. I would definitely recommend installing a diode at the input, since even if the power polarity is accidentally reversed for a short time, the transistor will burn out!