In the family of point-support foundations, the columnar structure looks like the black sheep. Unlike pile-screw schemes or options on bored piles, a columnar foundation cannot ensure the stability of a building on a slope or on decrepit peat soil. Even the most desperate amateur house-builders do not try to install columnar structures on a swamp or heaving foundation.
How to install a columnar foundation
But in fact, the columnar version has two remarkable features. Building a columnar foundation with your own hands is accessible even to beginners in construction, and the cost is approximately half the estimate for a shallow-depth tape. If you need to build a hut on a sandy area, near a pine forest or on hard calcareous soils, the easiest way to solve the problem of arranging the foundation is in one of the following ways:

From the above list, the first two options will require the use of construction equipment and handling equipment; for a brick scheme, the skill of a mason is required. The last method from the list above requires only time and a little patience in working with your own hands and following the recommendations of the practical guide.
Important! A cast columnar foundation can be safely called universal; if there is drainage and drainage on the site, it can be placed even on small slopes without the need to work with a grader to level the horizon on the site plan.
In fact, a columnar foundation is the best option for building a small summer kitchen, gazebo or bathhouse on a country plot with your own hands. For large and heavy buildings, a columnar foundation is weak and dangerous.
How to make a columnar foundation with your own hands quickly and easily
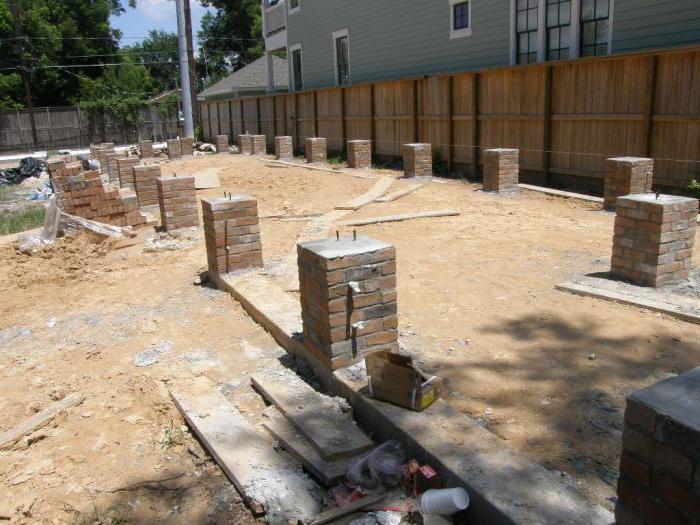
Casting concrete columnar structures will require lengthy and rather dirty work with mixing cement mortar, installing and strengthening columnar formwork, leveling and cleaning working surfaces. You can take a simpler route and buy ready-made blocks with a length of 40 cm and a cross-section of 20x20 cm. A foam concrete block of the structural grade D1200 or heavy expanded clay concrete grades are best suited.
For heavier versions of the house, granite blocks can be made. To do this, the blocks are cast on a manual machine for pressing cinder blocks filled with heavy rock. Such a block will be able to withstand a load of 300-400 kg, which corresponds to the weight of the walls of a log house. If you have experience working with your own hands with laying stone with cement mortar, then you can build 6-8 columnar supports in half a work shift.

In addition to standard rectangular blocks, massive hollow blocks in the form of a truncated pyramid with a reinforcing frame are cast on the machine. A pin or threaded rod is placed in the upper base of the pyramidal columnar support, which allows you to tie the installed pillars with a wooden beam or steel profile. It is enough to compact and fill the horizontal platform in order to install a finished foundation field of columnar supports along stretched cords.
Do-it-yourself columnar foundation step-by-step instructions
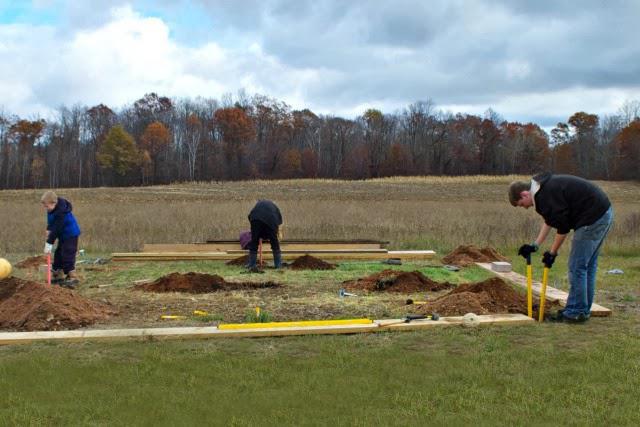
Casting foundation supports from cement is no more difficult than working with a shallow-depth tape, but the volume of concrete and earthworks is three times less. Most of the time is spent on the first columnar support, made with your own hands. From practice, it turns out that the next two columnar supports take the same amount of time as the previous one. The entire technology for arranging a columnar foundation comes down to five simple operations:
- Preparation of the cushion and pit at the site of marking the columnar support;
- Assembling the formwork to be poured with concrete;
- Installing reinforcement into the formwork and pouring concrete into the form;
- Assembling and tying the foundation.
Advice! To make a foundation field, it will take at least three days and three to four sets of split formwork. If we assume that one columnar support will require three days to cure the concrete, then in a week you can make a columnar foundation of 8 supports with your own hands.
The optimal option for arranging the base of a columnar block
The most serious problem with columnar foundations is not the weak load-bearing capacity of the supports, but their tendency to tip over when the lateral component of the load increases. Strong winds and uneven subsidence of the foundation, when some supports sink into the ground, while others are torn off by beams from the cushion, leads to tilting and overturning of the foundation pillars, as in the photo.

Therefore, when preparing a cushion for a columnar foundation, it is necessary to pay attention to the presence of reinforcement in the form of a backfill of gravel and soil. For columnar supports installed on the surface or in a slight recess, it is recommended to strengthen the base by expanding the support spot or use fungal types of pillars. In the latter case, the foundation structure can be made in the form of two independent elements: in the form of a round concrete platform, buried 10-15 cm into the ground, and a vertical support of a round or rectangular cross-section, connected to the platform by one reinforcement cage.

In any case, to install the supports of a columnar foundation, you will need to dig a pit to a depth of immersion plus 20 cm of sand and gravel cushion and 20-25 cm of a layer of large rubble or crushed stone material. The filling mass is placed on the bottom of the pit in layers of no more than 10 cm, with compaction of each layer using a hand or electric tool.
It is clear that for the manufacture of supports, formwork boxes of exactly the same size are most often used. This makes it possible to obtain columnar foundation supports of the same height, but only under one condition - if the crushed stone cushion in all pits has the same height. Therefore, it would be correct to do the following:
- Dig the required number of mini-pits for the foundation supports, trim and level the walls so that the soil and fertile layer do not fall on the gravel bed;
- Drive a reinforcement rod into the center of the bottom of the foundation pit for the future column, align it with the stretched foundation marking cords;
- Pour the gravel-sand mixture onto the pillow using a compactor. The compaction of the cushion must be done with the utmost care, the main thing is to prevent the centering rod from moving or deflecting. We constantly check the height of the pillow by the distance from the cord to the backfill plane using a clogged piece of reinforcement.
Installation of formwork and reinforcing frame
To obtain a homogeneous, defect-free concrete casting, you will need to make collapsible, reusable formwork of a box-shaped or tubular structure. The inner surface of such a box is covered with plastic film, or materials with a laminated surface are used. Thus, a support with smooth and even walls is obtained. In addition, the internal coating of the formwork significantly reduces the swelling of the wooden structure and helps maintain the original shape of the foundation pillars.

Before installing the formwork, it is recommended to tighten the dimensional cords, which can be used to align and fix the wooden frame of the form with a minimum error. In addition to the horizontal supports of the walls, it will be necessary to install additional fixing wedges to prevent the formwork from floating under the influence of concrete pressure on the lower part of the wooden form.

At the next stage, a reinforcing frame is installed inside the wooden form, welded from 4 or 6 rods with a diameter of 8-10 mm, photo. Like formwork, the reinforcement is aligned inside the form and fixed in a vertical position, after which you can proceed to pouring the concrete mixture inside the support.
Leveling and pouring concrete
Filling the formwork with concrete must be done as carefully as possible to prevent displacement of the installed support elements. Long foundation columns are poured in several portions, with each layer being “punched” inside the support using a vibrator or manual tamper for 10-15 minutes. In total, it will take 35-40 minutes to fill out one support form. 2-4 studs are embedded in the concrete surface of the upper part of the post, allowing the strapping beam to be subsequently secured to the concrete surface of the support. The poured formwork is covered with a plastic bag to reduce moisture loss and prevent the foundation concrete from being washed away by rainwater.

Important! If you have made the formwork boxes high, but not rigid and strong enough, especially in the central or bottom part, then a situation may arise where the concrete mass crushes and expands the lower part of the foundation form.
The result is not a rectangular shape of the support, but a barrel-shaped one. Everything would be fine, but the volume of the form increases, and the level of concrete drops, which means the height of the foundation column will decrease. Therefore, the formwork has to be poured several millimeters higher than the calculated one. After about a couple of hours, the surface can be sprinkled with damp sand to reduce cracking and shrinkage of the foundation columns.
After the concrete mass has set, the formwork is disassembled and removed, after which that part of the support surface that will be under the soil layer must be treated with waterproofing bitumen coating. After 7-8 hours, the space around the columnar base can be covered with layers of a mixture of gravel, expanded clay and sand.

Conclusion
No matter how hard you try, a columnar base does not have a perfectly flat and horizontal top surface. After about a couple of days, until the concrete reaches the design strength, the plane of each support must be trimmed horizontally and vertically with a grinder or grinder. Before tying the columnar foundation supports, treat them with mastic and lay roll waterproofing. Next, you can lay a wooden beam and tie it to the supports of the columnar foundation, but the construction of walls and further construction is permitted no earlier than a month later.
If you know how to build a columnar foundation with your own hands, you can safely start building any building on your country plot, from a small greenhouse or gazebo to a huge wooden house.
Columnar foundation - features and varieties
When you plan to build a residential house made of wood, any outbuilding, bathhouse or garage, the question arises of what type of foundation to choose for them. Anyone wants to spend less money on such an event and at the same time get a truly reliable foundation for future construction. The best option in this case is to install a columnar foundation. It is the simplest to implement and relatively inexpensive.
The foundation we are interested in is suitable for another object that does not exert strong pressure on the ground and does not have basements.
It is not recommended to erect heavy concrete or brick structures on such a foundation.
The structure of this foundation is quite simple - a number of support pillars are placed on the ground in places where the main load will be directed upon completion of the construction of a house or other object. Such places include:
- piers;
- corners of the structure;
- sections of wall intersections;
- heavy load-bearing beams.
Do-it-yourself columnar foundations can be made from natural stone and wood, rubble concrete, brick, concrete, steel and asbestos pipes, and bored piles. It can be prefabricated or monolithic. In the first case, the raw material for its construction is a “mixture” of stones, bricks and reinforced concrete blocks. The monolithic base is made of reinforced concrete, which provides increased foundation strength.

Columnar structures are also usually divided into two types, taking into account the degree of freezing of the ground on which it is installed and the type of soil itself. From this point of view, the foundation is:
- Shallow - the pillars are mounted into the ground at a depth of 0.4–0.7 m. Experts advise using such a foundation when constructing buildings on rocky or sandy soil.
- Recessed - the laying of supports is carried out to a depth that is 0.5–1 m below the freezing mark of the soil in a particular area. Pouring and installing such a foundation is recommended for watery and clayey soils, where there is always a danger of the foundation being washed out.
Note that a columnar foundation is built with your own hands using the same technology. Next, we will look at how to make a columnar base yourself using various materials.
Preparing for arranging a columnar foundation - important tips
First, you need to decide on the type of soil that is available on your site where construction work is planned. After analyzing it, you can choose the type of base and installation depth of the support pillars (see above). For a light gazebo, it will be enough to deepen the foundation by 0.4–0.5 m and make it from wood or asbestos pipe products. But a relatively large wooden house will need to be placed on a deeper (about 1 m) and powerful foundation, for example, made of concrete.
After this, you need to calculate the number of pillars that will go to construct the foundation. They must be present in the center and at all corners of any building (even if, in your opinion, it is very small). You will be guaranteed a truly reliable foundation for the building if you place pillars every 2 m (vertically and horizontally) of the structure. The height of the supports is usually taken 0.3–0.5 m above the soil level. It can be increased when there is a likelihood of large amounts of precipitation and flooding.

Next, we begin to clean the area of land where the foundation is planned to be poured. We carry out these works as carefully as possible - we remove all unevenness in the ground, remove debris, add gravel to the clay soil. Then we create a point plan of the planned foundation and mark on it the locations of all the pillars.
You should also move 2 m away from the perimeter of the future building on four sides to mark the area from which the surface earthen layer needs to be completely removed (20–30 centimeters). This is done to eliminate the danger of vegetation growing under the structure. And at the place chosen for construction, it is necessary to pour gravel or, after which you can start digging holes for installing the supports of the columnar foundation.
Formwork for the foundation - how to do it quickly and correctly?
The most common and economical is roofing felt formwork. This is what is most often installed on private farmsteads during the construction of various structures. It's done simply:
- We take a piece of roofing felt of the required length (we focus on the length of the post, and also add a little length to the scraps according to the level) and twist it in two layers into a tube. It is best to wind the material onto a template, for example, onto a metal pipe (its cross-section should be about 20 cm).
- We securely fasten the resulting twist with wide packing tape. Sometimes, before this, the roofing material blank is additionally wrapped with stretch film, which increases the amount of rigidity that the formwork will have.
- We take out the template from the resulting tube. In fact, the roofing felt formwork is ready!

Instead of roofing felt, you can use glassine. The sequence of operations in this case will be similar to that described above. Also, formwork is often made from wooden panels consisting of boards 15 cm wide and 4 cm thick. It turns out to be reliable and of high quality, but its cost, of course, is much higher than a structure made from roofing felt. Permanent formwork can be made of asbestos-cement or steel pipes. Their diameter should be 10–20 cm.
After this, we begin the process of strengthening the columnar base. For reinforcement, you need to use reinforcement with a diameter of 1.2–1.4 cm. It must be installed longitudinally. The function of horizontal jumpers will be performed by metal wire.
If the foundation is made with a grillage (special slabs or beams - the supports of the future building), about 20 cm of reinforcing bars are left above the pillars. With their help, after pouring the concrete mixture, you can easily connect the grillage to the columnar supports.
We make a columnar foundation from asbestos or steel pipes - you can do it!
In this case, permanent formwork made from pipe products of a suitable cross-section is required. The construction of such a foundation is recommended for any buildings, including wooden houses. For the work, you will need pipes with a cross-section of about 200 mm or more if the building is heavily loaded (several floors, large area).

Step-by-step instructions for building a foundation are as follows:
- We clear the site.
- We prepare cylindrical pits in which we install a reinforcement cage or pipes and fill them with earth, ensuring the fixation of the supports.
- We fill the pipe structures used with concrete solution to one third of their length. This procedure is mandatory; it creates the required hydraulic cushion for the base.
- We raise the pipes to a third of the height and pour the concrete mixture again, leaving about 15 cm of empty space at the top.
- We completely remove the pipes, and compact the concrete solution that remains in the hole and place a reinforced rod in its center.
- We are waiting for the concrete to harden.
The connection between the base and the erected walls of the structure is carried out using metal anchors. They should be attached to the lower wall beams and sunk into the 15cm cavity left. You have made a reliable and durable foundation out of pipes. All that is required is to finally concrete the structure.
Construction of a foundation made of concrete blocks and wood - instructions
For frame private houses, various gazebos in suburban areas, saunas and outbuildings, you can make a base from blocks. In this case, the support-column foundation is made with your own hands from concrete elements with geometric parameters of 20x20x40 cm.

The block base device includes the following stages:
- Site preparation.
- Digging holes, covering them with crushed stone and creating a sand cushion at the bottom.
- Installation (using cement-based mortar) of concrete blocks.
- Carrying out waterproofing measures (using ordinary roofing felt laid on the surface of concrete pillars).
- Plastering the surface of the blocks.
Block foundations cannot be constructed on horizontally moving soils, water-saturated and peaty soils. It is also undesirable to place overly massive buildings and structures on them.
You can also make a wooden foundation. But the service life of such a foundation will be objectively short. It can be increased by impregnating the wood with special antiseptic solutions. But even in this case, the foundation will last a maximum of a couple of decades.
For such a foundation, it would be correct to use coniferous wood or oak piles. The pillars are immersed in the soil by 0.5–1.5 m. The cross-section of the piles should be chosen larger - from 20 cm. Construction is carried out according to a simple scheme:
- We clear the area for laying the foundation.
- We dig holes. Their cross-section is taken to be 1.5 times the diameter of the wood supports used.
- We install wooden poles at the corners of the planned building, along its perimeter (every 2 meters) and at the points of intersection of the walls of the structure.
- Place a layer (15–20 cm) of sand on the bottom and compact it as thoroughly as possible.
- We carry out waterproofing of the lower part of the wooden supports (impregnation with oil, “wrapping” in 2-3 layers of roofing felt or ordinary roofing felt, which it is advisable to glue with bitumen-based mastic).
- We mount and align the pillars vertically (use a building level).
- We fill the voids between the pit and the pillar with broken bricks, large crushed stone and sand. These materials should be poured in layers and compacted constantly. The thickness of each layer is at least 10 cm.
- We level (now in height) the installed supports - we cut off their tops to achieve a completely horizontal plane. This procedure is easy to do if you stretch a cord over the posts.
- We apply roofing material or a special waterproofing film to the ends of the columnar supports.
Your wooden foundation is ready! Feel free to install a wooden structure on it.
The foundation of the building under construction must be strong and reliable, able to withstand all weight loads from the building structures of the house, engineering equipment, household items and snowfall on the roof. The foundation must remain stable in the event of possible soil movements and not collapse in the event of freezing or rising groundwater. However, erecting a heavy and powerful reinforced concrete foundation is not always advisable. In certain cases, the issue of reliability can be solved by using a supporting structure of a columnar-tape type.
This is a kind of combined strip-column foundation, which simultaneously combines technical solutions adopted for pile and strip monolithic systems.
Thanks to this, such foundations can be erected on weak, unstable soils with a high groundwater level and a large freezing depth for one-story residential buildings and outbuildings. Strip foundations can be built for wooden and frame buildings that do not have heavy reinforced concrete floors and stone walls.
Brief description of the design
Structurally, the columnar-strip foundation consists of several supporting stone pillars, on which rests a reinforced concrete shallow grillage, which takes all the weight loads of the building. Reinforced concrete pillars, poured on site, are most often used as pole supports.
In general, the columnar-ribbon base combines the following main elements:
- reinforced concrete pillars, the design and quantity of which are determined by calculation;
- reinforcing frame filled with concrete;
- above-ground strip structure made of bricks or blocks;
- internal vertical supports for bearing loads for walls and partitions.
Upon careful examination, you will notice that the very idea of the technology was taken from multi-story city buildings with basements and semi-basements, where a pile field of the design configuration is driven in, and after that a connecting tape grillage of small depth is installed to create a single support.

Advantages and disadvantages of column-and-ribbon structures
The construction of a foundation of this type is less labor-intensive than in the case of any other type of monolithic reinforced concrete, and also requires less construction materials. Having design solutions in hand, professional construction knowledge and extensive experience are not required to complete the work. Even a beginner can cope with this, having one or two assistants with him.
The structural advantages of columnar-tape foundations include:
- good protection from vibration effects and possible ground movements;
- special design of support pillars, which increases strength and stability;
- the use of mixed types of materials when installing the grillage;
- increased thermal insulation properties due to the lack of contact of the underground floor with the soil;
- the possibility of construction in areas with difficult terrain without preliminary planning;
- reduction in the volume of earthworks;
- the opportunity to make a columnar strip foundation with your own hands.
In addition to obvious advantages, such support structures also have disadvantages that can somewhat complicate the organization and implementation of work:
- complex engineering calculations that take into account a combination of soil characteristics and the total weight load;
- possible differences in the cross-section of the support along the height and perimeter of the building;
- the practical impossibility of determining the influence of soil heaving, which requires a safety margin;
- impossibility of making a basement.
Therefore, it is recommended to entrust the calculations and project development to professionals who will determine the necessary data and make decisions with the minimum possible, but necessary margin of safety and reliability.
Selection of support pillar material
The reliability of the foundation structure largely depends on the correct choice of material for the support posts. At this stage of construction, you should not try to save money. If at the moment the purchase of inexpensive materials will allow you to save some money, then in the future you will have to spend very significant sums on repairs and correcting defects.
For the construction of a columnar strip foundation with a monolithic floor slab, you can use:
- wood;
- rubble stone;
- solid red brick;
- aerated concrete, foam blocks, slag concrete or concrete blocks;
- asbestos-cement, concrete, plastic or metal pipes;
- concrete pillars;
- pre-fabricated and bored columns.
Each material has its own characteristics, which are described below.
Wood
The main reason for the low popularity of wooden foundations is their fragility. Even additional treatment to protect against moisture, rot and insects increases the service life for a short time. However, wooden beams can be used to construct grillages raised above the ground in the construction of light utility and domestic buildings.
Rubble stone
This material has long been known to builders and has been widely used for the construction of foundation structures. It is distinguished by great strength and durability. However, its laying requires highly skilled mason skills to fit individual stones to each other. Therefore, only a professional builder can lay reliable rubble stone pillars.
 Types of columnar foundations: a. brick pillar on a rubble base; b. solid brick pillar; V. brick pillar on a concrete base; d. burnt wooden chair (oak or pine); d. metal stand; e. rubble pillar.
 Bricks and blocks
For the underground part of the foundation structure, only high-grade clinker or solid clay bricks can be used. In columnar strip foundations made of bricks and blocks, the above-ground part of the grillage is laid out, located on a concrete monolith.
Considering the hygroscopicity of these materials, a surface coating with bitumen waterproofing in several layers is required.
Pipes
The use of asbestos-cement, concrete, plastic or metal pipes is advisable as permanent formwork, inside which a reinforcement frame is installed and concrete is poured. As a result, you can quickly obtain reinforced concrete pillars of high quality. Metal materials must be provided with a waterproofing coating to protect against corrosion.

Concrete pillars
Vertical pillar supports made of reinforced concrete are made on site after drilling or excavating wells. The structures are poured inside removable or permanent formwork after installing the reinforcement cage. In addition, individual poles or prefabricated piles can be purchased. They are installed at points with the greatest weight load and then tied with a grillage.
Rammed and bored posts
They are purchased ready-made on the building materials market. Installation is carried out using special driving equipment directly at the installation sites. Structurally, these are hollow reinforced concrete supports, inside of which a metal frame is installed and concrete is poured. Columns of both structures may be used together.
Technological principles of construction
The entire foundation construction process must be carried out step by step, in the following order:
- installation or installation of support pillars;
- installation of reinforced concrete monolithic screed, metal or wooden grillage;
- brick or block masonry.
This division is based on the possibility of continuous production of work at each of these stages.
Installation of support pillars
Calculation of the cross-section, quantity, locations and depth of pillar supports. When choosing the type of structure, it is recommended to use a shallow monolithic grillage strip located along the pillars to a depth of about 500 mm.
This allows the weight load from the building to be more evenly distributed on the foundation. A grillage structure raised above the ground should be done in the presence of complex terrain, in places of strong soil heaving and in permafrost areas.

The base needs to be buried 300-400 mm below the possible freezing point of the soil, taken from SNiP “Climatology”. Based on the results of engineering calculations, depending on the selected material and terrain features, the technical characteristics of the pillars are determined, such as diameters, locations and installation methods.
 Reinforcing frames must contain at least 4 vertical strings.
 The technological process of installing supports can also be divided into several sequential works, which include:
- removal of existing vegetation and leveling of the work site;
- marking the locations of pillars and grillage configurations;
- drilling or digging wells;
- installing a sand cushion and pouring concrete only to the height of the lower base plate;
- ensuring waterproofing protection of elements;
- installation of permanent formwork or bored columns;
- assembly and installation of reinforcement cages;
- pouring concrete into formwork or columns.
When pouring, one should take into account the mandatory expansion of the base to a size twice the diameter of the column itself, but not less than 400 mm. Therefore, pouring concrete should be done in two stages. Initially, you should fill the base, wait 2-3 days, and only then begin installing the formwork for the installation of supports.
Grillage installation
With a shallow grillage design, this stage of work should begin with digging a trench from the very beginning. The depth of the concrete strip should be more than 400 mm.
After this, the formwork of the design configuration is installed. To do this, you can use boards or standard factory-made shields. Inside the assembled formwork it is necessary to lay a layer of plastic film or roofing felt. This will ensure the tightness of the structure and prevent water leakage from the cement mixture.
Metal frames are manufactured according to the calculated design diagram for the installation of a horizontal reinforcing belt. All reinforcement structures are placed inside the formwork and, during installation, are connected in conjunction with the vertical strings of the pillars, which must protrude to a height of at least 300 mm.
 Correct and incorrect device.
 Next, you can start pouring concrete. The mixture must be laid in layers, and the work is planned in such a way that the laying of the concrete mixture is completed in a day. The above-ground part of the foundation can be made of bricks or blocks. This will ensure the presence of a horizontal waterproofing layer between the underground part and the supporting tape of the layer of construction of the walls of the house.
The formwork can be removed a few days after the concrete has gained strength.
At the final stage, all outer surfaces of the grillage are covered with three layers or roll materials are used. Protecting stone structures from moisture at each stage of work will ensure long-term operation and prevent the formation of destruction.
 Installation sequence.
 Foundation Construction Guide
Let's summarize. Step-by-step instructions for installing a columnar strip foundation with your own hands provide for the following stages of work:
- Clearing the site of trees, bushes and low vegetation. Leveling the ground surface if necessary.
- Marking the installation locations of pillars and grillage contours along the axes of the house. The pillars must be in all corners of the building and at a distance of no more than 2.0 meters from each other.
- For brick, rubble or square monolithic pillars, you need to dig holes. For permanent cylindrical formwork in the form of pipes or hollow columns, holes should be drilled. The depth of pits or wells is 300 mm deeper than the possible freezing point.
- Pour and compact sand or crushed stone-sand cushion into the open cavities. Install formwork elements or bored posts. Raise them above the bottom of the pit to the height of the support cushion.
- After this, install the reinforcement frame of the columns, resting on the bottom, and pour concrete to the height of the support pad. Wait 2-3 days for the concrete mixture to set.
- Pour concrete into the column formwork and compact it well using a vibrating tool. After hardening the concrete mixture with removable formwork or masonry, treat the surfaces with a triple layer of bitumen coating insulation. This work can be performed after installing the grillage.
- Install the formwork in such a way that the reinforcement protruding from the pillars fits into its internal space. Next, begin assembling the formwork for the horizontal belt. After its installation, cover the walls and bottom with plastic film or roofing felt.
- Assemble the reinforcement cage in accordance with the design and lay it inside the formwork structure. After this, tie or weld a horizontal belt with the vertical strings of the pillars.
- Concrete is poured into the grillage formwork in one day. Concrete is laid in layers and the mixture is compacted to remove air bubbles.
- If masonry is used in the construction of the foundation grillage, then 2 layers of roofing material should be laid over the concrete surface to create a waterproofing layer. Every 3-5 rows, the brickwork must be reinforced with a metal mesh with a cell of no more than 100x100 mm made of 5-6 mm wire.
5-7 days after completion of the work, you can begin installing the walls or frame structure of the building. In the case of a raised grillage structure, all sand located under the building must be removed. In this case, the house will remain supported only by columns.

Video on the topic
Main advantages:
- Reliability, strength, wear resistance, long service life;
- A universal material applicable for any type of construction, on any landscape;
- Cost savings - considered one of the cheapest;
- No extensive preparatory work is required, waterproofing is minimal;
- Installation can be carried out by one person;
- Speed of work.
Columnar foundations are economically justified - much cheaper than strip foundations. But the geological features of the soil should allow it to be installed.
- it is impossible to make a cellar or basement;
- Suitable only for simple, light buildings.
Foundation types
Before we start building a columnar foundation for a frame house, we decide on the material for the pillars: bricks, wood, concrete, stone, flagstone. The choice depends on the construction budget and type of structure:
- Lightweight structures on a frame;
- Buildings with 1-2 floors;
- Outbuildings, bathhouse, terrace.
Wood is a durable material, but capricious; it needs to be burned and treated with antiseptics to prevent rotting. Wood requires additional use of waterproofing materials.

- Main types of columnar foundation
A monolithic columnar foundation has maximum compressive strength, and with a reinforced base - tensile strength. The best material for foundations, which is why it is popular. It is wear-resistant, durable and easy to install.
Brick is considered one of the most affordable and durable. Unlike wood, it is stable, has the simplest technology, and will last for about a century. This type can be used to build a two-story building.
Among the disadvantages of a brick foundation are high labor costs, excavation work, and poor resistance to moving soil. The result: displacement of the structure. The main disadvantage: for masonry you need a special burnt brick, which is expensive. The minimum size of brick pillars is 500x500 mm.

The foundation is also created from flagstone and rubble stones. The minimum size of pillars is 600x600 mm.
A columnar foundation with a grillage is created to evenly distribute the load. Uniform distribution of forces by the grillage is the basis of construction.
We carry out calculations
The calculation of a columnar foundation can be performed independently under the supervision of specialists. We take into account the type of house, the weight of the structure and materials. We take into account the costs of a grillage to bundle materials and properly distribute loads. The technology ensures the safety and reliability of the frame.

There are 2 types based on depth:
- Shallow depth (40-70 cm) – used in rocky, sandy soil with low groundwater.
- Recessed (below half a meter - the depth of soil freezing) - it can be installed at a depth of up to 2 meters, below the groundwater level. Apply on clayey, water-saturated soil.
The exact calculation of the pillar parameters depends on the characteristics of the soil and construction features, but a reliable supporting foundation cannot be less than 500x500 mm. If the starting material is flagstone or stone, we make a foundation of at least 600x600 mm. When drawing up drawings, we take into account the fence - the wall between the columns. The fence protects the house from cold, rain and snow.

Phased construction of a reliable foundation
The first stage is preparing the site for construction. We don’t just clean the site (remove debris, fill up uneven areas), but also backfill if the soil is clayey and damp. The second stage is marking: we fix the axis according to the drawings, control the angle and diagonal. Work on the ground can be done manually or with an excavator. The main thing is to accurately position the holes along the axes.
- Digging holes for a columnar foundation
If the depth of the pillar is less than 1 m, then strengthening the walls is not needed; if it is more, we dig a pit with slopes and install fortifications with board slopes. We make the pits wider than the pillars, since it is possible to install supports and formwork. We make a reinforced concrete cushion under the pillar to protect against subsidence.
- Formwork

We arrange the formwork. We take boards 10-15 cm, 4 cm wide and about. Chipboard, plywood, iron sheets are suitable. If permanent formwork is needed, we use pipes made of asbestos, concrete, iron, 100 mm wide.
We reinforce the columnar foundation with rods 10-15 cm long. We make wire horizontal jumpers of 6 cm each. The rods should rise 15 cm on the foundation to connect the grillage to the frame.
- Reinforcement
We pour the concrete in layers of 20 cm. The finished mixture is compacted with a manual deep vibrator and waterproofing is performed. If the soil is wet, we make a double layer, for the rest - a single layer of roofing material.
We install the grillage. We connect the lintels with scraps of reinforcement, weld mounting loops, install the formwork and make a reinforcement base. We make a monolithic belt, or using reinforced concrete beams. After the concrete is poured, we take a break so that it settles and becomes strong and acquires its basic characteristics, then we do waterproofing and fill the hole.

Concrete columnar block foundation is another popular option.
Block foundation
The main advantage is ease of assembly: the base is made of crushed stone, a sand cushion is poured, blocks are placed and bonded with cement mortar. There are restrictions when choosing blocks:
- Do not use on horizontal soil prone to movement;
- Not used for the construction of large buildings;
- Do not use on weak-bearing surfaces - peat, permeable to water.

When choosing, we fix the concrete blocks with a rigid grillage made of reinforced concrete, which makes the construction process expensive, and if we take into account the cladding of the base, even more labor-intensive and complex
If we are planning a pipe With columnar foundation, then we make holes in the ground, tamp the base, insert pillars and sprinkle on the outside. Next, fill a third of the concrete, raise the pipe and fill it again, leaving 15 centimeters at the top unfilled. We tamp the concrete and install a reinforcement rod in the center, leave it to set, insert metal anchors into the left cavity to connect the foundation to the wall, then concrete it to the end.
Calculation of the cost of foundation construction
The main elements for the construction of a columnar foundation do not differ from the strip version: you will need concrete, reinforcement, sand, gravel and waterproofing. For the construction of industrial buildings, a special reinforced concrete foundation is used, manufactured by professionals. All types differ only in construction technology. The cost of materials varies throughout the country and the average figures are presented below:
Cost of materials:
- Heavy concrete class B15-B20 - from 800 to 1500 rubles per cubic meter. m.
- River sand - from 80 to 200 rubles per ton
- Expanded clay - from 800 to 1000 rubles per ton
- The glass type of industrial columnar foundations costs from 1000 rubles per piece. It all depends on the purpose, condition and class
- Fittings with a diameter of 6 - 14 class A400 from 10 to 15 thousand rubles per ton
- Cement 50 – 100 rubles per bag.

Cost of work:
- Digging – 250 rubles per cubic meter
- Installation of a monolithic foundation – 2700 – 4000 rubles per cubic meter. m.
- Waterproofing of a columnar foundation – 40 – 60 rubles per square meter
- Truck crane (rental for mounting main parts and supplying concrete) – from 3,000 rubles per day
- Rental of equipment for delivery of elements and materials – from 270 rubles per hour.
How to avoid mistakes during construction
During construction, it is important to ensure that all pillars operate simultaneously by distributing the load using a grillage. A professional design engineer will be required to draw up the correct project based on engineering and geological calculations. A project consists of drawings and materials consumption sheets.
The main mistakes in the construction and design of columnar foundations:
- Incorrect assessment of the geological features of the soil. If during the design it was not taken into account that the soil can freeze and subsidence, this will lead to cracks in the grillage;
- Poor quality concreting. For concrete to gain basic characteristics and strength, it must be kept for almost a month and moistened on hot days;
- Excessive savings on materials. To save money, the wrong grade of concrete was used during construction. Saving can lead to destruction and high levels of settlement;
- During construction, the engineers did not take into account the differences in relief (during construction on a slope) and did not maintain the depth;
- The main documents were not reviewed - the Project and the Work Agreement - with their help it is easy to control the correctness of the work, the savings in materials, and the completion time.
For small buildings with a volumetric weight of about 1000 kg/m3, one of the best solutions is a foundation made of pillars located in the ground at a certain depth. The step-by-step instructions on how to build a columnar foundation with your own hands are quite suitable even for a person who has basic construction skills.
To do this, it is necessary to carefully and correctly select materials, calculate and become familiar with the construction technology in all details.
If you go by the reviews of developers, the advantages of a columnar foundation are as follows:
- a large selection of materials that allow you to properly distribute the load;
- reasonable cost and low consumption of materials;
- small volume of construction;
For heavy buildings and high groundwater levels, a columnar foundation is not suitable.
How to calculate the foundation
When designing a house yourself, you always know what materials it will be built from.
1. Determination of loads on the house. The weight of all parts of the building is easy to determine. Seasonal loads and the weight of objects inside are added to them. This also takes into account the influence of the grillage, which is usually made of reinforced concrete with a volumetric weight of 2400 kg/m 3.
2. Assessment of the nature of the soil. A columnar foundation for a house is usually built with your own hands without laboratory studies of the composition and properties of the soil. The main indicator is its resistance, which is determined from tables and is in the range of 1-6 kg/cm2. Its value depends on the composition and porosity of the soil.
3. Number of supports. The bearing capacity of the pillars depends on the area of the supporting surface. Bored piles are usually used. It is desirable that they have an extension (shoe) at the bottom. It is important to consider the composition of the concrete mixture and reinforcement. The size of the step between the supports depends on the calculation and does not exceed 2.5 m. They must be present at all corners, at the junction of walls, under beams and in places of concentrated loads.
Foundation material
You can choose many options for how to build a columnar foundation with your own hands. The materials can be very different, but they must be of high quality. They are as follows:
- wood - for light houses, baths, saunas;
- red brick - for medium-heavy houses;
- - for buildings with weighted parts;
- reinforced concrete - for heavy buildings.

Columnar foundation with grillage. Step-by-step instructions for construction
Building houses is not so difficult when all the work is divided into separate and interconnected steps that smoothly transition into one another. If you are building a columnar foundation with your own hands, step-by-step instructions should include all stages of work:
1. Preparation. The construction site is cleared and a layer of black soil is removed under the base. If there is soil containing clay underneath, it is necessary to backfill with a layer of sand and gravel.
The site is leveled horizontally using a level. It provides convenient access for vehicles with materials and mixers with concrete.
2. Marking the house plan. First, mark the contours of the building and the places for the pillars, which are located strictly along the axes. The corners of the foundation of the house must be straight. The correctness of the layout along the center lines is checked, as well as the lower elevation of the trench for compliance with the design.
3. Digging holes for pillars. The foundation can be shallow (70-100 cm) and standard (from 100 cm). The first option is better suited for rocky and sandy soil. In clayey and wet areas, the pillars must be buried to great depth. It is not necessary to dig holes: if possible, the pillars are driven in or screw piles are screwed in. The most common and cheapest way is to drill wells and fill them with concrete.
4. Concreting. A cushion of sand and gravel mixture is placed at the bottom of the pit. The pillars are concreted directly into the ground when it does not crumble. In all other cases, formwork is installed from the following materials:
Boards no more than 155 mm wide, planed on the concrete side.
Ready-made metal shields.
Asbestos-cement or metal. Numerous reviews speak of the benefits of using pipes, especially on shift-prone and loose soil.
Roofing felt rolled into a roll and reinforced with wire or on the outside.
Rolled waterproofing is lined at the bottom with an overlap on the walls to prevent the solution from flowing out through the cracks of the formwork.
5. Installation of fittings. The pillars are reinforced in the longitudinal direction with steel rods. They are installed vertically in the pit and tied with clamps. Part of the reinforcement should protrude 15-30 cm above the foundation for further connection with the grillage.
6. Installation of pillars. If the supports are made by laying concrete, it is supplied in layers and compacted with a vibrator. There should be no cavities left inside to increase strength. The concrete should not be too thin or thick in order to further provide the necessary strength and prevent cracks. Until the required strength is achieved, it is covered with film and moistened.
When laying a columnar brick foundation with your own hands, it is fastened with cement mortar.
Deviation from the horizontal is allowed no more than 15 mm. It will be difficult to correct distortions in the future. There should be no gaps left during laying.
After hardening, the supports are covered with mastic or bitumen for waterproofing. The coatings are applied in 2 layers with roofing felt strips laid between them and outside.
Mistakes when laying the foundation
Developers who build houses themselves should not make mistakes with foundations, which significantly affect the durability of buildings. In most cases the errors are as follows:
- Uneven subsidence of a structure due to insufficient depth of pillars or their different depths.
- Uneven distribution of load on pillars.
- Use of low quality materials for construction.
- The composition and characteristics of the soil have not been assessed.
In order to correctly build a columnar foundation with your own hands, the step-by-step instructions must be completely followed during construction.
Making a grillage
To equalize the load on the pillars and prevent lateral displacement of the house, the instructions for creating a columnar foundation provide for tying the supports into a common monolithic structure using a grillage - horizontal fastening bars. It is installed at a height from the ground level.

For construction, timber, metal profiles or reinforced concrete are used. Particular attention is paid to the place where the grillage is attached to the pillars, since its reliability determines the stability of the entire building.
To construct a reinforced concrete base, wooden formwork is attached around the perimeter of the structure and at the locations of load-bearing walls. A frame made of reinforcement is installed inside, it is firmly connected to the protruding rods of the pillars, and then the concrete mixture is laid. The surface of the grillage is leveled and covered with a film to prevent it from drying out.
When the concrete gains strength, waterproofing is installed on top and the installation of floors and walls begins.

Complete instructions for installing a columnar foundation also include operations for arranging waterproofing and backfilling.
Grillage waterproofing
Waterproofing is done on top of the grillage. It is equipped in different ways, of which the most common are the following:
- Bitumen is applied on top and roofing material is laid alternately with it.
- Cement mortar mixed with sand 1:2 is laid out on the grillage. Then roofing felt is laid.
Pickup device
The underground space is protected from atmospheric influences by installing a fence - a fence between the supports. It is made from or stone. A concrete screed is laid underneath to serve as a base. To do this, first make a trench and fill the bottom with sand. For the screed, formwork from boards and a reinforcement cage are installed. The connection between the fence and the supports is not made in order to avoid the appearance of cracks in it when the house settles.
They try to make the base higher, which makes the structure look attractive. It corresponds to the height of the supports.
Column and strip foundation
A foundation made of pillars, combined with a monolithic concrete frame, combines all the advantages of both. When a columnar strip foundation is erected, the step-by-step instructions are the same as for construction with a grillage. The supports penetrate far into the depths, creating reliable protection against seasonal ground movements.

They are rigidly connected to a shallow shallow base running under the load-bearing walls of the building. The entire structure is poured with concrete at the same time, as a result of which it becomes monolithic and durable. When preparing the solution yourself, the concrete is laid in layers. The use of vibrators is mandatory to remove air bubbles from the mass as much as possible.
Conclusion
Various options for columnar foundations are widely used in private housing construction. It is characterized by high reliability, speed of construction and minimal consumption of building materials.
Having basic skills, many developers can build a columnar foundation with their own hands. Step-by-step instructions will help you avoid mistakes and make the foundation reliable.