Mixers are the main elements for comfortable water procedures. They are installed for bathtubs and sinks, and are used constantly, due to which various problems with their performance regularly arise. Most often you have to deal with leaks and blockages, and you can repair the mixer yourself, because if you first carefully and correctly understand the problem, then it’s not difficult to get rid of it.
Before you repair the faucet in the bathroom, you need to prepare, for which you purchase the necessary tools and certain materials for the job, these include:
- aerator;
- rubber or plastic rings of suitable size;
- control handle;
- attractive looking plug;
- ceramic head, as well as a casing for it;
- adjustable and hex keys;
- knife, screwdriver and pliers;
- drill and hammer.
Required Tools
Even a person who has some experience in repairing faucets or plumbing fixtures has these tools. Even without experience, you can handle repairs yourself to fix your item, but it is important to carefully study the instructions and purchase the tools necessary for this process.
Mixer repair depending on the malfunction
Repairing a ball mixer or any other begins with determining the features and causes of failure. Based on the information received, a decision is made regarding what actions must be performed for repairs. It can break for the following reasons:
- low quality of the device, since certain manufacturers sell products made from low-quality and unsuitable materials, therefore, repair of a ball mixer or other type of plumbing fixture is often required, so it is recommended not to initially save on such a purchase, so that there is no need to constantly invest money and effort in troubleshooting;
- the use of short-lived and low-quality consumable items, for example, gaskets or other parts, since hard water or other exposure factors quickly lead to their destruction, which certainly requires DIY repair of the mixer, which consists of replacing the damaged element;
- improper installation will lead to leaks or other malfunctions of the plumbing fixture, so either this work is entrusted to specialists, or it is carried out independently with strict adherence to the basic requirements and conditions for proper installation.
Bathroom ball faucets require repair most often, as they are considered the most popular and frequently encountered.
Before work, you should decide on the type of device:
- single lever mixer;
- two-valve;
- contactless.

Contactless

Two-valve

Single lever
Each type is installed with its own characteristics, so a broken element will be repaired using a special method. Repairing a faucet spout differs from repair work with housing or cartridge.
Crack in the body
Repair of a shower faucet or sink is often required due to the appearance of a crack on it. This is especially true for products made of brass; this material is no different high strength, such as steel. The mixer may leak due to the appearance of a crack located on the body.
Repair work consisting of eliminating a crack is considered simple, but ineffective, since the leak can be dealt with quickly and easily, but for a short period of time. The crack is sealed with a special sealant, but the problem will only be solved temporarily, so the destruction of the case usually leads to the need to soon purchase a new item.

Even a small crack in the faucet body can lead to the need to replace the device

A sealant is used to repair the crack.
Gasket wear
When a leak occurs, the housing must first be inspected to ensure its integrity. If no cracks or other similar problems were found, then it is possible to determine what kind of repair the single-lever mixer needs, only after disassembling it.

Types of gaskets

Replacing the gasket
How to change the gasket in a faucet? To do this, follow simple and consistent steps:
- initially the valves on the water supply pipes are closed;
- the tap drains completely;
- the inlets are unscrewed, after which the water is drained into the bucket;
- the fixing nut is unscrewed, and if you have to work with a mixer installed in the kitchen, then the nut is usually located under the sink;
- it is important to carefully examine the gasket in the faucet in the bathroom or kitchen, as this will allow you to determine whether it is worn out or has cracks and deformations, since if it has any defects, it will certainly be replaced with a new gasket;
- After replacing the element, the crane is assembled.
Gaskets are inexpensive and accessible elements, however, when selecting them, the optimal diameter is taken into account, since the gasket must come out with force into the groove in the product, so it is advisable to have an old worn-out element with you during the selection process.

Gasket replacement steps
Cartridge clogged
Often, even after the gasket in the bathroom faucet is replaced with your own hands, the problem with leakage remains. Most often, the faucet cartridge needs repair. During the operation of a plumbing fixture, situations often arise when small objects get into the cartridge, leading to its failure. The only solution to the problem is complete replacement element, therefore, repair of a single-lever mixer is carried out by the following steps:
- water is blocked;
- the remaining water is drained from the system;
- the mixer is removed correctly;
- the plug is removed, and to do this it is enough to carefully pry it off with a screwdriver or knife;
- the screw is unscrewed, after which the lever is removed;
- the old cartridge that has failed is dismantled;
- a new element is installed in its place;
- the structure is being reassembled.
Thus, if you figure out how to repair bathroom faucets and their cartridge, this process is simple and quick.

Replaceable ceramic cartridges

Replacing the cartridge
There is a blockage in the aerator
Repair of a single-lever faucet is often required after a blockage is discovered in the aerator. This problem is usually determined when water flows from one tap with strong pressure, and from another in a thin stream. In this case, the problem arose not because of problems with the water supply system, but because of a blockage. Most often it occurs in the aerator. To solve the problem, follow simple steps:
- the aerator is unscrewed;
- the water in the tap opens, and if there is strong water pressure, then the problem lies precisely in the blockage;
- if the aerator is rusty, then it is advisable to use a new element, and if its condition is optimal for operation, then it is simply washed and then installed in the right place.
Thus, it is not difficult to repair the ball mixer if a blockage occurs in the aerator.

Aerators can be of different sizes

On the right is a water jet without an aerator, on the left with an aerator

Replacing the aerator
Clogged water pipe or hose
If you cannot get rid of the problem even after cleaning the aerator, then there may be a blockage in the hose or pipe. This requires high-quality repairs shower hose.
The problem most often occurs where metal pipes are installed. Rust deposits quite often occur on their inner walls, so it is necessary to clean the pipes. If you have the financial means, it is advisable to replace metal pipes to plastic ones, since they are different high quality and resistance to various negative factors.
Repairing a shower hose is also done by cleaning it, but if different methods do not help eliminate deposits, then the element has to be replaced.

Removing blockages in pipes

Mechanical cleaning
Problems with the shower/tub switch
Often, bathrooms use a special design for switching between the faucet and the shower hose. To do this, you can lower the lever or perform other actions. Most often, water stops flowing to the shower when the switch lever drops spontaneously. At the same time, water is supplied exclusively to the tap, which reduces the comfort of using plumbing fixtures.
The cause of such a breakdown is usually the wear of the gasket used in the spool, so this element is initially inspected. If only the top gasket is worn out, then repairs do not require dismantling the mixer, but it is quite difficult to determine the problem. To do this, follow these steps:
- the hose is removed, for which you need to unscrew the union nut, since it is this that attaches the hose;
- Using a hook or awl, carefully pull out the gasket;
- the new element is moistened with water and then installed in the desired place;
- The mechanism is being assembled.
If after completing this process the problem still remains, then replace the lower gasket:
- the water supply to the system is shut off;
- The flexible hose is removed, for which you need to unscrew the union nut;
- the spout and adapter are removed;
- the switch is eliminated;
- the eccentric is pulled out;
- gets the spool;
- the bottom gasket is pulled out, for which a thin hook is used;
- a new pre-wetted element is installed in its place;
- the structure is assembled.
The mixer being repaired must certainly be equipped with suitable gaskets, and you can make them yourself using hard rubber, the width of which is 4 mm.

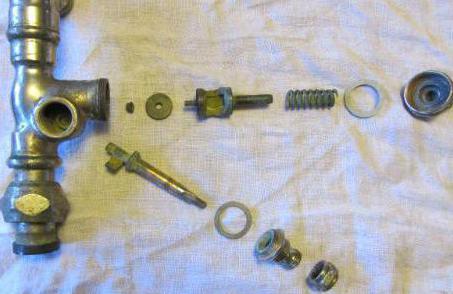
The return spring is clearly visible in the photo

The eccentric will not allow the barrel to be removed while it is in the mixer body

This is what the cartridge looks like

Switch replacement process
Leakage from gander clamp nut
If a leak is detected in the clamping nut, then the repair is considered simple:
- the main valve is closed;
- the clamping nut is unscrewed using a wrench or pliers;
- the gander and the gasket under it are removed;
- a new gasket is installed;
- the mechanism is assembled.

Leaking where the gander is attached

Installing a new gasket
Repairing a ceramic or any kind of faucet can be carried out in various ways, taking into account the existing problem in the plumbing fixture. If you carefully understand the structure of the mixer, then problems can be solved independently, since this does not require specific skills or unusual tools. Before repairing a bathroom faucet, it is important to carefully understand the cause of the breakdown in order to eliminate it. Often it is impossible to cope with problems, so you have to completely replace the mixer or its parts.
Video
1089 09/29/2019 6 min.
Even the highest quality and most expensive plumbing equipment sometimes breaks. In this case, you can either call a specialist or try to correct the situation on our own. There is no point in putting off repairs, because a leaking tap means unsightly stains on the floor, an increase in water supply fees and a long-term spoiled mood. Therefore, you must first familiarize yourself with.
Common breakdowns and how to fix them
- Replacing the gasket of a single-lever mixer. The size of the gasket should be slightly larger than the diameter of the hole intended for it. The gasket snaps into place with little effort.
- Breakdown of a mixer with two taps. The most common cause of failure is wear of the vertical oil seal. The problem can be solved by tightening the nut all the way. There is no need to apply force - you can break the thread and have to do it.
- Weak water pressure and the appearance of extraneous sounds from an open tap may indicate contamination of the aerator - the nozzle designed to release water. You need to take it out by turning it clockwise and rinse it well. If this does not help, the problem is due to factory defects in the mixer or poor water quality. Can be used .
If the tap continues to leak, the seal must be replaced. To do this, remove the union nut and take out the oil seal bushing. The gap is filled with a sealant, but the bushing must fit in it. Then put the bushing and nut back.
Repair of two-valve tap
Tools you need to prepare before you begin troubleshooting your faucet:
- a set of keys, you will mainly need an adjustable wrench and a wrench;
- a set of screwdrivers, a Phillips and a flat head are required.

Have a sponge and napkin ready to remove dirt, a special tape for making liners, and pieces of rubber. Place a soft cloth on or. But this is also prudent, because if a tool or plumbing part falls, it will not cause any damage.
Any manipulations with the tap can only begin after turning off the water supply and draining the remaining water. The valve is usually located in the toilet or hidden behind, just turn it ninety degrees all the way.
On older plumbing, valves can rust and become blocked. In this case, drip a lubricant onto them and carefully try to turn the valve.
Replacing the gasket
A worn gasket becomes the culprit of constant faucet leakage. Even if you use force when twisting it, water will continue to drip.
Scheme of work for replacing the gasket:

- remove the valve, do this by turning to the left;
- get a gasket that has lost its properties;
- a new gasket can be purchased at the plumbing department or made with your own hands from available materials: from rubber scraps or thick pieces of leather, and a worn gasket will serve as a sample;
- place a new gasket in place of the old one;
- place the seal directly on the stop edge;
- put the valve back, twisting it to the right;
- tighten the valve using a tool;
- supply water supply.
Replacing the sealing gland
Wear of the sealing gland becomes the root cause of water flowing when the tap is open. It oozes through the gap between the valve and the seal.
Scheme of work for replacing the oil seal:

- use a screwdriver to remove the oil seal nut;
- build a seal from a special tape;
- inspect and discard the worn liner;
- place a new liner on the valve barrel;
- tighten the oil seal nut;
- supply water.
After replacing the seal, water will stop flowing.
Faucet repair for drinking water watch the video:
Lever repair
Lever taps regulate the pressure and temperature of the incoming water with one handle. This function is performed by disk and ball cartridges. You can easily replace them yourself.
Problems that require cartridge replacement (in addition to leakage):

- hot or cold water has completely stopped supplying;
- the temperature regime changes without affecting the lever;
- weak water pressure;
- the water does not shut off completely and continues to flow in a thin stream;
- To switch the lever you need to use force.
Ball cartridge

Every owner has to repair the faucet.
The design of a mixer with a ball cartridge is simple - in the center there is a stainless steel ball with three holes. Through two holes, hot and cold water enters it and mixes, and the latter is the outlet for water at the desired temperature. The ball rotates on rubber seats.
By the way, according to the rules of Feng Shui for the kitchen, taps should be kept in good working order, since through a leaking tap, well-being leaves the house.
Replacing the ball cartridge or its parts is done in several stages. Scheme of work:
- remove the lever by removing the screw on which it is attached;
- Unscrew the threaded connection clockwise;
- remove the faucet dome;
- remove the plastic sleeve, clean it from plaque and dirt with a soft brush;
- if necessary, replace the seal;
- assess damage to the ball and other elements of the cartridge, replace the ball or rubber seals with new ones;
- check for leaks.
Disk
A disk cartridge is a little easier to change than a ball cartridge. Scheme of work:
- remove the plug and remove the screw;
- remove the tap lever;
- assess the damage to the cartridge, replace the necessary parts with new ones;
- assemble the structure in reverse order;
- check for leaks.
If the new faucet is leaking

New faucet, can be replaced under warranty
The new faucet should not leak. If this happens, there is a manufacturing defect.
You cannot repair such a faucet yourself - only specialists can do this. It is necessary to dismantle the defective mixer, return it to the store and get it replaced with a working product.
Watch the video with a full description of the work to repair a leaking faucet:
How to extend service life: rules for purchase and operation
In order for a crane to serve its owners for a long time, you need to take its choice seriously.
Rules for purchasing, installing and operating a crane:

- When buying a crane, you don’t need to be guided by a low price. Plumbing must be made from quality materials, and they cannot be too cheap.
- The installation will prevent large particles of dirt from entering the tap. It happens that blockages appear not in the tap, but in the hoses. Purchasing a filter for purifying water from excess iron and salts will permanently relieve owners of lime deposits.
- When installing a faucet, there is no need to be zealous with tightening the valve so as not to strip the thread.
- The tap should be opened and closed all the way, but without force.
- Regularly check the faucet for leaks, disassemble it, treat it with lubricant, and rinse it. The service life will increase several times.
When you first notice a leak or any other malfunction, begin repairs immediately.
See our guide to replacing a kitchen faucet:
During self-repair crane, do not neglect safety precautions. If at any stage of the work problems arise that cannot be solved on your own, you need to call specialists.
Even the best quality plumbing fixtures break down after a while. However, not everyone is able to solve the problem on their own and fix a leaking faucet. Don't put off repairs for too long. After all, a leak increases water consumption and spoils appearance plumbing with unsightly stains and traces of rust. You can fix the faucet yourself. What is required for this and how to carry out repairs?
Preparing plumbing
If the faucet is leaking, you can fix it yourself. First you need to prepare everything. If you still have the packaging from the mixer, it’s worth finding it. As a rule, it will contain detailed instructions, which describes the structure of the accessory and some recommendations for its repair. In addition, the package may contain the tools necessary to repair the faucet.
Before starting repairs, turn off the water. To do this, close the valve. In this case, you need to turn off the supply of not only cold, but also hot water. To collect the liquid you will need a deep container, such as a basin. During repairs, you should have dry cloths or sponges on hand to wipe off splashes.
What is needed for repairs
After preparatory work You can start troubleshooting the mixer. If closed tap leaks, you will need special tools to fix it. They need to be prepared in advance. To troubleshoot you will need:
- Flathead screwdriver.
- Crosshead screwdriver.
- Replacement part.
- or linen.
- Soft material.
- Dry cloths.
- Deep capacity.
This simple set of tools is usually enough to fix a leak. If you don’t have time to run out for new gaskets, they can be made from leather or rubber. Usually the faucet leaks due to wear of this part. Soft material is required to protect the sink from damage. After all, the tool can slip out of your hands. As a result, ceramic products may break, and the enamel of metal ones may crack.

Two-valve tap: replacing the gasket
Why is the faucet leaking? Most often, such accessories wear out the liner or gasket. To replace it you need:
- Unscrew the valve body. To do this, the part must be turned counterclockwise.
- Now you can remove the damaged gasket.
- A new part should be made from a piece of thick leather or rubber. It is worth taking a worn gasket as a sample.
- The new part must be carefully installed in place of the old one.
- It is worth wrapping a little sealing tape around the stop edge. You can use linen.
- Finally, it is worth installing the valve body in its original place. To do this, the part should be rotated clockwise.
- The installed valve must be tightened well. You can use a wrench for this.
If the faucet has been leaking for a long time and a quick replacement is required, then a new gasket can be purchased at a specialized store. This will save time. As for the homemade part, it is more suitable for short-term repair of a breakdown.

How to replace the oil seal bushing
A two-valve faucet leaks for several reasons: the gasket has become unusable or the sealing insert of the stuffing box is worn out. If necessary, both parts can be replaced independently. You can recognize the wear of the oil seal insert by the flow of water between the valve stem and the oil seal nut. To fix the problem you need to:
- Unscrew the nut of the oil seal itself. This can be done using a screwdriver with an appropriate tip.
- It is worth making a new liner from fluoroplastic sealing tape, similar to the old one.
- The worn part must be carefully removed.
- The new liner should be wound around the valve stem.
- Finally, tighten the nut.
If everything is done correctly, the leak will stop. In this case, the valve will turn more smoothly.

How to replace a shower hose gasket
Often a leak appears in the place where the shower hose and faucet connect. The main reason for such a breakdown is wear of the ring gasket. This part can be easily replaced. For this you should:
- Disconnect the shower hose from the mixer using an adjustable wrench. Everything must be done very carefully so as not to damage the thread. Otherwise, the hose itself will need to be replaced.
- Now you can remove the worn part.
- A new one should be installed in place of the old O-ring.
- Finally, all that remains is to screw the shower hose into place, acting carefully and without squeezing it.
To eliminate such a leak, experts recommend using a silicone ring gasket. Parts made of rubber are short-lived and wear out quickly.
If, when switching the water flow to the shower hose, the tap still flows smoothly, then the shut-off element needs to be replaced. This part is called a “crane axle box”. The locking element is located in the mixer handle. You can purchase a crane axle box in a specialized store.
The main causes of failure of a single lever ball valve
If a faucet is leaking, the problem must be fixed quickly and efficiently. Otherwise, the water can cause more damage and ultimately ruin your plumbing. Single-lever ball-type products may become unusable:
- Due to wear of the sealing gasket.
- Chips and cracks on the body that occurred as a result of mechanical damage.
- Rusted aerator.
- Accumulations of large amounts of dirt.
- Blockage between the ball and the seats.
A defect on the body can be eliminated by using cold welding or sealant. However, this is only a temporary measure. After some time, a complete replacement of the structure will be required.
If the reason lies in a rusty aerator, then it should be removed and then cleaned. This can be done using an old toothbrush. It is worth noting that after cleaning, the water pressure will become stronger.
If the ball valve is broken
A ball valve has a more complex structure and differs from a two-valve valve. Most often, such products break due to dirt accumulated inside the case. It is this that disrupts the operation of the mixer. If water flows from the tap, it must be disassembled, cleaned well and reassembled. This requires:

Problems with the new faucet
What to do if the faucet is leaking? How to fix a new faucet? As a rule, such products cannot be repaired. The main reason for their occurrence is a manufacturing defect. To troubleshoot problems, you should dismantle the new faucet and take it back to the store. You must replace the damaged product. The main thing is not to throw away the receipt and documents before the first test of the mixer. Only a professional plumber can repair a faucet that has a manufacturing defect at home.
Is it possible to avoid damage?
If desired, you can repair the faucet in the bathtub or kitchen yourself. This will save you a decent amount. However, repairs do not always allow you to fully restore the functions of the crane. In most cases, a complete one is required. To avoid frequent breakdowns in the future, you should carefully consider the choice of accessory. Please note:

In conclusion
A running tap in the bathroom or kitchen is unpleasant. Constantly dripping water irritates and spoils the appearance of plumbing fixtures. You can fix the problem yourself. The main thing is to clearly imagine the structure of the structure and have it at hand necessary tools. Repair of a product also depends on its type. Most often, ball and two-valve mixers fail.
Single-lever faucets are a new trend in the design of a modern bathroom or kitchen. The standard herringbone faucet and wall-mounted faucets are losing their popularity against the backdrop of such a functional and stylish analogue. A single-lever (or joystick) faucet is a body with a plate in which cold and hot water are mixed. The plate acts as a lever. This design can be made of ceramic, metal or plastic.
If the joystick mixer fails, it must be disassembled and any problems resolved. To eliminate them, you need to know the types of “one-armed” mixers, as well as the principles of working with them.
Types and features of single-lever mixers
Exist 2 types o bottom lever taps:
Advantages and disadvantages of joystick mixers
Single lever faucets have become popular due to convenience and ease of use. With the help of such mixers, water is quickly regulated to the desired temperature by moving the lever to the right or left. To increase or decrease the water pressure, the joystick is adjusted from top to bottom. In addition, single lever taps demonstrate long service life. This is due to the fact that in the design of such faucets there are no rubbing elements made of metal, as well as rubber gaskets between the moving parts of the faucet.
 The disadvantages of a ball valve are: rapid wear of rubber seals. Therefore, to avoid breakdowns and clogging of the mixer, it is recommended to replace these parts every 2 years. Failure of a single-lever faucet can occur if abrasive elements (for example, sand) enter it along with water. This is why it is so important to install special filters to prevent clogging.
Some cheap models of cartridge faucets are difficult to set a comfortable temperature within 35 - 41 degrees. This is due to the fact that inexpensive analogues Such mixers have a small angle for adjusting the water temperature. This design does not allow for precise adjustment, which is not inferior in accuracy to faucets with a ceramic faucet. But disk models from well-known brand manufacturers have wide angle settings up to 15 degrees, which allows you to quickly and easily obtain the required water temperature. This functionality is achieved due to the special design and high-quality material of the parts.
How to properly disassemble a disk mixer
If the plates in the faucet sleeve break, it is necessary to disassemble the mixer. To do this you will need the following tools: screwdriver and hex wrench.
Instructions:

Tip: before buying a new cartridge for the mixer, you need to take with you the old disk that has already failed. The thing is that cartridges can have different hole diameters (3 or 4 cm) and latches on the bottom plate of the cartridge. Therefore, there is a risk of purchasing a larger or smaller disk. Also, when choosing a new cartridge, you need to pay attention to the disk with a silicone gasket, since it is less susceptible to water.
How to properly disassemble a ball mixer
 This type of single lever faucet is as easy to disassemble as a cartridge faucet. It should be borne in mind that if a serious breakdown occurs, you will have to replace the entire mixer. If the malfunctions in the operation of the faucet are insignificant (for example, when turning on the mixer on full power the water flow is weak), you need to disassemble the faucet and repair it yourself. The cause of such a breakdown may be a clogged faucet. abrasive substances.
Instructions:
- Remove the nut from the faucet spout.
- Pull out the mesh, rinsing it with water.
- Place the nut and screen back into the mixer.
If the tap is leaking, it is necessary replace rubber seals for new ones. To do this you will need: a screwdriver and a hex key.
Instructions for replacing the rubber seal:
- The screw is unscrewed and the lever is removed.
- The connection is removed from the thread, then the screw is unscrewed with a screwdriver. Usually plaque collects on it, which needs to be removed with a cloth.
- The rubber seals are removed and replaced with new ones. The ball is also removed.
- After replacing the gaskets, the ball is installed in its place. The seals are secured with a plastic nut.
- The lever is installed and the screw is fixed. Finally, you need to check the operation of the mixer system by opening the tap. There should be no water leaks.
Prevention of breakdowns of a single-lever mixer
In order for joystick taps to serve for a long time, it is necessary:
Knowing the diagram and principle of operation of single-lever mixers, you can independently repair a failed joystick tap.
How to repair a faucet (video)
A leaking faucet in the kitchen or bathroom can cause a lot of hassle, including increased utility bills. If the damage is minor, then you can repair the mixer yourself. This will save time and money spent on plumbing services.
Single lever mixer
The most common type. He is simple design, where the locking mechanism is a ball or disk. Depending on this, such taps are:
- Ball;
- Disk.
The handle used to regulate the pressure and temperature of the water is called a flag. Therefore, the second name for such a mixer is flag.
The most common problem that owners of such a faucet encounter is that when the handle is raised, water flows out of it. This is a sign of a broken locking mechanism. Let's look at how to repair a faucet with a broken cartridge step by step:

If the problem is the opposite, that the water flows under too little pressure, the aerator is clogged. An aerator is a metal mesh at the outlet of the faucet. It serves to spray a continuous stream of water into thin streams, filtering solid residues (lime, rust).

How to clean the faucet aerator step by step:

Sometimes, instead of specialized compounds, even a simple dishwashing detergent is used. But it only works in hot water. Similarly, you will also get rid of scale and sediment on the shower aerator using hydrogen peroxide or ammonia alcohol.
Video on the topic:
Consider a two-valve mixer
This problem occurs in all types of faucets - with one lever, two, even newfangled touch ones. If water flows from the faucet when it is closed, this is a sign of a problem with the gasket or ceramic layer. Replacing the gasket in the mixer is the simplest type of repair work, which can be easily done with your own hands.

First you need to disassemble the double lever faucet:

In some old faucets, the role of this gasket was played by a thin string. The oil seal was wrapped with it. If this is your case, then you can do without changing the rubber gasket. Just change the harness.
Another common problem is the breakdown of the crane axle box. This is a locking mechanism in which ceramic gaskets and rubber bands are installed. The axle box itself is secured under a decorative cover, which can be removed according to the instructions above.

How to disassemble and repair the faucet axle box in the mixer:
- The upper part of the locking mechanism is unscrewed, ceramic parts and rubber gaskets are visible in the hole. They come out carefully. The outer gasket must be removed;
- With a slight movement, push the axle box out. If it is tight, we recommend lubricating the part with machine oil;
- If the axlebox itself is damaged (cracked, rusted or thinned in some places), then it can no longer be repaired. But most often the rings that are installed on it are erased;
- Locking rings are made from various materials: fluoroplastic, rubber. The average element thickness is 1 mm. If a part needs to be replaced, a similar new part is selected and installed in place of the worn one.