The construction of any building begins with the construction of a foundation, the strength of which determines the stability and durability of the structure. Trying to reduce the amount of estimated costs, developers use building materials of natural origin and build their own foundation from stones. Rubble is one of the most popular building materials due to its increased strength, inexpensive price, and resistance to moisture. Let's consider the properties of building materials and the technology for performing foundation work.

Rubble is one of the most popular building materials due to its increased strength.
Foundation stone - features of natural building materials
When planning to build a stone foundation for a house, many people prefer rubble, due to the close proximity of the quarries in which it is mined. The construction of a rubble foundation is similar to the construction of a brick building - the rubble is laid out tightly and fixed with concrete mortar. When deciding to use rubble stone for the foundation, you should study:
- properties of building materials;
- types of natural stone;
- rules for choosing a bottle.
It is also important to know how to prepare material for construction activities. Let us dwell on these issues in detail.
Advantages and weaknesses
Studying the characteristics of the material is mandatory when deciding on the construction of a stone foundation. Despite the fact that a stone foundation made of rubble has increased strength and can be used for more than a hundred years, you should study the advantages of a natural building material, as well as analyze its weaknesses.
Natural building materials have a number of advantages:
- increased safety margin;
- increased load-bearing capacity;
- environmental cleanliness;

DIY rubble concrete foundation
- long period of use;
- resistance to moisture;
- resistance to temperature changes;
- attractive appearance;
- affordable, compared to other building materials, price.
Natural rubble is capable of maintaining integrity under the influence of forces exceeding 100 kilograms per 1 cm² of surface. This allows it to be used for the construction of the foundations of two-story buildings. However, the use of the material has weaknesses:
- significant time spent on adjusting the size of rubble stone for masonry;
- increased labor intensity of masonry work caused by the selection of the shape of the building material;
- the need to first perform complex calculations that determine the bearing capacity of stone foundations;
- the impossibility of using rubble stone to build the foundations of multi-story buildings.
Despite the existing disadvantages, environmentally friendly building materials are often preferred due to their reasonable price and availability.

Natural quarry is able to maintain its integrity under stress
Types of rubble stone used
Professional builders call rubble a rock of natural origin mined in quarries:
- various types of limestone, differing in structure and color;
- multi-colored granite mined from various deposits;
- calcareous tuff, as well as siliceous and volcanic rocks;
- dolomite, which is carbonate rock of sedimentary origin.
The material has the following characteristics:
- color scheme;
- structure;
- overall dimensions;
- mass;
- form.

Natural quarry varies in shape
The material used to lay the foundations has certain requirements:
- maximum weight should not exceed 30 kg;
- The dimensions in the greatest dimension should not be more than 50 cm.
Depending on the configuration of the building material, it is divided into the following types:
- ragged. It is easily distinguished externally by its irregular contour and oblique edges, as well as numerous chips. This is due to the extraction technology carried out by the explosive method;
- cobblestone. This type of rubble is distinguished by its rounded shape, as well as its size not exceeding 30-35 cm. Round boulders look harmonious in rubble masonry and do not require external finishing;
- bedded stone. It reaches a length of 0.5 m and has two parallel edges. This type of mineral consists of parts of a layered rock mass obtained by breaking out of layered rocks;
- flagstone. This type of rubble is characterized by reduced thickness compared to length and width. The upper and lower planes of the mineral are parallel, which facilitates laying and reduces labor costs.
When choosing a stone for the foundation, you should take into account its features.

Bedded sandstone “Volga”
Despite the fact that rubble can be found in natural conditions, it is problematic to independently collect it in the required quantity to perform foundation work. When purchasing a foundation stone, it is important to be able to determine its quality. Sequencing:
- Visual inspection. Cracking and delamination of the material is not allowed.
- Strength test. When struck with a hammer, the rubble stone must maintain its integrity.
- Density estimation. The result of hitting with a hammer should be a ringing sound.
It is also important to pay attention to the cleanliness of the outer surface. The concrete solution will not be able to properly contact the dirty material, which will affect its strength.
Preparation of building materials
Svarog (Builderclub expert)When planning to build a stone foundation for a house, you must first prepare the material. To do this, large blocks should be split into small pieces weighing up to 25-30 kg.
Hello.
Indeed, a strip foundation will be the most optimal for you. Since your loam layer is very heaving, and the groundwater level can rise to the surface, you would have to make the slab thick (about 400 mm, if not more).
It remains to determine the width of the strip foundation and its depth. The fact is that the problem of heaving of your top layer (I don’t take the plant layer into account at all, I’m talking directly about loam) can be solved in several ways. The most standard way is to go through the freezing depth of the soil, then you will not have heaving as such. The second option is to make a fairly rigid grillage, and then you can put it even on the surface - the house will “walk” but as a whole. That’s how the same stove works, by the way. But it’s not easy to achieve such rigidity with a grillage - you need height, and we just wanted to get rid of it.
So let's look for a compromise. Namely, we will deepen the grillage so that frost heaving no longer has a strong effect and the grillage is not too deep. According to geology, your freezing depth is 1.32 m. Accordingly, you can go 700 - 800 mm below the surface of the earth, this will be enough. If you want to save even more, you can do the following: First, place a 300 mm thick sand cushion under the bottom of the grillage. Accordingly, the bottom of the foundation can be deepened by only 300 mm. Secondly, it will be necessary to insulate the blind area after building the house. Preferably in the first year (or cover it with snow around the house before frost). All that remains is to decide on the width of the grillage. According to calculations, your width is 500 mm; you will need to adjust it depending on the thickness of your walls. The grillage should be wider than the entire wall pie. You can, of course, make a wall with small overhangs, but it is not advisable. Let me remind you that you can’t make it any narrower than 500 mm, you can only make it wider.
You also asked about the base. The base is not made higher than the snow cover. It is made 300 mm above the blind area from water falling from the roof. They make both less and more, but I consider this height to be the “golden mean”.
Well, reinforcement. If you accept all the recommendations, you will get a grillage 600 mm high and 500 mm wide (don’t forget to check the width along the wall). Reinforcement of such a grillage can be done with 2 meshes. One below, one above. Many authors say that there is no need to connect these meshes with transverse reinforcement. I would still recommend connecting the meshes with vertical reinforcement in increments of 400 - 500 mm. For the meshes you will need 3 AIII reinforcement rods with a diameter of 12 mm. For transverse reinforcement of the meshes and vertical reinforcement connecting the meshes to each other, take AIII rods with a diameter of 8 mm. The protective layer of concrete from below is 70 mm to the mesh, from above 30 mm. In the corners and at the intersections of a strip foundation, additional L-shaped elements of reinforcement are usually laid, but since your foundation width is 500 mm, it will be enough to bring the grids to the outer edge of the opposite foundation - you will get an overlap of the grids.
If something is not clear, ask.
answerAny home craftsman can lay a rubble foundation with his own hands. And he will not need any special equipment or any specific knowledge. It is enough to understand the simple technology of constructing rubble stone foundations.
Experts say that rubble foundations for various buildings have been erected for more than 4 thousand years. In the Middle Ages, durable and aesthetically attractive rubble was used to make reliable strip foundations not only for houses, but also for powerful fortresses and defensive structures. Structures made from this stone last 150–500 years, demonstrating unique performance properties.
Rubble foundations for houses are absolutely environmentally friendly. They perfectly resist the effects of soil water and do not lose their characteristics when frozen.
Reliable foundation made of rubble
A rubble base is understood as a strip structure built from natural large-sized stones, which are filled with cement-based mortar.
This natural material is not divided into separate categories based on its size. For this reason, it may contain fractions with different geometric parameters - from 15 to 50 cm.
To build a foundation for a house, it is recommended to use stones with relatively wide and even upper and lower edges. Such material is usually called bedded. But it is also possible to use stones that are less correct in terms of geometry. Their shape does not affect the strength of the constructed foundation in any way.
Nowadays, rubble is most often used to build foundations for 1–2-story houses, as well as for various commercial buildings. The technology for constructing standard five-story residential buildings from rubble stone has existed for more than 60 years. A minimum of financial resources are spent on the construction of such buildings, due to the low cost of natural materials.
It is impossible not to separately note the natural beauty of natural stones. You can use them both to build a solid foundation for your house and to furnish the basement of your home. In the latter case, you will not have to spend money on finishing measures. The rubble base does not need to be plastered or tiled. It will look truly luxurious anyway.
On clay soils, high-density loams and sandy soils, rubble foundations last up to 150 years without any repairs. If such a foundation is being built on heaving ground that is prone to subsidence, the structure should be strengthened with reinforcing elements. And it will serve you for the same 150–200 years.
The quality of rubble for laying foundations for residential buildings is determined very simply. You just need to hit the stone well with a regular hammer. If the bottle does not break from a strong blow and at the same time produces a clear and ringing sound, it means that you have excellent material in front of you.
Stones are also checked for quality by splitting them. If you break the rubble, and it does not generate dust and does not break into small fractions, feel free to use it to build a foundation. Believe me, a foundation made of such stone will last for many decades.

Rubble house foundation
The rubble must be washed before laying. This procedure, let’s say right away, is labor-intensive. Please be patient and have some free time. You have to thoroughly wash every stone. If this is not done, the concrete mixture will not bond with the stones at the proper level, which will significantly worsen the strength of the foundation.
Large pieces of rubble for laying the foundation of a house require additional preparation - breaking them into smaller stones weighing no more than 30 kg. This procedure is called plinting. It is done with your own hands using the following technology:
- Using a soft pencil, draw a line on the stone along which you plan to break the rubble.
- Stretch the nylon rope and forcefully press it into a piece of pre-prepared chalk.
- Pull the cord marked with chalk over the line marked on the stone and suddenly release the rope. As a result, you will get a clearly visible chalk mark on the rubble. This is where the material needs to be split.
- Use a hammer to drive a steel chisel into the cut line on the rubble. You are splitting a stone. The hammer blow should be performed quite firmly. Do not be afraid. A high-quality stone, as we said, will not crumble, but will clearly separate into separate fractions along the split line.
Now that the material has been prepared, you can proceed directly to laying the foundation for the house.
The laying of the structure we require is carried out in several stages:
- Clearing the land.
- Dig a trench of the required size. The ditch must be made with a small margin. Maintain a distance between the boundary of the future foundation and the edges of the walls (load-bearing) of the house being built at a level of 15–20 cm. The depth of the trench is below the freezing mark of the ground in your area.
- You do. It will protect the ditch from soil falling into it. The formwork structure is dismantled immediately after pouring and setting of the concrete mixture.
- Place a 30-centimeter sand cushion at the bottom of the pit. Sand must be poured into separate layers, tamping each of them.
- Lay sheets of roofing felt over the made pie. They will be an excellent waterproofing material for the foundation.

Creating a rubble stone foundation
After this, start laying the rubble. It must be moistened with water before starting work. Then the stones will adhere well to the cement mixture. Note! Stones cannot be placed back to back in the trench. Leave a small gap between individual pieces of rubble.
The masonry technology itself is simple. You need to remember that the short side of rubble stones is called a poke, and the long side is called a spoon. In one row of spoons should alternate when laying with a poke. The total thickness of the masonry is usually taken at 0.6–0.7 m. For a residential building, this is quite enough. Installation of stones is carried out using a small sledgehammer or a massive hammer.
The construction of a rubble foundation is carried out according to three different schemes. The operation can be performed “under the bay”, “under the scapula” and “under the bracket”. If you plan to make formwork, it is recommended to implement the “flooded” scheme. It is given below:
- Place the butt row in the prepared ditch (on a sand bed). Pour fine gravel or crushed stone into the gaps. Compact the layer.
- Fill the stones with liquid concrete (3 parts sand plus 1 cement).
- Lay the spoon row. Repeat all the described procedures.
The topmost row is filled with thicker concrete (add less water to the mixture). The layer of mortar should have a thickness of about 0.5–0.6 m. Then, using a vibrator, compact the concrete until the mixture no longer penetrates into the gaps between the rubble stones.

Creating a foundation from rubble
Important point. If the foundation is developed according to the “bay” scheme, only light buildings (for example, a small or outbuilding) are allowed to be erected on it. Structures with a large mass are not installed on such a foundation.
For loaded houses, the foundations are usually built according to the “shovel” and “bracket” schemes. In the first case, you are allowed not to choose a bottle by size. But the “under the bracket” option involves careful selection of stones in height (it should be the same for all pieces used).
Laying according to these two options is done as follows:
- Place the bonded row dry on a bed of compacted sand.
- Compact the stones, pour small stones into the gaps between them.
- Pour liquid concrete.
- You install a row of spoons, tamp it, pour the concrete mixture.
- Next, lay the bond row again, then the spoon row, and so on.
Note! It is imperative to tie the seams between all mounted rows with reinforcing bars and steel wire. You need to ensure that the rubble in the masonry does not wobble, but stands really firmly.
And one last point. When installing rubble in rows, you must constantly monitor the horizontal and vertical positions of the corners of the masonry and the surfaces of the stones themselves. Then you will have an impeccably reliable foundation.
The walls and foundations of many wild stone buildings have survived to this day. Today, prefabricated or monolithic concrete has taken a strong place in the construction of foundations, but local traditions or the opportunity to purchase building materials at a low price encourage owners to build foundations from stone. Whatever the reason for the choice, you need to know all the intricacies of working with wild stone to achieve a good result of the strength and reliability of the foundation of the house.
A little about the stone
Nature has created an amazing building material, characterized by durability and strength. Stone is used for the construction of foundations, walls, barbecues and in landscape design. Large natural stone blocks are cut into equal parts by special machines and used for cladding. From natural stone you can pave beautiful garden paths on your site, line a fence, or create beautiful alpine slides.
Main properties of the stone:
- Durability - breaking natural stone is not so easy.
- Environmentally friendly - the material is created by nature without any human intervention.
- High level of resistance to various chemical and climatic influences.
- Aesthetics - the stone comes in different colors, and on its edges nature creates amazingly beautiful designs. Using these qualities, you can create entire compositions that are distinguished by their pristine beauty.
- Durability - stone buildings can last for centuries.
Not every stone is suitable for construction work. The material of exfoliating and soft rocks is not suitable for the construction of durable buildings and laying foundations.
Note! To construct the foundation, irregularly shaped fragments of durable rocks called rubble stone are used.
To make the stone foundation reliable and strong, and to make work easier, choose flat-shaped stones. Large blocks of rock are split at the construction site or hewn.
Advantages and disadvantages

Advantages of constructing stone foundations:
- The high strength index allows the construction of buildings that have a long service life.
- The natural material is characterized by a high level of resistance to destructive groundwater.
- For a stone foundation, no changes in air temperature are scary.
- The ability to replace expensive reinforced concrete foundation structures with building materials of a lower price level.

Disadvantages of stone foundations:
- High labor costs.
- The need to build massive structures so that they can withstand heavy loads. At the same time, smaller concrete structures are needed for the same load.
- High consumption of building material and labor during the construction of a columnar foundation.
Construction order

Step #1. Preparing the pit for the foundation. When the building design is ready and all construction approvals have been received, you can begin preparing the construction site. We import rubble stone and other building materials in the required quantities. Prepare all the necessary tools. Mark the project and dig a pit. The depth of the pit should be below the soil freezing level.
Step #2. Installation of formwork. If the soil is dry and strong, you don’t have to install the formwork, but lay the rubble stone directly into the trench. In case of crumbling soil, conventional formwork is installed or sheet or roll materials are used.
Note! Ventilation and communication openings are provided before laying rubble stone. It is very difficult to drill a finished stone foundation.
![]()
Step #3. Rubble stone laying. The bottom of the trench should be covered with a 25 cm layer of sand, compacted and the first layer of stone should be laid. To do this, select the largest stones and forcefully lay them on the sand so that they lie firmly and do not move. If the depth of the foundation is 50 cm, then its width should be from 65 cm to 70 cm.
Note! Before laying the stone in the foundation, it must be soaked. Having absorbed water, the rubble stone will be cleared of small crumbling particles and will adhere better to the cement. First wet it and then let it dry a little.
The stone is carefully selected according to its shape, laying out the first row and the corners of subsequent ones. If there is no rubble stone of the required shape, you need to trim a piece closer in shape with a chisel and sledgehammer. The empty spaces between large blocks are filled with small fractions formed after hewing. The laid row is filled with liquid cement mortar, and then sand-cement mortar is laid. They begin laying the next row, observing the dressing.
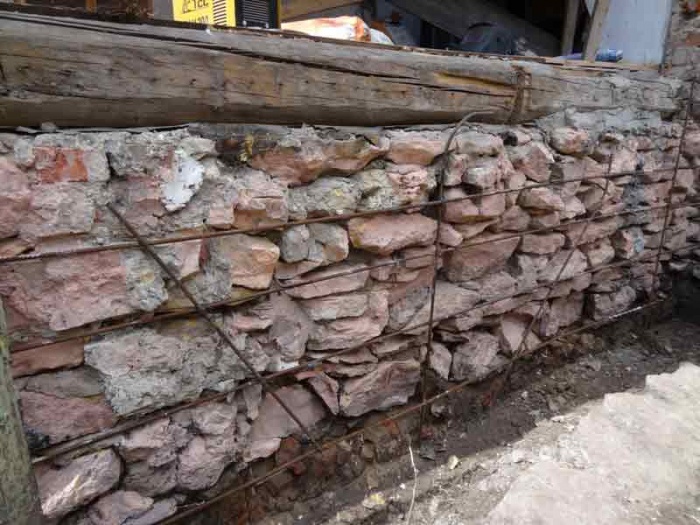
Note! When using concrete blocks or bricks for the walls of a building, the upper part of the foundation must be reinforced. To do this, a reinforcing mesh is placed in the stone foundation and filled with mortar.

Step #4. Removing formwork. When the stone foundation gained strength, it was time to dismantle the formwork. There is empty space between the trench wall and the stone foundation. It needs to be covered with small pieces of stone. You will get an excellent drainage layer.
The remains of the stone can be used to create a beautiful alpine slide on a personal plot and paving garden paths.
Video
Below are the nuances of laying a rubble foundation:
Photo


As a result of many archaeological excavations, a large number of preserved foundations of ancient houses have been found. All of them were made of stone and have survived to this day in good condition. This suggests that a stone foundation may be more reliable than other types of foundations. Moreover, such structures do not require additional finishing. It is worth noting that many owners of suburban areas create stone foundations for houses with their own hands.
General characteristics of the material
Stone is a strong and durable material. That is why it is often used for the construction of various types of buildings. For example, the following are created from stone:
- foundations;
- Houses;
- barbecues.
This material is also often used for cladding buildings. The stone has such properties as aesthetics, environmental friendliness and resistance to environmental influences.

But it is worth remembering that some types of stones are not suitable for creating a foundation. Examples include soft and exfoliating rocks. It is impossible to make a reliable foundation from such material. This is why builders choose rubble stone. This material consists of rock fragments that can have different shapes. All elements of the base of the house are fastened using cement mortar. When choosing such a material, it is worth considering that some of the stones have to be split and trimmed.
Advantages and disadvantages of rubble stone
You should make a decision on choosing rubble stone to create a foundation only after considering all the characteristics of this material. This is necessary, since creating the foundation of a house from this material is a rather complex process. It is important to remember that in order to create a level and strong foundation, it is necessary to carefully select stones in size and shape so that there are no voids in the created structure.
Most often, a rubble stone foundation is created if you need to build a high foundation for a house. This material has the following advantages:
- Environmental friendliness.
- Strength and durability. If you follow all the rules for creating this type of foundation, you won’t have to worry about deformation of the structure for many decades.
- Water resistance. Even when using stone in regions with high humidity, it will not in any way affect the condition of the stone foundation.
- Attractive appearance. Foundations for a house made of natural stone do not require finishing.

But it is worth remembering the disadvantages:
- Difficulties during the construction of a stone foundation. When creating a foundation for a house, you must carefully calculate the load on the structure. At the same time, during construction it is necessary to accurately select stones so that they are suitable for installation in a certain place.
- Duration of construction. Creating a foundation can take a long time, since fixing each stone requires careful attention to the work.
- Complexity of calculations. Before starting construction of the foundation for a house, quite complex calculations are made. If this is not done, the foundation may be less secure.

It is also worth noting that the material has a high cost, so only a small number of owners use it when creating their homes. If desired, you can reduce the cost of the structure - the base, which is located in the ground, is made of rubble stone, and the upper part is built of brick. But when choosing this option, you must remember that the technology for laying these materials is very different.

Many owners of country houses, instead of using natural stone to create a foundation, use decorative ones.
Preparatory work
When designing a structure, it must be taken into account that the foundation must be located below the freezing level of the soil. After drawing up the project, the territory is marked for digging trenches.

When creating trenches, it is necessary to remember that their dimensions should slightly exceed the values specified in the project. This is necessary, since after digging the ditches, their walls may partially crumble. To prevent this, you need to make formwork from wood or metal.
Creating a sand cushion
After the formwork is securely secured, sand is poured. The pillow should consist of several layers, each of which is moistened and compacted. After this, waterproofing material is laid on the sand. Typically, roofing felt is used, the sheets of which are laid overlapping. This prevents loss of moisture from the concrete pavement as it hardens.

If you do not have experience in performing such work, it is best to create a strip foundation, since during the construction of pillars, even a small mistake can lead to their destruction during operation.
Rules for laying stone
To construct the foundation of the house, cobblestones with horizontal surfaces are selected. Such elements can be easily combined into a single structure. Such stones form the basis on which the foundation will be created. The stones installed in the first layer should not wobble, as otherwise the base will be less reliable.

If there are no cobblestones with smooth edges, you can eliminate natural defects with a hammer. When cobblestones are pressed into the sand layer, depressions are formed. To eliminate them, you should re-compact the sand layer with the addition of crushed stone or pebbles. The space between the stones is filled with fine-grained crushed stone. Tamping occurs until the surface is level. Only after this does the cement mortar pouring begin. Having made a stone foundation with your own hands, you don’t have to worry about its durability, since such structures can last for more than a hundred years and do not need repairs.
Using certain work algorithms, you can speed up the process of creating a stone foundation. Professional builders give the following recommendations:
- If the trenches have gentle slopes, they can be used to supply concrete and stones. If there are steep slopes, it is necessary to create scaffolding.
- Before starting work, it is necessary to prepare places intended for communications. This will reduce the time it takes to create the foundation of the house.
- Before starting work, it is necessary to accurately calculate the amount of building materials used.
- Periodically it is worth mixing the created solution using a construction vibrator.
- If work is interrupted for more than a day, you need to make a coating over the structure that will protect it from drying out.
- After a break in work, it is necessary to clean the base. You also need to moisten it with water. If this is not done, the adhesion of the materials will deteriorate.
- If laying the base continues after the cement has already hardened, it must be pricked with a sharp object and then the fragments must be removed. This will also help improve grip.

The solution for creating a stone base should be prepared from cement grade M400 or M500. To prevent the base from cracking after drying, it is necessary to check the sand for the presence of clay and, if necessary, clean it. You should also remove any debris that may be contained in the sand.
It is worth remembering that cement and sand are mixed first, and then water is added. The consistency of the resulting solution should be such that it looks like sour cream. The foundation is usually not finished, since the created structure looks beautiful and is combined with many design styles of the site. Often the base of a house on a stone foundation is made of brick.