A homemade lathe for woodworking is a very useful thing for a true craftsman’s home; with its help you can make a variety of useful or simply beautiful things
The summer before last I made a wood lathe. Some design flaws have come to light and I will be eliminating them next summer in the workshop (in a rebuilt barn at the dacha, by the way, look at which one, as well). Dimensions of the machine; length 800 mm, width 400 mm, height 350 mm. Allows you to sharpen workpieces with a diameter of up to 250 mm and a length of up to 200 mm (on a faceplate, i.e. without centering with a tailstock) and with centering with a tailstock up to 400 mm. General view photo 1.
A homemade wood lathe consists of:
- drive - electric motor from the pump
- headstock (old powerful electric sharpener with two sharpening stones)
- supports for cutters with adjustment and support for cutters
- tailstock from part of a powerful old drill
- frames made of metal profile.
In the manufacture of a lathe, ordinary metalworking tools were used:
- drill with drill bits
- files
- small angle grinder (grinder with cutting and cleaning discs)
- electric welding machine with 3 mm and 2 mm electrodes.
Purchased on the market a metal profile (channel) and an angle, some pipes of two diameters (so that one pipe fits into the other), a 40 mm strip and a 20 mm strip. only for the amount of 600 rubles. Photo 2. The necessary fasteners were found in the garage. I purchased a drive belt from some company separately (to fit the length).  The headstock from the sharpener met all the parameters - a high-mounted axis of rotation, protected thrust bearings on the axis, four alloy washers for fastening abrasive discs. Replaceable disks are attached to two washers on the left side to change the rotation speed, and on the right side there is a faceplate for installing the blank (also made from one of the washers)
  The photo also shows part of the drill (an old burnt Soviet one) - a chuck and a metal body. This is precisely the most unfinished component of the machine.
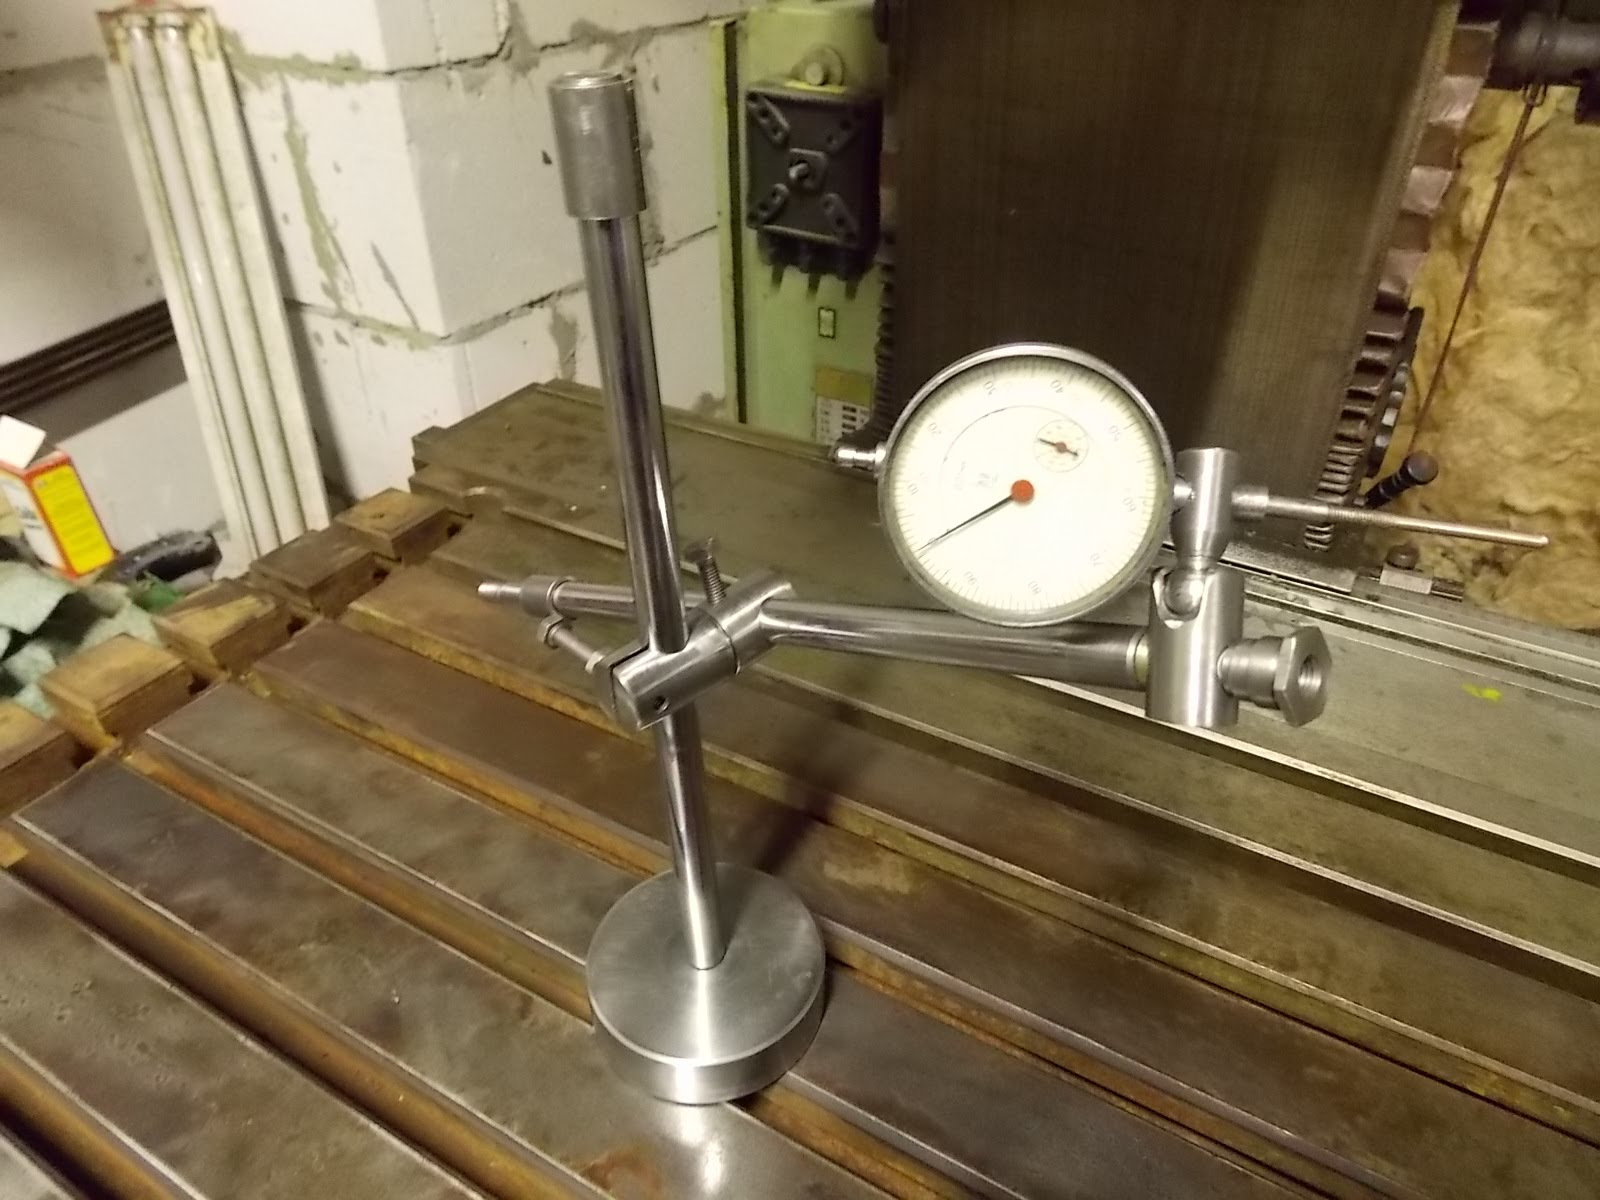
Disadvantages: the stand is rather weak, there is no lead screw for moving the headstock (I moved it with a lever and secured with a nut). The chuck itself is comfortable and allows forces along the chuck axis by default.  Photo 4 shows a bed with a support. It can move along the frame and across it, and is fixed with a wing nut. On the support there is a stand (pipe in a pipe) for adjusting the height of the stop bar for the cutters.
  To select the diameters of the pulleys (i.e., change the rotation speed of the workpiece), a graph (found on the Internet) was used - the dependence of the rotation speed on the diameter of the workpiece and the hardness of the wood. Two frequencies are selected that overlap each other. In addition, for some small jobs with hard wood, you can use a sharpener motor, i.e. with the drive turned off (removing the belt and turning off the motor). This way I can set three rotation speeds - 800, 2000, 3000 rpm. , practically covering my needs.
  In the photo we see a rubberized cartridge on the axis of the electric motor, which plays the role of a drive pulley, two driven pulleys (each made of two layers of ten-millimeter plywood) and a faceplate with holes for screws securing the workpiece. The faceplate is simply screwed onto the sharpener axis (i.e., the headstock) after installing the blank.
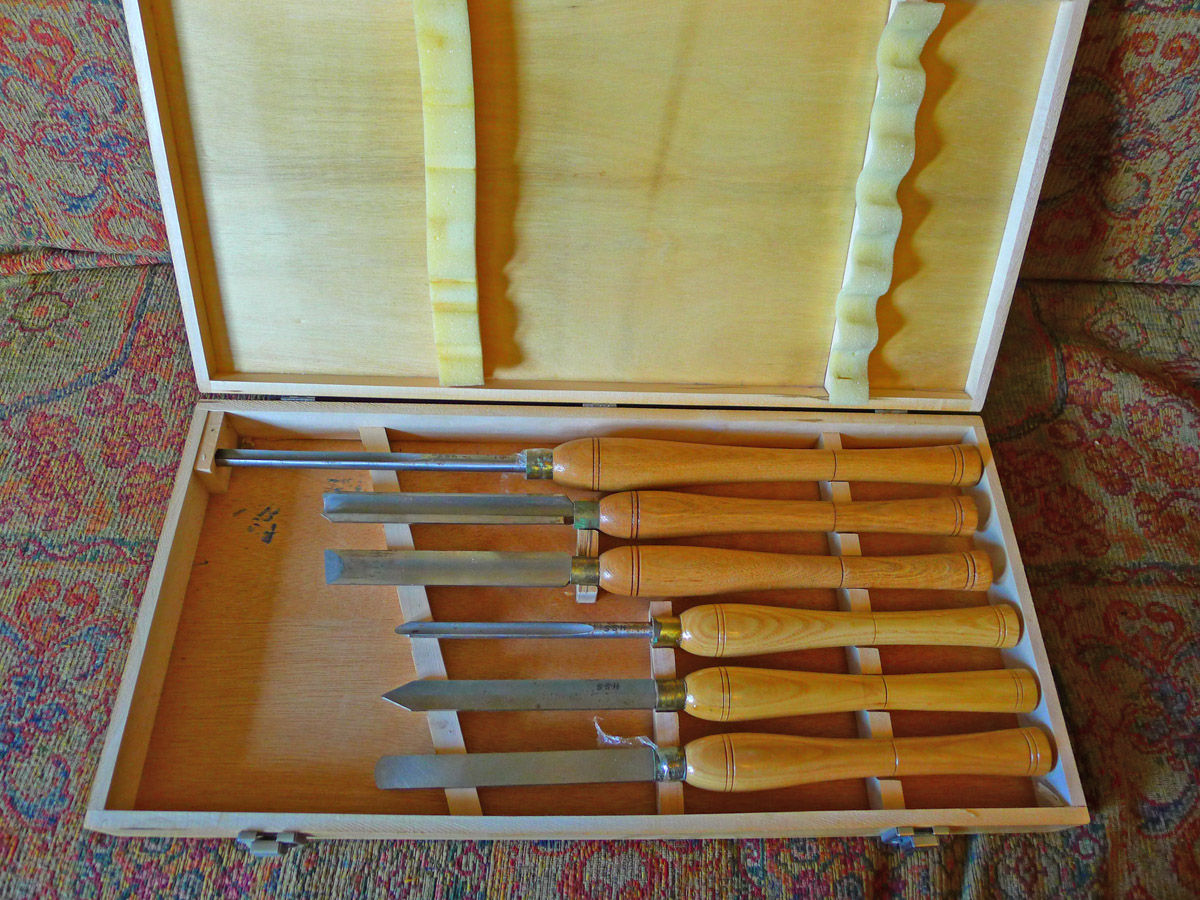
  To mount the motor, a platform is made of thick plywood, and the headstock sits on it (thereby increasing the possibility of turning a larger diameter). To adjust the belt tension, the motor stands on a small plate (no photo), which has the ability to move along the platform and be fixed on it. As a rule, professionals who have chosen this job or hobby make the equipment themselves - cutters of various types. I bought ready-made and inexpensive ones for the first time - five cutters for 350 rubles each.
  Quite a lot of souvenirs were turned on this machine, which were distributed among friends and acquaintances - salt shakers, boxes, simple and segmented vases (from several types of wood in one product), cups, large decorative plates for the wall, rosettes, etc. This is in the following articles.
From time immemorial, the tree has faithfully served people. Wood is the subject of the work of a master carpenter. Things made on a lathe are especially popular. Many metalworkers enjoy turning wood. The ability to work with metal-cutting equipment motivates them to make a wood lathe with their own hands for a home workshop.
Woodworking Machine
The woodworking equipment market offers an extensive line of wood lathes. Each consumer makes his choice taking into account his interests, but the main criterion is the drive power. For a home workshop where turning work is performed sporadically, a simple tabletop machine with an electric motor power of 1 kilowatt and a spindle speed of 3500 rpm is suitable.
The main components and mechanisms of a wood lathe correspond to the classic structure of a lathe, which processes workpieces by rotation. Three main mechanisms:
- drive - electric motor, single-phase or three-phase;
- transmission - a set of devices that transmit the rotation of the motor shaft to the spindle head;
- the executive is the support.

Four main nodes:
- bed - the body on which the mechanisms are fixed;
- front spindle headstock - for attaching a faceplate or lathe chuck;
- rear fixing headstock - for installing a rotating center or drill chuck.
Design feature
 You can assemble a wood lathe with your own hands from available materials. The design is simple and does not require much time to manufacture. The main part of the machine is the bed, made of a channel, in which a groove is cut along the central center line with a grinder for fixing the tool rest and tailstock. The fixation principle is an eccentric mechanism.
The tailstock design is standard. The quill has a hole for Morse taper No. 2 to set the center of rotation. The drill chuck shank matches the quill hole. It is recommended to use a factory made tailstock.
If a homemade wood lathe is intended for turning and drilling parts without requiring precision, you can make it yourself.

Under the quill, machine a hollow cylinder with a blank end wall, in which a thread is cut for the flywheel screw. The moving part of the quill is a cylinder with a conical hole and a keyway along the entire length. The moving part moves with the help of a flywheel screw along a key welded in the headstock body.
The tool rest is classic, has an adjustment function with fixation to the diameter of the workpiece being processed, the base of the tool rest moves across and along the bed. It is fixed with an eccentric with a handle. The upper part is a regular corner.
The headstock has two angular contact bearings. The spindle shaft has an M14 thread, step two. This is a thread that is used on grinders and grinders. Thanks to this, all the attachments used by the grinder can be attached to the spindle.
A faceplate for a lathe chuck is made with this thread. This entire structure is rotated by an electric motor from a washing machine with a power of 300 watts.
DIY spindle head
 The quality of the entire structure depends on the precision of manufacturing the headstock. Therefore, special attention must be paid to this node. Craftsmen recommend making the headstock of a lathe with your own hands. To do this, you need to machine a cylindrical body with a wall thickness of 10 mm. To attach it to the frame, you need to make a special stand. A section of channel is suitable for this. The channel end is welded to a corner made of sheet steel 10 mm thick. The headstock body is attached to the resulting stand.
To make a wood lathe with your own hands, drawings and dimensions do not matter, since everyone makes the design individually, taking into account their capabilities. Sectional view of a cylindrical body:
- outer diameter 56 millimeters;
- wall thickness 10 millimeters;
- length 180 millimeters;
- mounting sockets for bearings with a diameter of 24 millimeters;
- shaft with a diameter of 30 millimeters.

Simple accessories make the machine universal and increase the list of operations. For example, by installing a sanding drum with sandpaper in the chuck, you can sharpen the tool. The device for turning on a copier looks like this:
- copier;
- a pipe installed along the frame, acting as a slide;
- circular electric saw that acts as a wood cutter.
The milling device will replace the milling machine. Arbor with disc cutter

is clamped into the chuck. Instead of a tool rest, a work table with a stop ruler is installed. You can mill platbands, baseboards, and blanks for frames.
Enthusiasts and lovers of making homemade items are constantly coming up with mechanisms that make manual labor easier. Such people always have an answer to the question of how to make a woodworking machine.
Mini lathe
Craftsmen manage to make a homemade small wood lathe, spending 30 minutes of time. Material for production: chipboard 20 millimeters thick or thick-layer plywood. The device has the following circuit:
- base 540x260x20 millimeters;
- stand for electric drill 150x100x20 millimeters.
 The tailstock is made of two rectangular bars assembled into a structure at right angles. A mounting hole for an electric drill is drilled in the rack, and a clamp is made for reliable fastening. The stand is fixedly fixed to the base. A hole is drilled in the tailstock for a screw, the end of which is sharpened to a cone. This is the stubborn center. The improvised tailstock moves along the guide slot and is fixed with one turn of the eccentric. The hand rest is made of a strip attached to the base.
Such a simple homemade product will make it possible to easily turn wood into a handle for a file or the shaft of a dough shaker. And in general, woodworking is a very interesting activity.

In the process of designing and manufacturing turning equipment, the master will need the following metalworking tools:
- hand-held electric drill with a set of drills;
- files of various sizes and grain sizes;
- angle grinder – grinder with a set of cutting and grinding discs;
- electric welding unit and electrodes 3 mm and 2 mm.
During the design and assembly of the machine, you will need to purchase the following building materials:
- metal profile - channel;
- thick-walled metal corner;
- two pipes of such a diameter that the smaller pipe fits inside the larger one;
- steel strips 40 mm and 20 mm wide;
- fasteners;
- drive belt.

Pulleys provide rotation speeds of 800, 2000 and 3000 rpm
Before designing and assembling a wood lathe with your own hands, you should watch a video on making such equipment. Such a video can easily be found on specialized websites dedicated to the manufacture of woodworking equipment.
The use of an electric sharpener for the manufacture of the headstock is suitable in all respects - the axis of rotation is located high, in addition to this, the unit already has 4 washers made of hard alloy. Two washers are used to install replaceable disks of different diameters on the shaft of the electric grinder, which are designed to change the rotation speed. On the other side, a special faceplate is made from one of the washers to secure the blank.
To drive the shaft, pulleys of different diameters are used, providing rotation speeds of 800, 2000 and 3000 rpm. If possible, it is possible to make one combined pulley with seats of different diameters for the drive belt.
Manufacturing the bed, tailstock and stop
From an old hand-held electric drill, the chuck and the front part of the body are taken, from which the tailstock is made. When using a part from a hand-held electric drill as a tailstock, you need to choose a drill with a metal body.
To secure the unit, a stand is made, fixed to the machine bed, so that it is possible to move the unit along the longitudinal axis of the machine. The design of the cartridge allows significant longitudinal loads to be placed on it, which is a significant advantage when using it in the design of the device.
The bed is made from pieces of channel material. All elements of the frame are connected to each other using a welding machine. To install the electric sharpener, which performs the functions of the headstock, a platform made of thick plywood is fixed to the frame.
A stand is made to secure the lathe
The electric drive of the machine is installed on a special plate mounted on the table on which the lathe bed is installed. The plate is made in such a way that it can be moved along the direction of movement of the belt. This is necessary to adjust the rotation speed of the headstock shaft.
A support is fixed to the frame with the possibility of its smooth movement along and across the frame. It is made of two pipes of different diameters. A wing nut is used to secure this unit. A stop bar is fixed to the support, on which the cutters for the wood lathe are located during its operation.
Working tools - cutters for working on a wood turning unit can be made with your own hands, using tool steel plates for this purpose, or purchased ready-made in a specialized store. The cost of a set of cutters for working on a lathe ranges from 300 rubles to several thousand rubles. The cost of the set depends on the quality of the cutters and their quantity in the set.
The cost of a set of cutters for working on a lathe ranges from 300 rubles to several thousand rubles
Basic rules for operating turning equipment
After making a wood lathe with your own hands, it is recommended to watch a video on how to safely and correctly work on such equipment. This will allow you to familiarize yourself not only with the rules of operation on this type of equipment, but also to study the safety rules when operating a turning unit.
General instructions for using turning equipment for wood processing include several points that require mandatory implementation. The main points to be fulfilled are the following:
- Selecting a workpiece for processing. The workpiece intended for processing must not have knots, cracks or other wood defects.
- Installation of the workpiece into the unit for turning. Installation and fastening of the workpiece in the unit is carried out using special fasteners located on the headstock shaft and on the rear panel.
- Selecting the optimal shaft rotation speed during workpiece processing. The number of revolutions is selected by rearranging the drive belt on drive pulleys having different seat sizes.
- Carrying out processing of a workpiece by using special cutters for this purpose. During processing, the actual dimensions of the part should be measured periodically. To work with this type of equipment and produce quality products, experience is required. The fact is that when using such equipment, one awkward movement with a cutter is enough to ruin the workpiece.
The optimal option for designing a reliable working unit is an integrated approach to the manufacture of each structural element. The frame of the unit should be made especially well. This element must provide a high degree of stability during equipment operation. The quality of functioning of the remaining equipment components also depends on the quality of the frame.
The disadvantage of this type of design is the high labor intensity when changing the number of spindle revolutions.
The optimal option for designing a reliable working unit is an integrated approach to the manufacture of each structural element
The choice of the optimal headstock shaft speed depends on the size of the workpiece used and the type of wood. To select the required rotation speed, it is recommended to use special tables depending on the rotation speed on the diameter of the workpiece and wood.
Cylindrical wood products are common in all areas of everyday life. These can be tool handles, balusters under the railings, furniture parts, door handles.
At construction markets and hardware stores you can pick up any workpiece, which, as a rule, is made on a wood lathe.
If you buy a set for a staircase to the second floor of your private house, the amount may become unaffordable even for the owner of a country property.
Everyone knows that wood is the easiest material to process. With an axe, a hacksaw, and sandpaper, you can do anything. With the exception of round parts.
It is these practical decorations made of wood that sell the most. To produce them in more or less large quantities, you need a tabletop lathe. And again the question of cost arises (ready-made machines are available in stores). 
Looking at the photo, any home craftsman will think, what’s so complicated about the design? And he will be absolutely right. You can and should make a woodworking machine yourself.
Its design is quite simple. The workpiece is fixed along the axis of rotation. Torque is applied to one of the stops. The product rotates and can be processed with any cutting or grinding tool.
An example of a simple design of a wood lathe that you can assemble with your own hands in a couple of days - video
Short workpieces of small diameter can generally be clamped at one end in the chuck of a hand drill (having previously secured it), and ground to the desired shape.
Speaking of the drill, it’s easy to use it to make a low-power lathe.
Even in the old magazines "Modelist Konstruktor" the simplest devices for wood processing were offered. 
Making a wood lathe with your own hands
The design is primitive, but absolutely functional. And most importantly, the sketch gives an idea of exactly how the machine should look.
Components:
It is a horizontal frame structure on which all other parts of the unit are located. 
Important! The lathe must be solid. Therefore, the components cannot be fastened separately. During operation, the device vibrates (due to the asymmetry of the workpiece). All parts must work synchronously, otherwise the part may resonate and break out of the fastener.
Homemade wood lathe with a reliable frame. A detailed guide on how to make it yourself.
is the dream of any carpenter, because with its help you can make a wide variety of things and decorative elements for original design, making beautiful furniture or individual exclusive items. But purchasing such equipment is often impossible due to the high price and not everyone can afford it.
What is required to make the machine?
If it is difficult to buy, then you can design it. In fact, its design is not that complicated, it is enough to think a little and have at least a tiny amount of abstract thinking. The fact is that there is no universal equipment, and every master wants to have the most comfortable and convenient unit, so he decides to make it himself.
Basic elements of a lathe:
- the basis of the structure is the frame;
- engine;
- rotating element;
- stop for placing the workpiece;
- guide beam;
- front and rear stock;
- tailstock stand;
- support axis.
Before making a wood lathe, you need to study the available offers and options for finished equipment from other craftsmen. In any case, the price of a homemade machine will be much less than the cost of purchasing new factory-made equipment. But, in addition to ready-made models, machines are available for sale in sets.
Its cost is much lower than the price of a whole machine. Therefore, if you do not have the materials necessary to construct the equipment, you can always order a kit for yourself and assemble it. And for creating the bed and guides there are attached drawings.
A wood lathe has an advantage over metalworking equipment. Its frame and supporting parts can be made of the same wood, which greatly simplifies the process, because anything can be made from this material.
Homemade wood lathe with your own hands
What can the machine be made from?
You can use anything that spins as a motor for a homemade wood lathe:
- Drill. A conventional drill can be used as an electric drive mechanism. It is important to understand that prolonged work without a pause contributes to increased wear on the power tool. But for short-term operations it is an excellent option, especially when there are no other options.
- Screwdriver. You can make a mini wood lathe with your own hands using a screwdriver. This option is completely universal, since the equipment can be transported and worked with anywhere. And if the power tool is powered by a voltage of 12V, then a car battery can be used as a source.
- Asynchronous motor. The best drive device for wood turning is an asynchronous electric motor. But it is more difficult to control than a DC motor. But by means of a belt drive and a primitive gearbox or the use of a gearbox, it is quite possible to make high-quality and productive wood lathes with your own hands.
- Motor from a washing machine. One of the most successful types of homemade wood lathe is a design using an engine from an Indesit washing machine. The motor is quite powerful and has a lot of torque, so the traction will be good. And to regulate the rotation speed, you can find a lot of electrical circuits using thyristors, triacs, or even transistors with feedback.

How to make a bed
Depending on the type of motor selected, you can begin constructing the frame.
A wooden frame is suitable for such a lathe. Because it does not require such high rigidity as when working with metal. Plus, this material is easy to mold, so you can easily cut out any part for the sharpening unit itself.
Standard dimensions of a simple lathe:
- length – 90 cm;
- width – 50 cm;
- height – 45 cm.
With such dimensions, the machine will be able to process materials up to 20 cm in length, with a diameter of 25 cm.
To assemble the structure you will need:
- metal corners;
- pipes of different diameters;
- steel strips 2 cm and 4 cm wide;
- various fasteners;
- drive belt.

Drive Belt for Lathe
Stages of bed assembly:
- two corners are placed on a flat board, so that the shelves are directed towards each other;
- In order for the corners to be parallel, you need to place liners between them in increments of 5 cm;
- the guides are fastened with corners, at the ends;
- all parts are fastened and welded;
- the bed is attached to a workbench or deck.
The tailstock blank is made of hardened steel. Sometimes the engine itself can perform the functions of a tailstock. The main condition when making parts is to correlate the centimeters of the headstock and tailstock.
An alternative to a wooden base is a metal frame, because it will have the necessary rigidity and strength. And to make the centers where the workpiece is installed, you will need to contact a metalworking lathe.
In order to simplify the design as much as possible, it is better to use a motor from a washing machine or a DC motor, since it is easier to control by making a primitive thyristor power regulator.
Features of the copier assembly
And if you need to make a copy of a made wooden product, then you can also make a wood lathe with your own hands with a copying machine. It will make it possible to turn the same thread or cut out any product with ideal parameters. To make it, you can also use wood as body parts.
A copier is an additional accessory to turning equipment. It is a beam or a thick piece of plywood with a profile cut in the form of the shape of future blanks. If there is no need to copy parts, the profile is dismantled, and the device is used as a regular turning option for the production of unique parts.
One of the most suitable options for the manufacture of the body and frame parts is glued plywood. It is quite durable and can be easily processed with cutting and grinding tools. And thanks to the availability of plywood of various thicknesses, it is possible to produce rigid and stable structures.