In many houses where there are cats, the furniture looks sad - the animal constantly sharpens its claws on the sofa or chair. But it is quite possible to wean your cat off this habit if you buy a scratching post. Or do it yourself, because it’s cheaper and even faster. Instructions for making scratching posts at home are further in the article!
A little about scratching posts
Cat owners often say that the most comfortable scratching post for a cat is a vertical post. Although you can also find a rug, a hanging panel, or a ring on sale. Such structures are made from fabric, cardboard, twine, and wood.

If a cat has just arrived at home, you can buy a scratching post that also combines play functions. There are models combined with a house for the animal, bridges, tiers and shelves.

The structure can be attached to the ceiling and walls. The height can also be different - up to 1 meter. But these are options for those who have 2 or more cats. For one animal, you can simply look at how to make a scratching post yourself and choose a smaller size.


What errors are common?
It is important to calculate the sizes of scratching posts and other nuances in advance so that you don’t have to redo anything later. It is worth considering the following:
- It is better that the height of the pillar is at least 1 meter, and the beds and houses can be placed even higher.
- The pillar-shaped scratching post should be about 8-10 centimeters in width.
- If the scratching post comes with a house, it should be placed on top of the structure. Otherwise, the cat may think it's a toilet. In addition, animals like to climb higher if they want to rest.
- For several cats, beds should be placed on the same level so that there are no wars between animals for supremacy in the pack.
- You can hang toys from the scratching post if you work a lot and your cat spends the whole day alone.

Scratching post on the rug
The scratching post bed for cats is very convenient. It will be easier for the animal to get used to it, because it will be possible to rest on such a rug in the absence of its owners.

By the way, you can choose a material that will make the scratching post fit perfectly into the interior.

To work you will need colored rope, any rug, a knife, a stapler and sisal rope. We determine the center on the rug - this is the place where the scratching post will be located.

Using glue, attach the sisal rope to the rug. It is better to also treat its edges with glue so that the cat does not pull the threads out of it.

You can leave the mat as is, or stretch it over a wooden stand, using a stapler to secure the edges. Then the scratching post can be attached to the wall.

Wall-mounted plywood scratching post
Looking at photos of hand-made scratching posts, we can see this option. This design is very easy to make.


You will need to prepare two plywood sheets with a width of 25 centimeters (for large cats, these parameters naturally increase). For a soft layer, a piece of old carpet will do - you will need to secure it to the plywood with the wrong side up. The piece is fixed using a stapler.

You can also wrap the sheet with a rope and secure it with slats along the edges. Next, the structure is nailed to the wall. All that remains is to train the cat to use the device.

Quick option
It happens that a cat appears in the house unexpectedly, or you are given an animal for a while (for example, the owners go on vacation).

In this situation, a DIY scratching post house is an additional waste of time. You can make the construction faster:
- A softwood log is an excellent alternative to the store-bought version. Its length can be about 70-100 meters. We chop the log lengthwise and attach a piece to the wall.
- You can take packaging cardboard and roll it up. We secure it with rope in several places and attach it to one of the walls.
- An old carpet or bedding can be rolled up with the inside out - it will be convenient for your cat to sharpen its claws on this surface.


How to train a cat to use a scratching post?
You can play with the animal using a scratching post so that the cat shows interest in the object. You can also moisten the tip of the scratching post with valerian tincture - this technique works great!


The cat will quickly get used to the fact that its claws can be sharpened in a new place, and you will no longer have to worry about the safety of the furniture!

Photo of DIY scratching posts


Are you interested in the question - how to make a scratching post for a cat? Then we suggest you make a scratching post with your own hands, because in any family where a representative of the cat family lives, sooner or later such a need arises.
By nature, cats are predators, and therefore their main weapon is not only their teeth, but also their claws. In nature, cats actively run and climb trees, during which their claws are worn down. It is important to let our pets have their say. In animals, “to pour out emotions” means to caress, protect territory, sharpen claws. It’s the latter that often brings owners a lot of trouble, a lot of inconvenience and both emotional and material losses. Just look at the damage to new wallpaper and good furniture that you were going to use for a long time.
It is worth making sure that your pet has a “magic wand” – a scratching post. Let's make it with our own hands!
Today, scratching posts are presented in a wide range in stores, the choice is great, but we will make such a device ourselves.
Bringing a log into the house is not always feasible, especially for city dwellers, but wooden slats and blocks can be found in hardware stores. From these we will make a claw holder for the cat.

The slats need to be shortened to the optimal size and glued together.

Compress well with clamps or in a vice for strength.

Mark the distance from the edge.
Attach thick twine to this point.

Cover the area of the glued board with it.

If desired, decorate with durable colored threads.

We drill two holes at an equal distance from the edge on both sides.

We attach a lace, you can take the same twine, you can make a leather lace.

We fix it at a level accessible to the pet from the floor, introduce it and make sure that this item is used for its intended purpose.

In any case, no matter how severe the devastation, do not cut the animal’s claws under any circumstances!

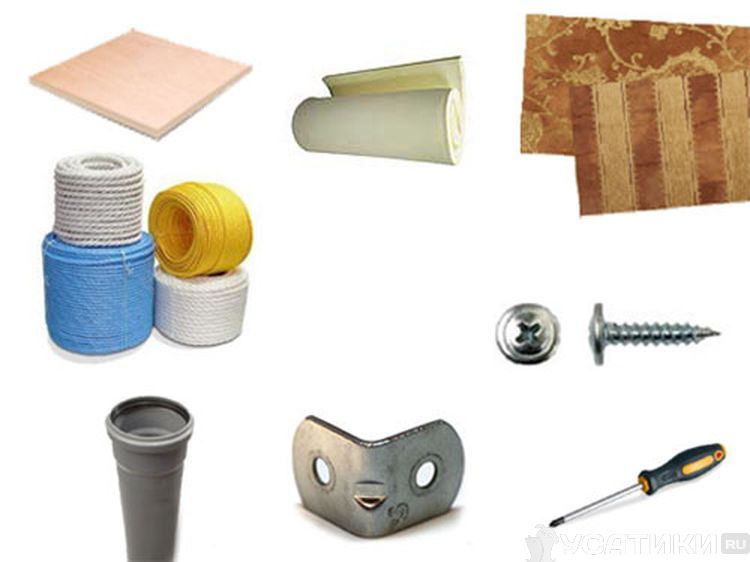
There is another option for making a scratching post, which is presented in the video. He will require from you the following tools and materials:
- Base: plywood, USB, chipboard, PVC pipe or for stacking
- Wrapping: twine, jute rope, linen rope
- Design: carpet, lining fabric
- Tools: construction stapler, knife, screwdriver, glue gun (screws, corners), PVA glue
Balance beam

Let's make a gymnastic beam for the cat, which will give him a lot of joy; he can climb the beam and sharpen his claws at the same time.
A 4-meter cardboard tube was purchased from carpet sellers, on which the carpet is wound.
We shorten the pipe to the required length. We make the lower edge obliquely - then it rests on the floor with its base.
 Sew a piece of carpet onto the pipe (you can glue it). It is advisable to do this overlapping.
The most difficult job is sewing the edge of the carpet. This will have to be done, because the glue at the joint will not hold up, the cat will easily tear it. Sew with thick threads. 
We install the log (optionally on the balcony), screw it to the edge of the carpet with screws.

The lower end is simply installed on the floor. You can also secure it if desired.

So, we learned how to make a scratching post in symbiosis with a balance beam for gymnastics for cats!

Carpet scratching post
Materials for production:
- board
- timber or piece of plastic pipe
- thick plywood or boards for the base
- carpet for covering

If you do not want to beat the scratching post, then you will need a rope; hemp rope, which is very durable, may be suitable for this. If you still decide to upholster, it is recommended to choose a carpet with a woven base rather than a glue base. For climbing and scraping, a woven cover is an ideal and durable option.

So, how to make a scratching post for a cat. First you need to take a column and cover it all with carpet fabric. The simplest option would be to cover the wooden board with a coating, but this needs to be done as tightly as possible. The block should be wrapped with hemp, the turns are secured every 10-15 cm with a bracket, you can also use a special clamp for this. When the post is completely entwined, the mobile scratching post needs to be secured to the base. We select a heavy base so that it stands stable.

If you have a stationary scratching post, then you need to mount it from the wall at a distance of at least 20 cm, and on top you can additionally install a bed, a kind of shelf. We cover such a shelf with carpet, but so that the pile is outward.

There is also the easiest way to make a scratching post. It can be wall-mounted, namely, attach a piece of carpet to the wall, you can choose tapestry fabric, a piece of carpet, etc. All edges must be additionally secured with slats, so they will not fray later, or simply tuck the edges.

It won’t be difficult to accustom a kitten to a scratching post, especially if he is still a baby. It will be more difficult with an adult cat, because it will not be clear to her why it was previously possible to sharpen its claws anywhere, but now it is not possible. However, diligence will help, take your paw and lightly press on the pads, so the cat will release its claws, and run the claws along the scratching post.
It will be convenient to make several scratching posts that can be placed in those places where the cat is already accustomed to sharpening its claws.
Sports town

The sports town consists of climbing poles, mezzanine paths and several bed-shelves.

The upper mezzanine is made of plywood about 1 cm thick. The width of the path (path) is 35 cm, and the same distance to the ceiling so that the cat can move freely on it.

First, we attach standard metal corners (brackets) under the ceiling, the length of the “arms” is 25cm + 35cm.

We fasten them at a distance of 1-1.5 m from each other. This will prevent the plywood from sagging. For fasteners we use 8 mm plastic dowels with self-tapping screws.

We attach the plywood (cut) to the corners using 12-15 mm bolts, it is advisable to choose bolts with a countersunk head. The top of the plywood must be tightened with a nut. For strength, we attach a block (support point) to the ceiling, and secure it at the bottom with a self-tapping screw.

We attach a side around the perimeter, making it from a 25x15 mm bar. It is also secured with self-tapping screws.

At the end of the path we will make a secret place where the cat will hide.

To make beds, we attach bars for supports, 25x15 mm, in the selected corner. We secure it using self-tapping screws and dowels. We place shelves on them, cut to the shape of a corner. You can use plywood as a material.

Then the pole itself, which acts as a scratching post and a ladder along which the cat will climb up.

For the pole we take a beam of about 100x100 mm, choose the length corresponding to the ceiling. And, of course, the rope. The best option would be hemp. It is best to take a thickness of 16, 19 or 22 mm, because... a very thick one will bend poorly, and a thin one will slip. The length must be calculated independently; for this example, with a rope thickness of 19 mm, a height of 2.65 m, and our timber it took 60 m.

The rope must be wound tightly, with tension. We strengthen every few turns with a staple or nail.

We fix the ends with crimp clamps, nailing them to the beam.

At the end, the plywood parts can be finished with carpet, securing it with a stapler, or we can place mattresses made of thin parallon covered with fabric there. The outer part can be varnished or draped with fabric.

Thus, by making a scratching post for a cat with your own hands, you can make a whole town if you wish.

In situations where a pet begins to damage furniture and wallpaper by scratching them, a scratching post made according to a master class will be the best assistant. If you figure this out well, the task will turn out to be completely uncomplicated, especially considering how much benefit you will get from it.
Since this habit is inherent in the nature of the animal, you cannot scold your pet for its tricks. With a homemade scratching post, the cat will be able to calmly sharpen its claws, and the owner will forget about the problems with the scratched sofa.
You can choose the right scratching post for any apartment, based on its size and design concept. Our master class suggests making one of the following scratching post options for cats:
- scratching post in the shape of a cone, wrapped with ordinary rope, which is glued to the base
- a rectangular product covered with natural fabric to make it convenient for the cat to sharpen its claws on it

- compact scratching posts with fleecy fabric placed on the wall

- houses that combine both a place for a cat to sleep and vertical columns for sharpening claws

- scratching post resembling an ordinary board, which is tightly wrapped with rope

- corner design, which is placed at an angle for the convenience of the pet

Any option can be adapted to suit your apartment and make it convenient for the cat, and if necessary, the structure can be installed exactly in those places where the pet likes to sharpen its claws.
Our master class on creating a scratching post is very simple. If you do not have the opportunity to purchase any materials for its manufacture, there will be suitable things in the house to construct a scratching post according to the diagram. It can be:
- any remnants of coverings (fabric, carpet, etc.) that will be comfortable for the cat;
- small but stable plastic pipes;
- remnants of furniture that has already outlived its usefulness.
It is important to take into account the fact that for manufacturing you need to select materials that will not leave debris as a result of sharpening the claws. You can take a ready-made form as a basis or use cardboard, but it is better to wrap it with fabric or rope on top.
Step-by-step making of a cardboard scratching post
One of the simplest and most affordable materials for a scratching post is cardboard, because it can be found in almost every home. This product will serve your pet for quite a long time, so its production will be not only easy, but also practical. To work you will need to take:
- pencil;
- ruler;
- ordinary cardboard;
- stationery sharp knife;
- fabric or rope for decoration.
You don’t need to have any specific skills to make such a scratching post according to our design. Follow the steps below and construct it yourself, without much difficulty or expense:
- Drill a hole in the center of the board.
- Attach the cardboard to a wooden dowel that also has a hole drilled in it, right in the middle.
- Screw the screw into the base, holding it with a screwdriver, and screw the dowel onto it.
- Then, for several levels of the scratching post, you need to prepare templates and cut them out.
- Use these templates to get the pieces you need from cardboard and cut them out with a sharp knife.
- Assemble all the cut pieces onto the dowel.

All you need to do is spend a little time, and a scratching post for a cat from improvised means is ready for use.
Scratching post with a bed for your beloved pet
This design will require some sewing skills, and more complex materials are needed to make the scratching post, namely:
- timber is dry;
- plywood (thickness about 1 cm);
- rope;
- textile;
- self-tapping screws;
- plastic;
- foam;
- sharp knife or scissors;
- necessary construction tools.
Having selected the necessary materials and decided on the size of the future scratching post, you can begin to perform the step-by-step master class presented below:
- Based on the results of measuring the required characteristics, a stable board is selected, which will be the base of the product.
- Cut 2 rectangles to the specified dimensions.
- Determine their center by drawing diagonal lines.
- Make an oval template out of paper before cutting it out of a wooden board or chipboard, attach it to the base and trace the shape.
- Once you have the base of the desired shape, sand the edges.
- Cut another such oval out of plywood, only its thickness should be smaller.
- Make a side for the future bed using metal, and cut out another oval from foam rubber for the bed itself.
- For a scratching post, take a plastic pipe or wooden beam of the required length and diameter and attach it with self-tapping screws.
- Assemble all the received parts as follows: fix the pipe on the base of the scratching post with self-tapping screws, decorate the pipe with fabric or rope using special glue so that it is convenient for the cat to sharpen its claws on it and there is no debris left on the floor, and install the bed itself on top, in the same way , with which the pipe was secured to the base.


This version of the scratching post will be more versatile, since the cat will also have a place to rest. The structure can be placed anywhere, because it is quite compact.
Twine scratching post: step-by-step description
In order for a scratching post made according to our master class to be of high quality, the design and dimensions of the product must be correctly selected. Natural twine is perfect for a standard scratching post in the form of a vertically mounted tube wrapped in fabric or rope. You can do it as follows:
- Take a stable and strong base.
- Make a post of the required size, which can be a regular pipe or a wooden beam.
- Next, you should connect and fix the post on the base of the scratching post.
- Wrap the finished form tightly with rope, the skeins of which should fit tightly together, and secure them with permanent glue.

To make such a scratching post look more interesting, you can install a bed on top or attach some toys to interest the cat.
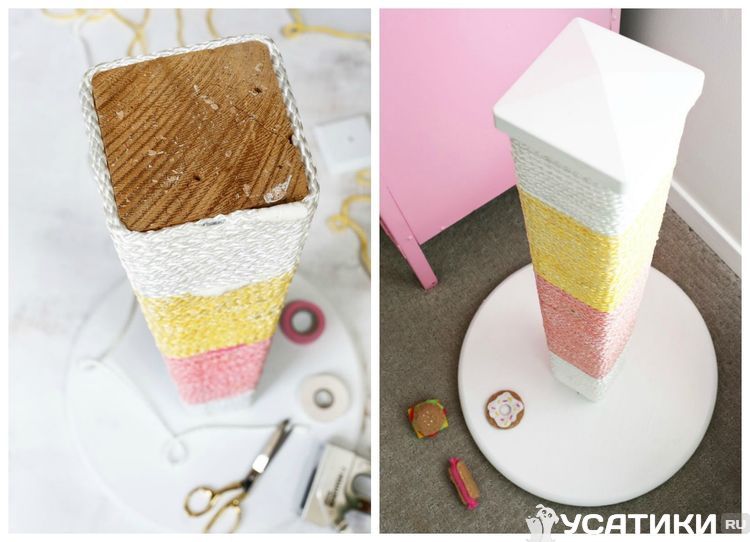
Making a flat or corner scratching post for a cat
The flat scratching post for cats, the photo of which can be seen above, is made from the same materials as the previous ones, except that it does not need to be mounted on a column.
- You can take any board or timber, the main thing is that it is flat.
- Then you should wrap the base with material that you find around the house.
- Using a stapler, you need to fix the material on the base of the scratching post.

This structure is attached to the wall or floor. Its main convenience is that it can be installed specifically in the place where the cat sharpened its claws before the scratching post appeared in the house.
As for corner structures, the process of its creation involves the use of the above steps, with the exception that it must be made in two planes. Attach it to two surfaces, the floor and the wall, and firmly fix it with self-tapping screws, and this scratching post will serve your pet for a long time.

Tips for making scratching posts at home
If you have never encountered master classes before, then perhaps the process of making a scratching post will seem complicated and time-consuming to you, but it is much easier and faster than you think. Follow the step-by-step recommendations and everything will work out, and small tips will help you avoid mistakes:
- in structures with a house, place it on a pole, since the cat can use this room as a toilet and relieve itself in the wrong place;
- if you have several cats in the house, and you decide to design a scratching post with several beds, then think through everything so that the resting places are at the same level from the floor, otherwise disagreements may arise between the cats;

- the height of the scratching post or the entire structure should not be higher than 1 meter;
- If you want to arouse your pet's interest in the scratching post using toys attached to the structure, make sure that your cat will be interested in it so as not to waste time.

If you take into account all the parameters of the room and the factors that influence the convenience of the cat in using the scratching post, you can create an excellent design according to our scheme and spend your time profitably, saving your own money on the purchase of the product.
We will send the material to you by e-mail
Nature provided cat scratches for a reason: the animal really needs claws for protection, for climbing vertical surfaces like trees. Under natural conditions, cats give themselves a manicure by scratching trees, stones, and soil with their claws. Domestic pussies are deprived of this opportunity, especially if they do not have the opportunity to walk. The editors of HomeMyHome.ru are kind to pets and declare that with proper preparation, a scratching post for cats with your own hands is a task that anyone can do.
You shouldn’t immediately throw yourself into the embrasure and try to do something tricky: beginners can make a simple version of the design
A cat's claws grow throughout their cat's life, and to prevent their size from exceeding a comfortable norm, animals file them down by scratching something hard.
Yes, cats will tear at something with their claws in any case, and it would be cruel to deprive them of this opportunity. If the claws are not kept in order, cracks and chips will not occur, and it will be easy to climb trees.

If a pussy visits the street, then it needs protection, and without a manicure, going outside can lead to problems.

Advice! Pay attention to which piece of furniture the cat is tearing up with particular zeal. A scratching post covered with the same material will distract your pet from dirty activities with an object not intended for damage.
How do scratching posts differ in shape, size and material of manufacture?
Bravo to the imagination of creative people: there are different types of scratching posts. They differ from each other in shape, size and material. Below in the photo are selected types of devices for cat manicure.


The material used in the design can be different: twine, wood, corrugated cardboard, thick fabric. The designs differ: it can be a whole town with a playground, sleeping places, hanging bridges.

The dimensions of the products also differ: up to a meter in height, more than a meter. There is no point in building a huge castle for one cat.
How to make a simple cat scratching post with your own hands
Simple designs do not require special tool skills. Let's look at how to make a nail clipper from cardboard and wood.
Making your own cardboard scratching post
Cardboard is a material from which you can make anything. We stock up on pressed cardboard from store boxes, a stationery knife, glue or adhesive spray. You can take a glue gun with sticks. It is worth considering what fabric to use for the upholstery.
We choose any form. To simplify the task, we recommend stopping on a circle. We cut the cardboard into strips of equal width, which, in turn, begin to twist one by one, gluing them together.

The circle should be at least 45-50 cm in diameter based on an average-sized pussy. To ensure the stability of the bowl, legs are made from cardboard by cutting out the desired shape and gluing the elements together. The outside of the scratching post is decorated with fabric or adhesive film. For complex forms, skill in handling installation tools and design skills will be required. The process is clearly presented in the video.
Video: corrugated cardboard scratching post
How to make a wooden scratching post
The simplest option would be to find a log or a thick broken branch in the forest or park. The bark is completely cleaned off with an iron brush, and the wood is dried in a dry, dark place. We offer two options: the log is fixed vertically on a stable stand or sawn in half and attached vertically to the wall.

Some people don't know what the rope for a scratching post is called. We are happy to suggest: there is sisal, cotton rope and jute rope. Each rope has its own characteristics and strength.
Step-by-step instructions for making your own floor scratching posts with photo examples
If a simple option does not seem attractive, and your hands are eager to create something more interesting, then we will consider more original options.
Master class on making a flat scratching post for a cat with your own hands
We suggest making an excellent nail polisher: in 3 hours the cat will be able to give herself a manicure.
| Illustration | Description of action |
|---|---|
 | We take pressed cardboard and cut off equal, narrow strips with a stationery knife. |
 | We will glue the strips with PVA glue. We smear the plane of each strip. We place the strips between two books or boxes for alignment. |
 | After 2 hours everything stuck together, the glue dried. We tape everything around the perimeter with tape. |
 | We watch how the cat uses a new object. |
How to make a scratching post for a cat with your own hands
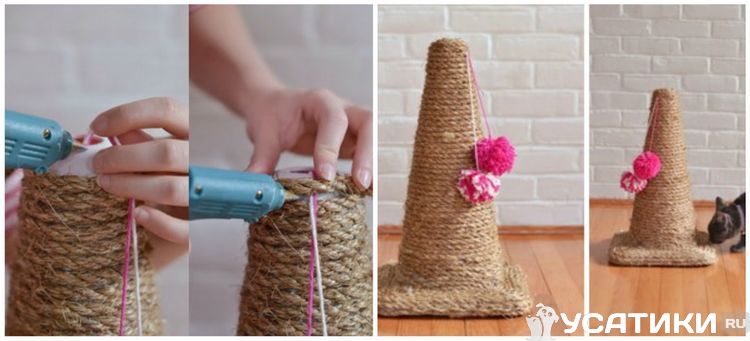
It's time to find out how to make your own cat scratching post in the form of a column.
| Illustration | Description of action |
|---|---|
 | Prepare two sheets of chipboard (can be from old furniture), a sewer pipe with a diameter of 100 mm. Its height is approximately 60-70 cm. |
 | Using a homemade compass or an ordinary one, draw identical circles on the chipboard. The smaller diameter circle will be the base, and the larger one will be the bed on top of the column. |
 | They cut out circles with a jigsaw and try on how the product will look. |
 | The pipe is secured with furniture corners, three corners per circumference. The post is wrapped with rope and glued at the base and top. If desired, the base and the lounger are decorated using fabric and a furniture stapler. Under the fabric of the lounger you will need synthetic padding or foam rubber. |
Making your own cat house with a scratching post
The most complex design: prepare, or, several PVC pipes with a diameter of 100 mm, self-tapping screws, any compass of suitable size. So, how to make a scratching post for a cat with a play complex, we work with our own hands. The photo shows the work process.
| Illustration | Description of action |
|---|---|
 | On a sheet of chipboard, draw two circles taking into account the size of your pet. Cut them out. |
 | To assemble the house, you will need to cut the plywood correctly - perpendicular to the grain so that it can curl. Cut a wide strip, keeping in mind that the cat should not be too cramped inside the house. |
 | We assemble a house from circles and strips of plywood with a pre-cut hole |
 | You need to attach 4 PVC pipes to a rectangular chipboard sheet. To do this, you can put a small wooden plug to fit the size of the pipe inside the base of the pipes. Now the pipes are screwed with self-tapping screws at the corners of the board. This is where the permanent fixation ends. Next, the remaining elements are prepared and assembled into a game complex in order to see what will happen in the end. After this, we disassemble almost the entire structure and engage in decorative finishing of each element. This will be followed by final assembly with fixation. |
 | In the future shelf, holes for pipes are cut out in the corners with jigsaws. The shelf is placed at some distance from the floor. We build up the third tier using the same method, but take a different shape of the chipboard sheet - you can cut off a corner. The 4th floor is located nearby. Between them the house will be fixed to a PVC pipe on the base of the third tier. |
 | Fastenings are made using furniture corners. |
 | At the end of the assembly, we launch the pet into the complex and admire the work done. |
Diagrams and dimensions for making your own scratching post for a cat with a bed
To make it easier to assemble a scratching post with a bed yourself, we offer a number of diagrams that may be useful.


DIY wall-mounted scratching posts for cats with photo samples
Each cat has its own character and preferences. There are pussies happily scratching the posts with their claws, others are happy to do a manicure on a flat floor scratching post. We suggest considering wall models.
Scratching post on a flat wall
The scratching post is mounted not on a bare wall, but on a wooden panel. The width can be any, and the height should ideally be twice the length of the cat without a tail.

Using a drill, you need to drill 6 holes into which screws are inserted, and the board itself is wrapped very tightly with jute twine. The panel is screwed to a wooden panel on the wall and the cat is called.


Scratching post on the corner of the wall
For such a model, you do not need to allocate a separate place on the walls - you can borrow any free protruding corner.


Cat claw sharpener - which one to take on the road
Let’s make a reservation right away that there are no special travel nail clippers: if the journey is long, for the comfort of the pet, take a flat model with you - it does not take up much space.

The toy will distract your pet from the long journey. This model is made similarly to the design with a column, but without a sunbed. The basis could be anything. If you have a road post, it will be an excellent base.
It is better to take a rope that is not very fleecy for making. If the product gets damaged along the way, it will be difficult to get a new one. You can not wrap the post with rope, but use a furniture stapler to wrap it in carpet.
How to explain to a cat where it is better to remove its claws
At first, your pet may not understand that you allow him to sharpen his claws with all his heart on a new object. To attract attention to the scratching post, a hanging toy is placed nearby, and the cat that comes up to play is actively praised. There are also sprays based on the scents of valerian and catnip. They are applied to the surface of the object, and the cat simply will not pass by.
Along with the huge charge of positivity that cats bring into the house, the owner has a lot of troubles associated with this event. One of the most common problems is the cat’s need to wear down its claws, causing damage to household utensils.
The solution to the problem is to arrange a place where the pet could satisfy its needs without causing damage to furniture, parquet or wallpaper.
What is a scratching post for?
Teeth and claws are the main weapons of a predator. Claws grow throughout life, so they require constant care. It is impossible to wean an animal from the ritual of grinding off overgrown claws.
If the animal has the opportunity to be outdoors, the length of the claws is controlled naturally: climbing trees, pebbles, dense soil, sand. For a pet who permanently lives indoors, a cat scratcher will help cope with the problem.
 Walk outside
 You can purchase a ready-made item at a pet store. Choose a device that will harmoniously fit into the interior, corresponding to the habits and characteristics of the animal, so that its dimensions correspond to the allotted space. However, the offered assortment may not always fully satisfy the buyer’s needs. Sometimes it can be difficult to choose which scratching post is better, whether it will interest the cat or not get his attention.
Those who prefer to make things with their own hands know how to make a scratching post for a cat themselves and what materials are best to use for this. When developing the design of a cat accessory, they very often create not just an object for sharpening claws, but an entire play town, a kind of simulator for a cat, which is also a unique element of the interior.
General design principles
A self-made scratching post for cats must meet the following requirements:
- Have sufficient height. The vertical scratching post is fixed at a height exceeding the length of the animal. By grinding its claws on such a surface, the cat bends its back as much as possible, stretching its muscles.
- Guaranteed strength and stability of the structure. A shaky cat scratcher will not be used by the animal for its intended purpose: the lack of reliable support will not allow full stretching.
- Maximum use of natural materials in production. The animal's claws should freely penetrate the material from which the scratch is made, and also be removed from there without injuring the animal.

Materials
A DIY cat claw sharpener starts with developing a project that can be a fun project for everyone in the family. At the same stage, having analyzed what scratching posts are usually made from, they select a natural material for the work:
- wood;
- rope or rope for winding;
- burlap;
- corrugated cardboard;
- cotton wool;
- fabric backed carpet.
Jute or sisal rope (rope) is most often used as a winding. Both types of winding are made from environmentally friendly material of plant origin.
Jute is used primarily in the textile industry; burlap is made from it. The gray-brown material has the following characteristics:
- the fibers are soft to the touch;
- the surface of the rope is smooth, there are no protruding fibers;
- lower cost.

Sisal is obtained from the leaves of the agave plant. The widespread use of light sand-colored ropes in various industries is explained by:
- their more rigid structure;
- the surface of the rope is slightly more fleecy;
- high wear resistance.
How to understand: jute or sisal, which is better for a cat? If the scratching post is being made for a kitten or young animal, it is better to use jute because of its comparative softness. The owner of a large adult cat is better off choosing sisal, which will last longer. This choice is especially relevant if several cats live in the house.
Adaptations for cats are so varied that it is almost impossible to describe all possible design options. Let's consider the most popular models and algorithms for their creation.
Cat scratching posts can be wall-mounted or floor-mounted, simple or complex, equipped with beds, houses, and toys. It is more expedient to arrange play towns and observation decks located under the ceiling for several individuals. For one animal it is better to make a simpler model.
All cats are partial to paper packaging and boxes. The simplest cardboard scratching post will definitely interest your cat.
You need to cut strips 10-12 cm wide from store-bought cardboard boxes. Having previously softened each piece with a rolling pin (as dough is rolled out), tightly twist the cardboard tape, securing the end with tape or glue. We also attach the next tape here and wrap it around the workpiece, gradually increasing the “puck”.

When the diameter of the product reaches 50-60 cm, fix the last strip and decorate the end with bright thick fabric or self-adhesive film. For greater stability, you can attach legs cut and glued from the same cardboard to the bottom on four sides, having previously wrapped them in decor.
Wall-mounted scratching post
In a small apartment, it is better to resort to making a wall scratch. Its basis is a rectangular panel mounted on a vertical surface. You can build a corner model from two planks connected end-to-end if your pet has already chosen a corner of the wall for his activity.
You will need plywood, wooden slats or a wooden board (at least 20 cm wide and 50-60 cm long), and winding material. If you use several slats, they must first be glued together, clamped, for example, in a vice. Stepping back 5-10 cm from the edge, you need to stick the edge of the rope onto the base, securing it.
Next, tightly wrap the board with rope, placing it on PVA glue. At a distance of 5-10 cm from the bottom, the edge of the rope is secured again. In the upper part of the board you need to make two holes into which a leather cord or the same rope is threaded. The product is attached to the wall at the required height from the floor.
Vertical scratching post
Required:
- massive wooden base;
- wooden beam, log or pipe 70-80 cm long and up to 20 cm in diameter;
- rope or natural carpet (if a plastic pipe is used under the stand, the thickness of the rope must be at least 8 mm);
- PVA glue or glue gun;
- material for covering the base (natural carpet or burlap).

- The cat stand is coated with glue from top to bottom., and turn after turn is tightly wrapped around the rope. Every 10-15 turns, the winding is compacted with a hammer. You need to secure the end of the rope at a distance of 10-15 cm to the intended base of the stand. If carpet is used for wrapping, the timber is wrapped tightly with it, securing it with a stapler. Then the excess parts of the material are cut off, and the staples are nailed tighter with a hammer.
- The stand needs to be attached to the base using corners and screws.
- The base is covered with carpet or burlap, folded in several layers. You can leave the wooden structures as they are.
- A wooden cover can be attached to the top of the stand.
Similarly, you can make a scratching post-bench using two posts covered with a board on top as a support. The lounger is covered with soft, dense material.
Scratching post of complex design
Craftsmen often make multi-level structures with their own hands, connecting them with transitions, bridges, and planks. A scratching post house is often harmoniously woven into such a complex.
When making such a combined scratching post with your own hands, step-by-step instructions should be at hand in order to keep track of completed items, and also not to miss important details when proceeding to the next stage.
- Develop a design project. At this stage, you need to think over a sketch and diagram of the connection of parts, which should contain the necessary dimensions (length, width, height of each element, taken taking into account the size of an adult individual of a particular breed), the location of the parts of the complex relative to each other, and fastening elements.
- Make a list and purchase all the necessary materials and tools.
- Make templates for structural elements, use them to cut out all parts of the structure from boards or plywood.
- If necessary, cut pieces of pipes, which can be used as posts and connecting elements.
- Choosing a solid solid board as a base, apply markings on it indicating where the elements of the complex will be attached.
- Main scratching post(a pipe or several pipes of the largest diameter), secure to the stand with fasteners for drywall and self-tapping screws.
- The stand must be covered with the selected upholstery material, making a hole in it for the pipe. To secure the fabric, use a construction stapler and a hammer.
- Shelf of the next tier(second in a row) attaches to racks in the same way as the base.
- On this tier, racks of a smaller cross-section are used. They are fixed in exactly the same way as was done in step 6.
- The second shelf is covered with soft material(for example, foam rubber or padding polyester), and then stretch the upholstery, making slits for the racks, again using a construction stapler and a hammer.
- An upper shelf is installed on top of the structure on the racks, secure it with self-tapping screws and hangers, and cover it with fabric.
- All vertical posts are wrapped with rope or cord, laying the coils tightly and compacting them with a hammer after 10-15 turns. The ends of the ropes are secured and hidden under the upholstery.
- You can install cat scratching posts on the shelves, the dimensions of which will correspond to the size of an adult cat of a particular breed. They are attached in the same way as indicated above.
The figure shows an approximate layout of a cat house with a scratching post with the dimensions marked.