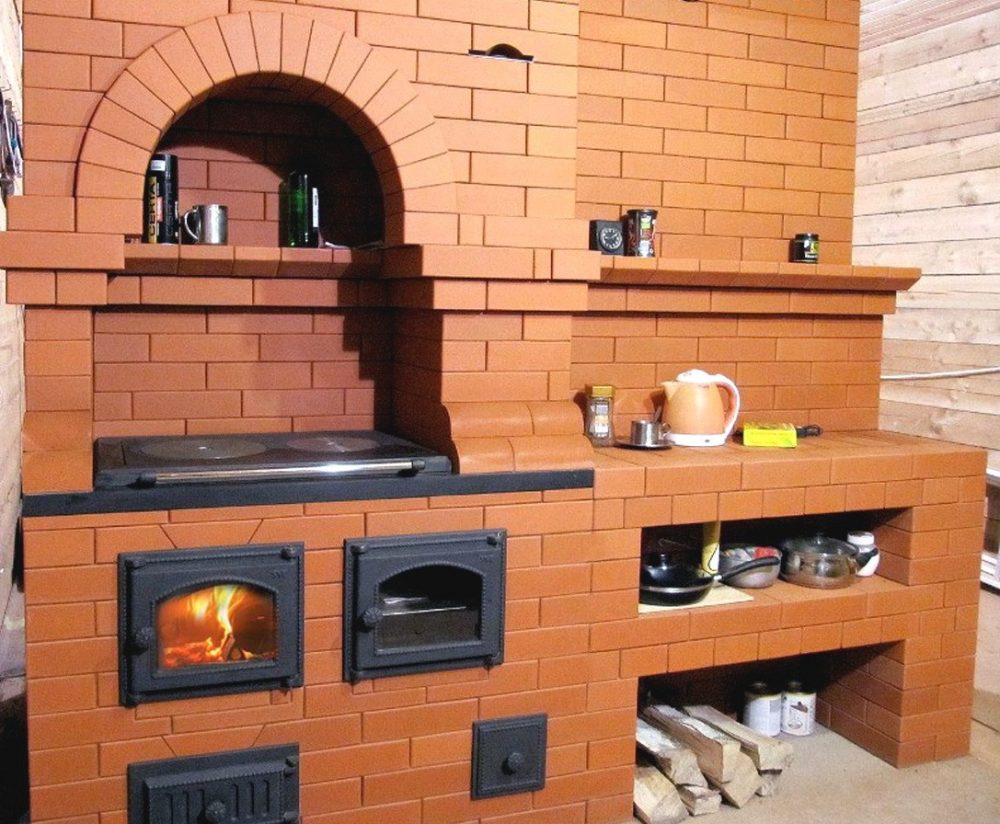
In this article I will tell you about such an effective and practical stove called “Swedish”. Its main advantage is that it can simultaneously be used not only for heating a room, but also for cooking. And if you build such a stove with a stove bench in your country house or dacha, then on cold winter evenings you will be guaranteed absolute coziness and comfort.
You can build such a miracle oven yourself or invite specialists. You can also read what materials are needed and the main stages of the construction process in this article.
The emergence of modern models of heating equipment has significantly increased the comfort of the home. It would seem that such structures as stoves should fade into oblivion, remaining only in museums and in people's memory. But the opposite situation is observed.
Owners of country houses are increasingly showing interest in them and a desire to build a stove in their home. There are several reasons for this phenomenon.
Firstly, recently more and more people are thinking about the environmental safety of housing.
A Swedish stove is a very effective and practical heating and cooking device, which is quite possible to build with your own hands by a home craftsman who has not previously worked on stoves.
If we take into account that bitter frost does not always occur in winter, then in terms of efficiency on average during the heating season, a Swedish stove is slightly inferior to a Russian one, but is more compact and heats up quickly.
By its design, a Swedish stove with a stove is designed to be placed in the wall between the kitchen and the common living room, as in traditional Scandinavian homes, or between the kitchen and living room, in more modern and richer houses.
The kitchen warms up well and quickly for the cooking period, but the heat reserve accumulated in the oven is mostly gradually transferred to the adjacent room. There, depending on the taste and wealth of the owners, you can attach a stove bench or a fireplace to the stove.
![]()
The main advantages of the Swede are:
- compactness;
- high efficiency.
The medium-sized structure occupies only one square meter and is capable of heating a house of 30 m2, provided that the stove is placed in two rooms.
The firebox is located in the kitchen, and the back wall heats the living room or bedroom. Such efficiency and economy is ensured by a complex chimney system that allows rational use of heat.
An important advantage of this stove is the ability to simultaneously create two or three firebox options: winter, summer and autumn.
Each has its own smoke path, which allows you to cook in the summer without raising the temperature in the house. This system simultaneously keeps the stove in working order at all times, eliminating the smoke that owners of conventional structures have to deal with at the beginning of the heating season.
The Swedish stove is a unique design in its characteristics, which is suitable both for heating residential premises and for preparing a variety of food.
The design features and relatively small size of the unit allow it to be placed in adjacent rooms. Usually the front side of the Swede goes into the kitchen, and the back wall into the living room to heat it.

What is most attractive about the design of the Swedish stove is the efficiency of fuel combustion.
Thanks to a successful technical design, coal, firewood, reeds or small wood burns in the firebox, forming a large mass of thermal energy.
Unlike a traditional Russian stove, which takes a lot of time before it starts giving off heat, a Swedish stove heats up very quickly. Thanks to this, within 10-15 minutes after laying and igniting firewood, the room is filled with warmth.
At the same time, it not only quickly warms up the room, but also retains heat. To do this, after the firewood has died down, it is necessary to close the valve tightly. Otherwise, all the heat that has accumulated in the oven will quickly come out.
Like the popular Dutch oven, the Swede is very compact and does not take up much space in the house, which is indispensable in small country houses where the location of a large Russian stove simply does not make sense.
In addition, the cooking hob and oven provide additional comfort and increase the functionality of the oven.

Advantages of a Swedish woman:
- compact dimensions;
- functionality (hob, oven, water heating, etc.);
- fuel efficiency;
- the ability to warm two rooms at the same time.
But, speaking about the advantages of the Swede, it would be unfair not to notice some of her shortcomings.
The design of the Swedish stove is very demanding in terms of the choice of material. If ordinary fireclay brick is suitable for creating a Russian stove, then you need to stock up on very high-quality materials, otherwise the efficiency of the heating apparatus will be greatly reduced.
In addition, the design of such a furnace is quite complex and requires certain knowledge and a very subtle, scrupulous approach. After installation and launch, it will be very difficult to eliminate your mistakes.

A Swedish oven always performs at least 2 functions:
- heating;
- cooking room
The size of the firebox is 35-50 cm, the size of the stove is 41-71 cm. If you, for example, want to change the size of the firebox, then you will have to recalculate all other parameters of the stove. It is not for nothing that the best mathematicians of past times calculated their brainchild with meticulous accuracy.
Before choosing a specific stove model, think about what its main function will be; a lot depends on this.
If, for example, your stove will only be a heating and cooking structure, then it can be placed in the kitchen and made small.
If the task is to heat the whole house, then choose a place from where the heat will freely spread throughout the house. Whatever stove model you prefer, work begins with building a foundation to fit the size of the stove.
The Swedish stove is designed for a small house with a simple layout (ideally a two-room house). Typically, the power of the heat generator is enough for buildings with an area of 30-50 square meters, provided that two fires are produced per day.

The device, as a rule, is erected between the kitchen and the main room, that is, the stove plays the role of a partition.
The firebox and ash door, valves, stove and niches are located in the kitchen (this is where the stove is controlled), and the rear plane with the smoke channels faces the room.
They try to collect the Swede closer to the center of the house, only occasionally they place it near the outer wall or in the corner.
The shape of the Swedish stove resembles a vertically oriented block cabinet, which has a height of 2 meters, often it rises almost to the ceiling.
The model is notable for its modest dimensions on the floor; its length rarely exceeds the threshold of 1300 mm, and its width is 900 mm. That is, we lose only 1 m2 in free space (instead of 3-4, as is the case with the Russian stove).
Great potential is hidden in small dimensions; performance seems to be concentrated here. For example, if you make a Dutch brick from the same amount of brick, its thermal performance will be about a third lower.
The efficiency of Swedish stoves is almost the same as that of a Russian stove, but they are less material-intensive and much easier to install.
Operating principle of the furnace
- The fuel burns in the firebox, and the resulting gas passes under the hob.
- The stove and oven are heating up.
- Heating gases accumulate in the enclosed space of the heating chamber, where it is heated.
- Gases are removed through the chimney bur.
What is attractive about these stoves is their combustion efficiency and low fuel requirements.
Firewood, coal, small wood or reeds are loaded into the combustion chamber - all this burns successfully and releases a lot of thermal energy in the house, thanks to its successful design.
It is very convenient that hot air from the oven begins to flow into the room almost immediately after lighting. At the same time, the back side, which is heated by the flue gases, retains heat for a long time. The main thing is not to forget to close the valve after the fire goes out, otherwise the stove will quickly cool down.
Like the Dutch one, the Swede takes up little space in the house, and is installed in the wall between rooms, which further helps save space.
A stove for cooking and a niche for drying things creates additional comfort when using this type of heat source.
Types of furnaces and their characteristics

There are several models of the Swedish stove:
- a heating and cooking stove, which has only a stove, and also, if desired, additionally equipped with an oven, a water heating tank and a niche for drying;
- a fireplace stove, which can be located in such a way that the heating and cooking part of the structure will go into the kitchen, and the decorative fireplace side into the bedroom or living room;
- a Swede with a stove bed - such a stove has a more complex design, but it can serve as a warm bed in winter.

A Swedish stove with a stove bench is an analogue of a Russian stove and until relatively recently was quite common. Now such designs have been replaced by more compact classic versions.
However, the positive effect of such stoves on colds is widely known. Our ancestors believed that if you sleep on a well-heated stove, the disease will go away.
The model is selected depending on the area that can be used for it, since some of the varieties are quite massive, while others, on the contrary, have compact shapes.

When choosing a stove, in addition to the area, of course, the requirements for functionality are taken into account.
For example, if a Swedish oven is installed in the kitchen and its location does not border on other rooms, then the choice usually falls on a compact heating and cooking stove.
If it is necessary to heat the entire house, then an appropriate place is selected for the stove, where it will heat two rooms at once, or an option with a stove bench, from which a fairly large amount of heat also emanates.
A Swedish stove with a fireplace is perfect for a romantic interior - it is usually chosen by those owners who like to spend evenings near the fire. If the fireplace compartment is laid correctly, it will also be able to heat the room into which its firebox opens.
Regarding the construction of the shield, such furnaces are also divided into several types:
In the case of a horizontal shield, the structure is heated evenly.
However, to clean such a system, a large number of cleaning holes equipped with doors is necessary, which makes such a structure more difficult to construct and expensive.
In the case of a vertical arrangement of gas ducts, such a stove may have only one cleaning hatch.
Since most often such stoves are located between two rooms, one of them will warm up faster than the other. This is explained by the fact that in the first channel, located on the furnace side, the temperature will be significantly higher than in the third, where somewhat cooled gases are discharged.

Swede with bell-type firebox.
This option has the advantages of both systems described above. In this case, the oven heats up evenly, and the structure itself requires only one cleaning window. Another plus is that the construction of such a furnace requires less bricks. In addition, this design cools down relatively slower.
Do-it-yourself Swedish oven
A Swedish stove can be built with your own hands only if the home craftsman already has strong mason skills and at least a little experience working with stoves.
The Swede itself is a rather complex structure, clearly not intended for primary training in such technologies.
Whatever furnace model is chosen, work still begins with the construction of the foundation.
The key material for building a heating and cooking unit with your own hands is red ceramic brick.
It is strictly forbidden to use previously used bricks for masonry, for example, from an old disassembled stove. For the firebox, use fireclay bricks.
To make a small oven you may need the following materials:
- Clay;
- Red and fireclay bricks;
- Doors of various types (blower, combustion, inspection);
- Valves;
- Cooking cast iron stove;
- Grate;
- Steel corners and strips;
- Mertel.
Like other types of brick ovens, the Swede should be laid on a foundation, which must first be prepared.
Its installation does not differ from the installation of a similar one during the construction of other heating, cooking and other types of stove and heating structures.

Remember that the size of the foundation must exceed the size of the furnace. It is laid out on a base of crushed stone and broken brick, then filled with concrete in layers.
The last layer of the foundation is subject to waterproofing and then bricks can be laid according to the order of the structure.
But the stove is not always planned at the stage of building a house, so you often have to make holes in the finished floor. But in any case, the foundation of the stove and the base of the concrete building must be separated from each other. Otherwise, if the shrinkage of one side is unsuccessful, the other side may also warp, thereby deforming the entire masonry.
To build such a powerful unit, you need an appropriate foundation, which will go almost a meter deep into the soil, or more precisely 70 centimeters. If the soil freezes deeper, then the hole, accordingly, should be dug deeper. This information should be taken care of in advance.
If the construction of the stove takes place in an already finished house, and not at the construction stage, then marking the future Swede should be done directly on the floor with the condition that the hole in it should be 10–15 centimeters larger than the size of the foundation in all directions.
After the marking and hole in the floor are made, you need to mark the soil and dig a pit. Cover the bottom with sand moistened with water. Compact it too. The thickness of the compacted sand layer should be 10–20 centimeters. Specific data depend on the depth of the excavated pit.
Then there is a layer of crushed stone of 15–15 centimeters, also well compacted.
Next, install the formwork and attach roofing material to its walls for waterproofing. The formwork should rise above the soil layer to the entire height of the foundation, which is either 1 layer of brick short of reaching the floor, or rises 8–10 centimeters above it.

When laying, it is necessary to maintain the evenness of the surface and strength. The inside of the channels should have a smooth surface, and the seams should not contain voids or excess masonry mortar.
The seams should be controlled using a level; they should not be too thick. If ceramic bricks are used, the permissible parameter in this case is half a centimeter, and if fireclay bricks are used, then 0.3 cm, respectively. They should be bandaged by half a brick.
The main heat accumulator in a Swedish stove is the chimneys lined in the wall or rear wall of the stove.
The main option is vertical wells, the number of which depends on the desire of the owner and the length of the wall.
The lower part of the wall warms up worse, but less soot is formed, and cleaning the channels is much easier.
Horizontal channels warm up the lower part of the room better, but for cleaning you need to install more doors and soot accumulates much faster.
Both options do not require special knowledge and extensive experience; their laying is carried out based on the specific dimensions and design of the furnace.
Be sure to monitor the cross-section of the smoke channel so that it does not change during operation of the stove. If it begins to narrow even slightly, flue gases will not be able to escape properly and may enter the room, forming smoke.
The laying begins from the first row and it is very important to lay it out with maximum precision, because it is this that determines the reliability and strength of the entire stove. When laying it, use a level to check the evenness.
After the first row is laid out, install the door for the blower. Next, follow the order when laying subsequent rows.
To form the internal space of the blower, firebox and other internal elements of the furnace, the bricks should be cut down a little.
It is very important that the upper masonry part and the height of the doors match. In the next row the doors overlap.
Remember that bricks and metal have different configurations in terms of thermal expansion, when installing them next to each other, maintain a gap of one and a half centimeters.
Fill the gaps with dry sand, and seal the space around the combustion chamber and the firebox itself with fireclay.
Avoid deviations and distortions at this stage of work so that you can easily place a cast iron hob on the masonry for cooking.

Any Swedish stove is a heating and cooking stove. This means that the firebox is covered by a cast iron stove with burners on which you can cook.
A standard size stove is used; naturally, the device is adapted to our two-burner product 410 X 710 mm.
For culinary manipulations, two modes are used - winter and summer. The summer direct passage opens when the main smoke circulation is cut off using valves, this allows you not to overheat the kitchen in the warm season.
To ensure that the surface heats up well, the firebox is made relatively small in height - from 280 mm to 330 mm. Its width is up to 350 mm, and its length is up to 505 mm.
In most designs, an oven is a mandatory element. It is designed both for baking dishes and for transferring heat into the room. In fact, this is the main function.
The box plays the role of a convective heat exchanger: when the heat generator is ignited, you don’t have to wait for the bricks to warm up, a hot wave of air will immediately come out of the oven.

The oven is a steel box with almost the same dimensions as the firebox itself. The oven is installed immediately after the combustion chamber, but at some distance from the grate, so that the flame does not particularly touch the metal.
A distance of about 25-30 cm or a little less is considered acceptable (it can be moved closer if the wall closest to the burning firewood is protected with vermiculite or fenced off with refractory bricks or quarter-thick masonry).
A gap of about a quarter of a brick is left between the back wall of the oven and the masonry, so the product will be “washed” by hot gases on three sides.
In most Swedish home ovens, several large niches are created on the front side (as wide as a stove and 5-8 rows high). One is usually located above the stove, and the other is above it. Their direct purpose is drying clothes, shoes, berries, mushrooms, etc.
Below, during heating, the heat is more intense, because the cast-iron stove gets very hot, while the upper niche works only due to heat transfer from the brick.
And, for example, in the “Swedish simplified” model, a second niche is not formed; the only overlap above the hob is simply a convenient shelf.
Floors are mostly made straight horizontal, only occasionally they resort to the use of arched structures, which look more elegant, but require more materials and are more difficult to construct.
Sometimes, to preserve heat for a long time, the opening of the niches is closed with metal doors or wood inserts, resulting in a kind of low-temperature oven.
It is better to complete the construction of the stove with your own hands in the warm season, since it must go through a drying period, otherwise you will have to dry it with an electric fan, which will lead to additional costs.
First, preliminary drying is carried out for 2 weeks. Then - warm drying (the Swede is heated with a small amount of firewood for 12-14 days).
And at the final stage, it is necessary to hot dry the device, that is, bring the temperature to maximum and back several times a day.
A Swedish stove is an ideal option for heating a country house or small cottage.
Its design can be easily combined with other heating devices, for example, with a fireplace, and anyone can put it together with their own hands. The main thing is to have the desire, the material and the necessary tools.
Furnace laying process
- The foundation of the structure is laid out from two continuous rows of red bricks, which are installed in a horizontal position. Using a square, you need to check the accuracy of the angles made.
- On the 3rd row, it is necessary to provide for the laying of the ash chamber, the installation of the door, the laying of the lower chamber of the furnace, as well as the bases of the channels. This level of ordering is also made of red brick, while the blower is made of fire-resistant elements.
- Row 4 provides for the further formation of previously laid structural parts: vertical channels, ash chamber, bottom heating chamber.
- It is necessary, as before, to lay out the blower from refractory bricks, and the remaining elements are made of red. At the level of rows 3 and 4, the channels are interconnected.
- In the 5th row, the laying process begins from left to right. At this level, the ash door is closed and the ash chamber is finally formed.
- When installing a grate, be sure to take into account the expansion of the metal due to heating of the furnace. To do this, a small gap of 1.2-1.6 cm wide is left between the masonry and the grate. This gap is filled with sand. The Swede's ash pan is lined with fireclay, and all other elements continue to be formed from red brick.
- On the 6th row, the base of the firebox is laid and a door is equipped for it. An oven is installed on the same level. A wall is made of fireclay between the fuel chamber and the oven; the rest of the masonry continues to be made of red brick.
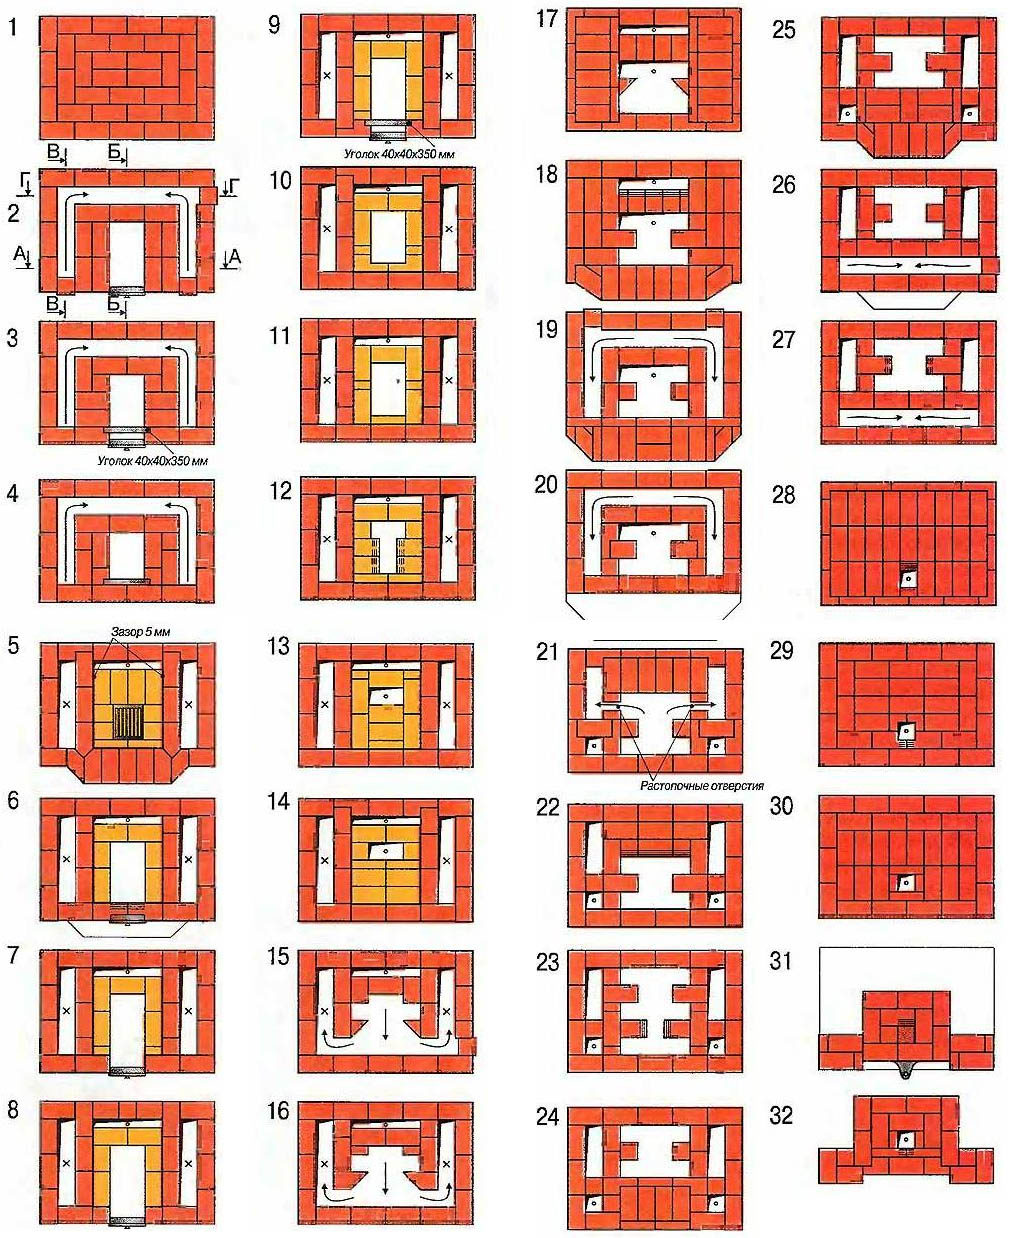
- The previously connected vertical channels are separated at this level. 3 are made from one U-shaped channel.
- Row 7 involves the further formation of a firebox made of refractory bricks.
- On the 8th row, they continue to fire the furnace, and also close the first vertical channel.
- Row 9 is located at the top level of the firebox door. So that the smoke from the combustion chamber smoothly passes into the chimney, on the 9th row the bricks from the bottom and top are cut at an angle.
- On the 10th row, the inner part of the oven is formed from fireclay, and at the same level the oven door is closed. Just as in the case described above, the bricks are cut at an angle. When laying this row, there is no wall between the firebox and the oven.
- The finished 9th row is leveled strictly horizontally, after which a hob is installed on top of it. When installing the stove, you should provide a cutout with a small margin, approximately 1.2-1.6 cm, since the metal will expand when the oven heats up. A metal corner 45x45 cm is installed flush with the outer wall of the structure.
- On the 11th row they begin to lay out the cooking chamber. The hole to the right of the slab is filled with brick. The row is made of red brick. At this same level, a door is sometimes installed so that the cooking chamber can be used as a second oven.
- The 12th row is formed from red brick. At this stage of work, the left vertical channels are combined into one.
- The 13th row is performed by analogy with the previous one, but during the installation process the vertical channel is again divided into two parts.
- The 14th and 15th rows are laid out similarly to the previous one; red brick is used in the work.
- On the 16th row you can block the cooking chamber. For this, metal corners measuring 45x45 cm are used. The level is made according to the same pattern as the previous rows.
- On the 17th row, the cooking chamber is blocked. To ensure that steam has somewhere to escape during cooking, when closing the chamber, you need to leave a hole the size of half a brick.
- The 18th row is carried out according to the ordering scheme; at this level a safety metal corner is laid, which will serve as a reinforcing element of the lower part of the drying chambers.
- In row 19, exhaust ventilation from the cooking chamber is formed, and drying chambers are also installed during operation.
- In rows 20 and 21, the installation of the furnace continues in the same way as the previous level.
- Row 22 is performed according to the same scheme, but at this level the smaller drying chamber is covered with a metal plate.
- On the 23rd row, the drying chambers are completely formed and the place where the exhaust duct valve will be located is prepared.
- In row 24, the first and second vertical channels are connected.
- When laying the 25th row, the hood is combined with the third vertical channel.
- The 26th row is formed according to the order rules. The chambers for drying clothes are covered with a metal corner and an overlap is made over it. A metal reinforcing mesh is laid on top of the structure.
- In the 27th row, the upper part of the Swede is completely closed, leaving only the third vertical channel open. During the work, the perimeter of the masonry should be increased by about 3-4 cm.
- In the 28th row, a side is formed on the stove and the perimeter is increased by another 3-4 cm.
- When completing the 29th row, the perimeter is returned to the previous values.
- On the 30th row, the base of the pipe is laid; a place is provided in the masonry for installing a valve. The further work process is aimed at forming a pipe of the required height.
The finished stove should be dried. If it was laid out in the summer, the structure will dry naturally, but in winter you can use a fan and then heat the stove for 2 weeks.
Operating rules for the stove
Like any other stove, before it is put into operation, the Swede requires compliance with basic requirements:
- Do not light the stove immediately after installation. She needs time for everything to freeze and dry thoroughly. It is very important to take weather conditions into account. If it is raining outside, you should wait until it stops.
- During the first fourteen days it is heated in small portions. This is necessary for the entire structure to dry thoroughly.
- By placing crumpled newspapers in the doors, you can maintain the required temperature. A structure can be considered dried only when the paper has stopped smoldering and is completely dry.

Sometimes problems arise after installing the furnace.
For example:
- The structure “fell over” to one side. This means the foundation is not dry enough. This is a big nuisance. The oven will have to be disassembled and reassembled.
- The bed doesn't heat up. This means that the air exchange system inside the furnace is not installed correctly. It is likely that the stove will have to be dismantled and checked according to the diagram to ensure that everything is done in strict accordance with it.
- The stove or oven does not heat, which means that the open fire is too far away from them due to the large number of rows. They need to be reduced; to do this, the system must be disassembled.
- Smoke remains in the room - the chimney and pipe do not function. This issue needs to be resolved urgently to avoid an accident. The stove is disassembled and checked for compliance with the diagram. The chimney can be very narrow and sometimes needs to be widened.
- The oven heats up very quickly and cools down quickly. Perhaps the wrong and low-quality brick was chosen, which does not meet the state standard. To solve the problem, you will have to redo all the work.
- Do not operate the furnace structure if the unit is not functioning properly. It is better to take the time and redo it than to suffer from carbon monoxide or a weak firebox.
Similar designs or what the Swedish stove is compared to

A Swedish stove is a fairly effective and practical device for heating a room and operating a hob.
Among similar devices, it is worth noting several of the most popular varieties:

Dutch oven.
A special feature of this type of stove is that the stove operates exclusively to heat the room. It is compact and does not take up too much space, so only a small amount of materials are needed to build it, making it a more economical option.
Of course, the absence of a hob cannot always satisfy the client’s needs, but knowing the basic rules and technology of how to build a Dutch oven, you will provide yourself with heating for the entire cold period. Please note that the efficiency level is several times lower in contrast to the Swedish one (by about a third);
Muscovite.
This model is a type of Swedish stove with oven and stove, only it is more advanced. Having the same dimensions, it is much more practical, since all elements of the structure are located more thoughtfully (taking into account further operating conditions).
As a rule, this stove has the following functional parts: ash pan, cleaning hatches, grate, firebox, cooking surface, ventilation system, water heating tank, oven, valves (winter, summer and central).
It is worth noting that for a small-sized house (up to 50 square meters) it is ideal; the only difficulty may be its independent construction, which is almost impossible to create without experience;

Stove with stove and stove.
In a sense, this type of stove can be classified as a more simplified version of the standard Russian stove. This is due to the fact that the bench is not an ordinary brick extension, but a real place that has full, gentle heating.
As for operation, this stove does not have any significant shortcomings, which cannot be said about the mass of the structure.
In addition, due to the presence of a stove bench, it is necessary to allocate a significant area of the room for installing this stove.
If a novice builder intends to build, I will say frankly - the order is quite complicated, and for a beginner it is difficult to understand how to assemble a stove with a stove;

Swedish stove with fireplace.
Most often, this design is preferred to be installed between rooms. The oven is easy to use and has high efficiency. The difficulty for a beginner still lies in laying and connecting all the functional parts.
How to choose a stove

To choose a stove model and determine its dimensions, it is undoubtedly necessary to build on individual preferences.
But there are some specific criteria that you should pay attention to first.
- If the owner of the stove does not want to spend extra time on additional cutting of firewood, then it is best to choose elongated stove models.
- If the firebox is located at the end of the stove, then it is recommended to lay out the width at 2.5-3 bricks, when placing it at the front - 3.5-4 bricks.
Only then can you melt the swede with logs up to 60 cm in size. - One of the important points is the distance from the floor to the hob.
- According to the old rules, it was allowed to lay 11 rows of bricks, which is approximately 76-78 cm, and this is quite low. Therefore, it is now recommended to make the height of the masonry 12-13 rows, especially since this allows you to install doors with glass for the fireplace.
- Since the Swede is both a heating structure and an element of the interior, its external appearance is one of the first places.
- In addition, it is very dependent on the internal filling of the Swedish stove and can consist of a stove bench, a dryer and a water heating tank.
Therefore, there is a huge variety of Swedish brick stoves with figured cladding, artistic tiles, ceramic tiles and mosaics.
In these matters, you need to take into account personal taste, room design and the amount of finances.
Swedish oven with stove and oven
In the absence of gas heating, a Swedish stove can serve as a worthy analogue. It allows you not only to heat your house or cottage, but also to use the stove for cooking. Unlike the Russian stove, this stove has lower efficiency, but it heats up faster due to its small size. Most often, such a stove is placed in the wall between the kitchen and the living room, or the living room and the kitchen. If desired, such a stove can have an additional bench. The classic version is made of ceramic bricks, and the firebox is made of fireclay. A large oven is located on the side of the firebox. The oven heats up in the first minutes of the fire and helps improve the heating of the room.
Photo


The Swedish stove "Shvedka" can be visible, rough and weighty. Usually equipped with a stove and oven. Small decorative options are placed in the corner. The modern analogue is made from ceramic bricks and can be lined with soapstone magnesite. They can be installed in any convenient place. This design has a special storage cap, which helps burn fuel and increase the heat transfer of the stove. This oven consists of a lower, upper niche and a niche above the stove.
Catalog of stoves "Shvedok"
|
Has a high level of efficiency. High degree of heat transfer, functionally adapted to cook food in the oven or on burners, of which there may be one or two.. It heats up quite quickly. The combustion process is regulated (by dampers). Can be done with “winter” and “summer” running. |
|
Swede oven 2With good efficiency, it is small in size. Ovens of this type are multifunctional. Food is cooked on them, water is heated, various foods and clothes are dried. Rooms are heated with such stoves.. In addition, the Swede can be wall-mounted; angular; in the center of the room; built into the wall. |
|
|
This design can be: wall-mounted; angular; in the center of the room; built into the wall. Dimensions - 115 x 90 x cm. Weight 2000 kg. Heat output with two fireboxes per day is 1900 kcal/h. Power = 4.2 kW. Can heat a house up to 40 m2. |
|
|
Equipped with an oven, a stove with one or two burners, and an upper drying chamber. In this design, the firebox is located on one side. It is possible to move the combustion door (if the customer requests it) to the opposite side. |
|
|
By combining a stove and a heating stove into a single structure, you will get a device of this design. There is a firebox with a stove, an oven and a heat shield. |
|
Plate with shield 6Design dimensions: 102 x 102 x 217 cm. Weight (including shield) - 2800 kg. Heat transfer (with two fireboxes) - 3100 kcal/h. The front sides of the shield and slab are usually plastered. |
Design and features of the Swedish stove
The lower niche heats up first, the second after. The upper niche is quite spacious. Warming up occurs with both the first, second, and final heat. The Swede heats the lower part first, since the flue gases from the firebox go down. Instead of a chimney for this oven, an overflow is made, which is placed below the oven. To preserve heat, after the firewood burns out, you need to close the valve. Vertical channels are considered a classic option. Horizontal channels heat better, but require more frequent cleaning.
| Heating and cooking stove Swedish No. 2. Designed for a rural home. Has heating and cooking functions on the stove and oven. The most common design in northern latitudes. |
   |
The construction process of the Swedish
The process of constructing a Swedish stove. For the construction of the furnace, the following calculations are taken: for the stove - 71 by 41 centimeters; for the firebox (height, width, depth) 30 by 35 and 45 centimeters; for oven 30 by 35 and 50 centimeters. These dimensions may vary depending on the oven version. The metal walls for the oven must be at least 4 millimeters. The distance from the edge of the grate to the oven should be about one brick. There should be a gap of a quarter brick from the back of the oven to the firebox. The oven is made of dense cast metal.
Orders of the Shvedka stove
When the oven approaches the firebox, the walls are additionally protected with vermiculite. The door must be cast iron. It is attached to the masonry, which guarantees reliable fixation.
Before masonrybrick ovensThe floor is thermally insulated. Insulation can be made from basalt cardboard. The insulation is laid so that at the end a 1.5 centimeter layer is formed. The middle layer is made from a foil sheet.
The foot of the stove (the first 2 rows) is laid out with widened centimeter seams, this creates a ledge. The brick is moistened before laying. The next two rows form an ash pan and three doors are installed for cleaning the oven. The doors are mounted with a gap. An asbestos cord is inserted into the gaps.
   |
With a two-layer stove made of red and fireclay bricks, a distance of 6 millimeters is made between them. The internal lining of the furnace is lined with fireclay bricks. The grate bars are inserted. And the oven is inserted into the same row. From the sixth to the ninth the combustion chamber is formed. The door is inserted. The tenth row covers the oven.
Next, the slab is laid and smoke channels are made. When laying the slab, quarters are cut out of the bricks.From the twelfth to the sixteenth, the cooking chamber and smoke exhaust channels are laid out. The next two are laid with trimmed bricks. From the twenty-first to the twenty-eighth there is a chimney. In the twenty-seventh, a valve is inserted with a basalt cord gasket in the gap. From the twenty-ninth row there is an extension for the cornice of 5 centimeters. The channels (except the pipe) are closed.
The next row is made even wider by 5 centimeters. Then the size is reduced to the original size. The pipe is laid out in 5 bricks. In front of the ceiling, 3 rows of pipes are fluffed up. The thickness of the pipe is one and a half bricks. An iron smoke cap is placed on top of the pipe. The pipe running outside the house is lined with cement mortar.
Materials
* ceramic brick m200, - 600 pcs.;
* brick-resistant, - 80 pcs.;
* fire door 210 x 250 mm - 1 pc.;
* blower door 250 x 140 mm - 1 pc.;
* cleaning door 140 x 140 mm - 5 pcs.;
* cast iron plate 410 x 710 mm - 1 pc.;
* oven 450 x 360 x 300 mm - 1 pc.;
* grate length 250 mm - 1 piece;
* pre-furnace sheet 500 x 700 mm - 1 pc.
Video: Do-it-yourself Swedish oven
Chimney
The Swede's chimney is made with a wider fluff. It rises above the ridge of the house to a height of at least 60 centimeters. The width of the fluff from the edges of the mouth should be half a brick in all directions. There should be a gap of 5-6 centimeters between the iron roof parts and the brick.

After building the stove, the Swede must dry and only then can it be used. To dry it, you can heat it daily with a minimum amount of aspen firewood. Warming up increases over time until it reaches full power. After this, you can use the Swedish stove.
And so complete ordering, selection, calculation of the necessary materials and tools for work.
Stoves of various designs came to us in Russia mainly from Europe, and they also began to heat them with white heat abroad, that is, they came up with a chimney to remove stove gases, smoke, soot, and soot. At the beginning of the 18th-19th century, by Decree of the Tsar, our Country switched to the European standard for heating stoves “in white”; before the villages who stoked their huts, the “black” people had to make chimneys. But black heating continued in rare cases until the 20th century)
From the Europeans we received such stove designs as “Swedish” and “Dutch”; from the name it is clear that the first was invented by the Swedes, and the second by the Dutch. Both are based on the principle of fuel economy and maximum heat transfer, as well as ease of installation and, of course, functionality. The Shvedka oven includes a cooking chamber with a stove for 2, an oven for baking baked goods and pies, as well as for heating the room in which it is installed.
So, let's look specifically at what is needed to lay a stove?
Materials
1. red ceramic brick
2. fire brick
3. clay (or ready-made masonry mixture)
4. sand
5. cement
6. gravel
7. rubble stone
8. oven door
9. sheet metal oven
10. damper
11. grate
12. metal strip
Tools
1. shovel
2. trowel
3. rule
4. container for preparing the solution
5. plumb line
6. level
7. corner
8. roulette
9. trowel
10. jointing
11. pickaxe (if the ground is rocky)
12. spatula
Step-by-step instructions for laying a Swedish stove with your own hands and ordering.
This type of stove is very economical in terms of building material, namely, according to the author, its creation will require only 500 bricks, excluding pipes. You can also save a little on pipe laying by using used red brick, the price for it is usually half that of a new one, and a thrifty owner always has a good stack of used bricks in his yard, collected brick by brick over several years)
The oven includes a cooking chamber with a 2-burner stove, as well as an oven for baking bread and pies. In general, despite its small size, the oven is quite functional and provides additional benefits in household terms in addition to heating the room.
The stove itself has significant weight and pressure on the ground, so a foundation is required; it is best to fill it at the stages of building a house, to make it easier to remove the soil; if the house has already been built, then you will have to carefully dig a hole under the foundation and carry it out in buckets ground to the street.
You also need to know the characteristics of the soil in your area, the level of groundwater and whether there is quicksand. The depth is generally made at 50 cm, and then the formwork is built, with the expectation that it will be 5 cm below the floor level. The solution is prepared on the basis of cement of a grade not lower than M-400 and sand with filler in the form of gravel and rubble stone. The composition is one part cement, 2 parts sand and 4 parts crushed stone. All this fills the formwork to the very top and is compacted so that air bubbles escape and the solution evenly fills all cavities and cracks. After everything is ready, a chemical reaction and hardening of the cement will begin. For this to happen evenly, it is necessary to periodically moisten the surface with water, so the cement will become more durable.

Professional tool used for laying stoves.


For laying the walls of the stove and chimney channels, ordinary red ceramic bricks are used, but for laying the combustion chamber it is better to take fire-resistant ones, because they can withstand high temperatures and changes, unlike ordinary bricks, and do not crumble or crack.

The oven also has dampers, oven doors, an oven made of sheet metal (you can weld the oven yourself), a grate, a hob, and a corner.

General view of the Shvedka stove.

And so, first of all, a layer of waterproofing in the form of roofing felt is laid on the foundation, and then the first row of bricks is laid out.


When laying rows 3 and 4, an ash chamber is formed and 3 cleaning doors are installed.


Next, when laying the 5th row, the combustion chamber is laid from refractory bricks, and an oven and grate are also installed. Attention! There should be no connection between refractory and ordinary bricks, because they have different degrees of expansion when heated.

The masonry of the sixth and ninth rows is the combustion chamber; the brick between the oven and the firebox is placed on the edge.


The tenth row is a partition over the oven, and the cavity must be filled with clay-sand mortar.


Then the cooking chamber and chimney channels are formed.


The overlap of the cooking chamber is done as follows, namely, a corner and a metal strip of 4-5 mm are laid.

Then the brickwork is done again.


Doors are installed for cleaning the channels, the gap between the door and the masonry is filled with asbestos cord.


After which comes the formation and laying of chimneys.


Then all the channels are blocked and connected into one chimney. Extension by 5 cm.
" This stove is probably one of the most common in its design. In terms of its dimensions, it is quite compact, but at the same time it can heat a room up to 30 m2. Oven dimensions 1020x885x2030mm. Furnace power is at least 3.2 kW or 2750 kcal/hour.
The design of the stove is such that it is convenient to place it in two adjacent rooms. In this case, the furnace part with the stove and oven will face towards the kitchen, and the rear part, where the main heating ducts pass, will face towards the living space. This division allows you to make the entire structure of the furnace visually even more compact.
There are a great many descriptions of furnaces of this type on the Internet, however, during the actual creation of this project, the customer put forward the following conditions:
- The size of the heated room is a country house made of silicate blocks 4 by 7 meters.
- The stove will use wood as its main fuel. At the same time, the use of other types of fuel cannot be ruled out.
- The lining of the fuel chamber and adjacent furnace objects should only be internal. This was due to the fact that the construction will be made of high-quality bricks and any further plastering of the stove will not be provided. Exposed refractory bricks, in the customer's opinion, will spoil the appearance of the stove.
- The oven must be made in a thick-walled version. Installing bricks in the outer row on edge is not allowed.
- The oven must include a drying chamber.
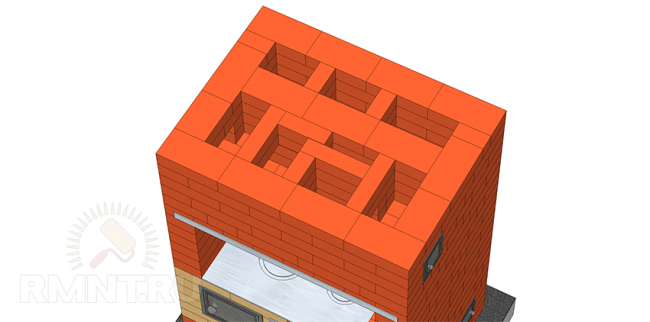
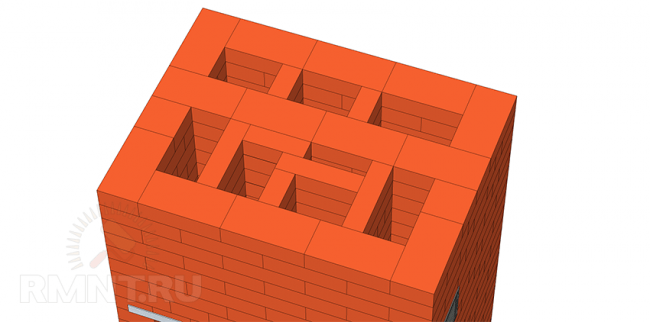
What happened as a result of the design can be seen in the photo at the beginning of the article and in the 3D layout of the oven.
To learn more about the furnace structure, watch the video here.
Due to the fact that, as indicated at the beginning of the article, there are a lot of options for similar stoves on the Internet and they are all very similar to each other, both in their general description and the errors made in them, I cannot indicate the true original source. However, I note that the design is still based on the stove developed by K.Ya. Buslaev.
The information necessary to build this stove is in the project, which can be opened and downloaded by clicking on one of the links below.
To display the project in full screen mode, click on the icon located in the upper right corner of the project. In the window that opens, you can familiarize yourself with the project and download it in format PDF.
Download the design of the Shvedka stove.
Also, when working with a project, you can use an electronic assembly made in the SolidWorks program. However, this will require download the special program SolidWorks eDrawings. But, as they say, this is not for everyone.
Download electronic assembly.
| Source | File Format | Download |
| Y.Disk | sldasm |