Among the most popular and interesting design solutions for wall coverings, photo wallpapers occupy a special place. If a few decades ago the most popular were "Birch Grove" or "Shishkinsky Forest", which were characterized by dull shades, now the construction market offers a huge variety of bright and juicy paintings. They are sure to become an original accent in your home. All materials of this group are made on modern printers and have a long service life. But besides, in order to glue such a picture with high quality, it is also necessary to correctly decorate it. Today we will talk about how to arrange photo wallpaper on the wall in a frame.
Milling operations are required to drive the screw heads. 2nd work step Align the panels with spirit level or crossed laser. To do this, attach the laser to the appropriate height, e.g. on the ladder, and orient the ladder exactly as required. Place the first rail of the base rail and find the position for the top anchor hole.
3rd stage of work Then drill a hole and press on the ankle. They must be suitable for work in brickwork. Screw on the bar lightly, align it vertically and look for other holes. 4th working step. Drill holes, insert anchors and screw the plank completely. In the same way, assemble all the strips of the base rail. Finally, align the bar with the laser, then screw it in.
Photo wallpapers in the interior
If you want to make your room individual, then gluing photo wallpapers will be an indispensable solution. They are made on modern equipment. Due to this, you will be able to enjoy bright, rich colors that will please the eye for a long time. Particularly noteworthy is the fact that you do not have to buy products presented in a hardware store or catalog - all photo wallpapers can be made to order. In this case, you yourself can choose the color, size, brightness and texture.
Step 5: Select the panels to the required dimensions. Since they are heavy and not very comfortable, the incisions should not be too large. Moreover, narrow cuts subsequently lead to the appearance of more panel joints, which, therefore, increases the amount of work.
If you haven't spotted the skewed panels to pick up their edge, the seams may become visible after they've been covered. 7th working step. At the attachment points, the screw holes must be pre-drilled to match the rails. The edges of the plates will be covered, eg. because they are highly absorbent.
Important! There are many photo wallpapers with one structure or another on the construction market. Therefore, your walls may have the effect of wood, stone, pebbles or any other.
Products with the image of paintings can be used in any room. They are great for zoning in studio apartments, when the kitchen is combined with the living room, in one-room rooms. However, the framing of such products deserves special attention. Below we will tell you how to arrange photo wallpapers in the interior. But let's first highlight their "pros" and "cons".
8th working step. To mount the panels on the base, you must have spacers 2 cm from the ground. Then place the first panel on the wooden spacers and place it under the bottom. Then you can screw it in. 9th working step Turn the screws until their heads protrude from the edge of the panel and are slightly pressed in. Then coat the screw heads. If you have skew panel joints to cover, you can skip to this step.
10th step of work After the coating is dry, smooth it with abrasive paper. Hollows and irregularities should be covered a second time and then smoothed out. If you're happy with mounting and dismounting the panels, you can build a pendant with diamond moldings that will be screwed to the back panel, you get a front face without screw heads, making plating unnecessary.
Advantages and disadvantages of photo wallpapers
In order to decide how to design photo wallpapers in the interior, you need to have an idea about all the advantages and disadvantages of large images on the walls.
Advantages of photo wallpaper:
- Juicy and bright colors.
- Attractive appearance.
- Eco-friendly and safe.
- The service life is at least 15 years.
- Huge selection of different models, patterns and textures.
- It belongs to the universal type of coatings, since they can decorate any item in the house.
- Ease of product care. They can even be cleaned.
- Ease of installation. Most models are made on an adhesive basis.
- It is possible to create an order according to individual preferences.
- different price range. This allows each buyer, regardless of his "wallet", to choose the best option for himself.

About placement rules
There are also screw moldings on the base rail. The width of each panel must match the width of the wallpaper. The panels can then be styled differently. 11th step of work After assembling the panels, finishing the surface. To apply non-woven wallpaper, use a wallpaper primer. In fact, this product equates the differences in color and brightness between the coating and the panel. In the case of non-woven wallpaper, these differences appear on the surface.
Advantages and disadvantages of photo wallpapers
Step 12 To apply non-woven wallpaper, glue the wall surface with special non-woven wallpaper adhesive. There is no need for the table to be upholstered. Then place the top wallpaper on the surface and then unfold it. You can cut out strips of wallpaper at the bottom and then apply the next sheets without overlapping them all the way.
Disadvantages of photo wallpapers:
- Before ordering photo wallpapers, it is necessary to measure the dimensions of the desired product very carefully and several times so that they harmoniously fit into the interior.
- The surface on which the photo wallpaper is glued must be pre-prepared and brought to an ideal state.
- If your photo wallpaper consists of several pieces, then sticking it will take you more time, skill and effort.
As you can see, the idea of decorating photo wallpapers on the wall has several times less disadvantages than advantages. Therefore, you can take these products without even thinking. They will become the hallmark of your home.
Removing a wall in its original state
In the case of paper tapestries, glue the back. The wallpaper must then be impregnated according to the manufacturer's instructions before it can be applied to the wall. 13th stage of work Cover the surface of the floor with a covering film. To remove the wall cladding you don't need to completely remove the wallpaper, just remove the screws, you want to reuse the panels in which case remove the wallpaper completely.
Moisten wallpaper with water before removing. Use a ceiling brush to apply water to the wallpaper and try the test to determine best time To remove wallpaper, if the water dries too quickly, repeat the procedure. Create your personalized custom wallpaper online with a unique selection of photos or your own images and get your order printed on pre-pasted paper that's easy to apply. With a few clicks, you will create your interior on your screen, with doors, windows and furniture to get an accurate preview of the wall that will get the width.
We select wallpaper for wallpaper
Thinking about how to arrange photo wallpapers on the wall, at first glance, nothing complicated is found. After all, in fact, you only need to choose a theme, make the right calculations and stick the product. However, an important nuance in the design of the room is the design of the drawings on the wall covering and the selection of wallpaper for them.
Production takes place in France on the latest machines, using the latest technology digital printing based on solvent-free latex inks. Thus, our wallpapers can be placed in rooms without fear of harmful emanations. Print your wall decals in your workshops and can offer you at the best price and with very short lead times high quality personalized wallpapers, both in rolls with thick and pre-glued non-woven fabric, and digitally printed in very high resolution.
Create your wall and its surroundings
Set the dimensions of the wall you want to decorate. For a more accurate representation of the final result, set the color of other walls, choosing the one closest to your home. Margin: Walls are not always straight. Provide a margin of safety. If your paper is for multiple adjacent walls, you can create wallpaper for multiple adjacent walls. Then follow the instructions.
Where to glue?
At the first stage, you need to decide on the wall on which the wallpaper will be pasted. We recommend that you opt for the largest wall in the room, because it will get all the attention.
Important! An excellent option would be products with the effect of "removal". In this case, they will expand the space several times and "go into the distance."
Arrangement of doors, windows and furniture
Throughout the project, you will use the diagram in the top center to select the wall you wish to intervene on. Once the wall dimensions are set, click Next to proceed to the Layout page. To help you visualize the final effect, position the important elements: doors, windows, rocks, and bulky furniture. All elements are adaptable and can be positioned according to the dimensions you saw on the wall. "Next" to go to the "Draw" page.
Design
The next step is to decide on the image. Of course, it seems that it could be easier. However, it is worth considering, because you will see this picture for 10-15 years. Are you ready to plunge into the world that is depicted on your wall? If your unequivocal answer is “yes”, then glue these photo wallpapers, and don’t even think about it!
Upload images or choose from our image bank
You can select photos, drawings or drawings. To upload an image from your computer, click Upload Images. The images you upload will only be visible to you. You can restructure the image by dragging, scaling, inverting the image and locking when you are satisfied with the result. For multiple walls: By default, walls are linked, meaning the image you import will be applied to both walls. This window also allows you to delete the image, return it and lock it.
What combination of wallpapers and photo wallpapers is the most popular and practical?
An important nuance is the color scheme:
- The best solution would be to purchase wallpaper and an image with a pattern in one tone.
- The main coating that will be present on the rest of the walls should definitely be monophonic, not have drawings, ornaments and other distracting images. This is due to the fact that the photo wallpaper will attract all the attention and looks very ugly when the rest of the coating also stands out.
Important! The most popular shades are: gray, cream, ivory, pearl. If you want your main color to be white, then choose wallpaper in black and white. Of course, you can choose bright colors for the walls. However, then you should be more careful about the combination.
You can also write on your wall!
If you see "Pixelization Warning" above, the image may not have sufficient specifications to match the size of your wall. You can add text of your choice on the wall by clicking Add Text. Select the style, color, shape, and position of the symbol. You can also include pictures that will appear in the foreground in front of the background image.
We select wallpaper for wallpaper
Print your wall to select pre-pasted nonwovens that don't require any equipment other than spray, ruler, cutter and brush or rag. Pre-pasted wallpaper that can be reactivated with a water spray. Clean the sponge with soapy water.
Several ways to decorate the walls:
- Sticking photo wallpapers on most of the selected wall or on the entire area. In this case, the volume of the room visually increases, there is a place for relaxation.
- Interruption of photo wallpaper by a window or doorway. In this case, two parts of the image divide the room into two zones. An excellent option would be to stick one set of images.
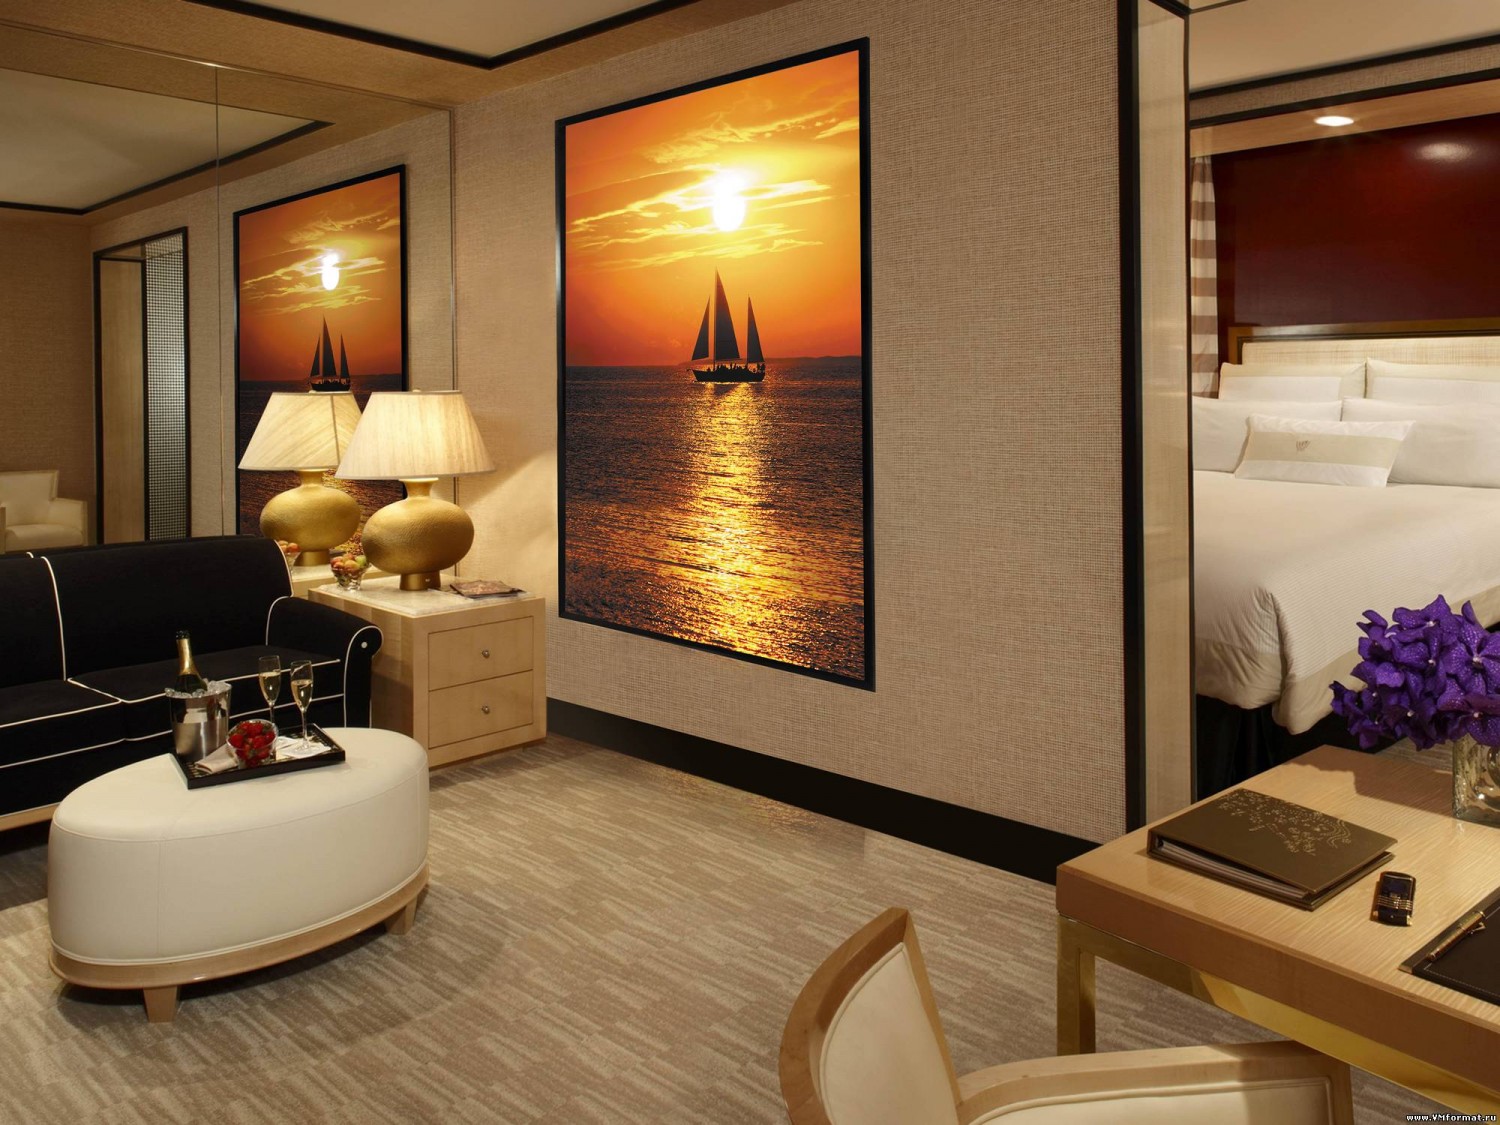
- One of the most the best options Placement of photo wallpaper is a mirror sign opposite the picture. With this method of design, the area of \u200b\u200bthe room visually doubles.
- If your room is already divided into two zones, do not be upset. You can take two types of small photo wallpapers and set your own unique mood in each zone. You can also use interior stickers.
- An excellent solution would be to frame the picture. How to arrange wallpaper in a frame - we will tell you below.
Important! Before pasting photo wallpapers on any of the walls, you must carefully study the instructions that come with these products. Often they consist of several parts, and they need to be glued in a special way.
Your immediate customs clearance
When you are satisfied with your project, click "Submit Work". A window will open to save your project. Then click "Cancel" or "Size" if you want to return to the starting point, or "Add to Cart" if you want to place your order. Your order has been added to the cart.
You can send the parcel to the specified address. When you call to pay, you will be given a billing address and a shipping address. If you are present at the time of delivery, check the condition of the product as verified by the delivery person and note any disclaimers on the delivery note. If possible, take some pictures of the product. We will find a solution so that you get a new item quickly and you do not need to advance postage.

The play of light and color shades on the walls
Before deciding how to decorate photo wallpapers in the interior, it is necessary to clearly imagine the combination of the image along with the main coating. We recommend that you first indicate what effect you want to get and present the final result:
What functions do moldings perform in the interior?
Our packages are prepared with the utmost care and checked before shipping. Restoration of an incompatible product will be at the expense of our customers. After confirming your order, you will automatically receive a confirmation email. This may be considered spam. Check if you received it in your spam folder or promotions.
Moldings in the interior to separate the wallpaper, photos of interesting solutions
Are images sent before printing? We do not retouch an image uploaded from your computer or an image selected from one of our image galleries. The wallpaper and wall decoration software analyzes your photos and alerts you to possible risks that the image may become too small. The software calculates the effect created by a one-meter representation of a custom wallpaper. In the event of a warning during creation, the software will indicate the distance from the wall from which there will be less sharpness, and it is up to you, depending on the room and viewing distance, to choose whether you are appropriate.
- For lighter rooms, it is worth choosing light green, light green and bright shades of lush grass. In this case, sunlight will reflect off the walls and create a pleasant atmosphere. At the same time, the color scheme will not dazzle, but will be characterized by softness and calmness.
- If there is little sunlight in your room, then we recommend that you opt for photo wallpapers with large flowers or patterns. If you give your choice to large flowers, they will additionally visually emit light.
- Color shades - orange, yellow, coral, will make your room rainbow, elegant, festive. She seems to be in a festive mood. All large elements drawn on a paper product will seem real.
In any case, you can choose an image that will be the highlight of your home.
Framing photos and decorative elements
Check the quality of your image and the cropping or possible artificial enlargement you would have done. When in doubt, create your project, save it, and before completing your order, join us by email or phone to have a technician review the files. Once your order has been confirmed and paid for, production will begin and it is no longer possible to cancel the order.
tube frame
Each wallpaper, wall sticker, poster or personalized canvas is made to measure according to your order. Therefore, the rules must be made upstream so that we can start production. Several payment solutions are available for easy and completely secure payment.
Making photo wallpaper in a frame
Now we will talk about how to arrange photo wallpaper on the wall in a frame and what is required for this.
Preparation of materials
At the first stage, you need to stock up on the basic material that we might need. Stucco molding is best suited for this purpose. Items in this category include moldings, pilasters, ceiling moldings, brackets, and similar items that you can buy at a hardware store.
No, we do not offer incremental payments. You can add your text to wallpapers, posters, adhesives and canvases. In the last step, just click the "text" button. A window will appear indicating where to enter text, a choice of about fifty types of characters, color, shape and size of the text. At any time you can edit the text, move it on the panel or delete it.
Variations on a theme
What happens to my personal data? All your personal data is protected in such a way that it will never be passed on to third parties. The photos, images, texts that you upload to the site when creating a personalized print are not accessible to others, and we regularly remove them from our files. No item belonging to you can be used for another project, whether by the customer or by us. If you see "Pixelization Warning" at the top of the module, the image may not be technical enough for your wall size.
Choosing a technique
In the world of interior design, there are two ways to frame wallpaper:
- by the most in a simple way is the frame of the entire image.
- The second method involves the creation of a triptych or driptych. In fact, these are two, three, four or five parts of the image, which are mounted on the wall in the form of a cascade or in another form.
Important! You can create a composition with photo wallpapers framed in frames of different sizes, but they will all be in the same plot. All this can be done by hand. However, it will take you a little more time than just pasting the walls.
Choosing a technology
If you are going to arrange a photo wallpaper in a frame, it is important to solve the following question: will you order printing of individual elements of the image in the store that will fit the frame, or will you cut out the pictures you need from the whole canvas?
The sequence of designing pictures of photo wallpapers:
- At the first stage, it is necessary to cut out the necessary parts from the whole canvas.
- We mark on the main wall the place where the paintings will be attached, and outline how they will be located.
- We install frames for photo wallpapers on the main wall covering. This action involves gluing, puttying and painting stucco or other base purchased for this purpose.
- The final step is gluing the photo wallpaper elements into pre-prepared frames.
Important! There is another way to arrange photo wallpaper on the wall in a frame. You can stick the image directly on the wall, and only then attach the frames. However, in this case, wooden blanks are used.
Today we talked about photo wallpaper and figured out how to arrange wallpaper in a frame. With this wall covering, you can create an individual interior that no one else will meet. It is great for every room, every design and style. You can reflect any mood on a variety of surfaces. Be individual, create your own style!
Each owner can create an exclusive design in his house with his own hands. There is a huge opportunity to choose the one and only decor for decorating your home. One of these solutions is a panel of wallpaper on the wall, the photo in the interior clearly demonstrates how original such a design is. The design will not only create an attractive atmosphere in the room, but will help to visually expand it.
Modular panel
Wallpaper design is beautiful a budget option. Moreover, it is a modern trend. The essence of this way of decorating a space is to reduce the amount of unnecessary garbage as much as possible, to create something new and necessary with its help. Indeed, to create something beautiful, it is not necessary to spend incredible amounts and buy paintings from famous artists.
Having a good taste, a special desire to create and improvised means, you can create a masterpiece of design art with your own efforts.
The panel, consisting of modules, is very popular today. This is a kind of one of the options for creating frescoes, the application technique is the same: the canvas is superimposed on the texture. You can buy this type of panel in a special store, as well as make it yourself.

It is carried out without much special training in the field of design art, it is enough to have a good taste. You can make it from the remnants of wallpaper (of which, for sure, a lot was lying around), for example, use a floral ornament and beautiful patterns. Place such a panel on the wall in any room, the main thing is that the theme matches.
Rules for placing panels in the interior
Any panel, including modular ones, must be correctly placed by choosing the appropriate place. 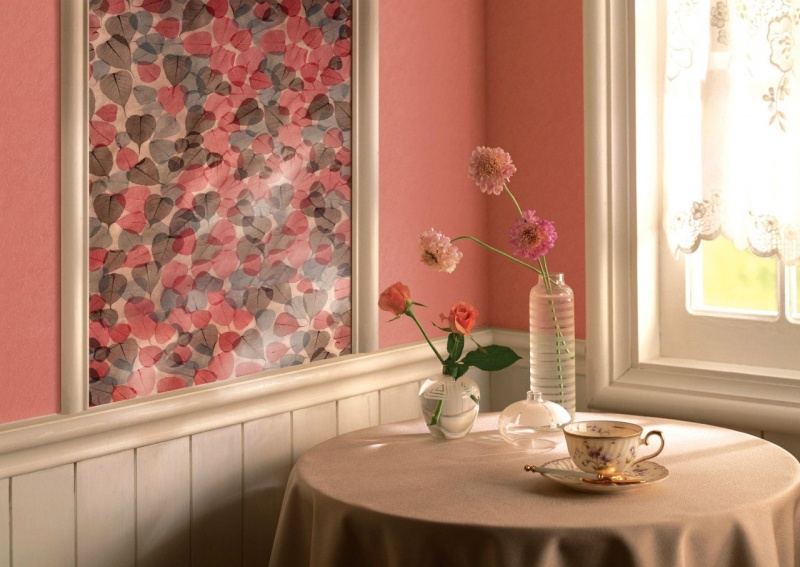
What should be taken into account:
- The product must be framed on a wall free from decorative elements. It should "live" independently, not be loaded with additional attributes.
- If the design is mirrored, you need to place it on the wall so that light falls on it, which will be reflected. Thanks to this design move the room will become visually wider and more spacious.
- If the panel is designed as a picture, in this case, you can use pieces of photo wallpaper, vinyl paintings. Such a product will delight the eye with its originality.
There are modern panels, such as LED. They look very original and can decorate any room, such as a nursery or even nightclubs.

When making panels from canvases, it is necessary to take into account the size of the treated surface, light transmission. Given all these parameters, you can achieve the desired result - get the original design of the wall.

To highlight the sleeping area, it is possible to decorate a panel wall from pieces of ordinary wallpaper. Most importantly, it should not stand out from the general concept, do not violate the color schemes of the entire room as a whole. Basically, the panels in the bedrooms are placed at the head of the bed.

It should be done in soothing shades, as this room is designed for relaxation. Also, do not forget that the decoration on the wall should be in lighter colors than the main wallpaper.

The room for children should be bright, dynamic, uplifting the child and interesting solution in the form of decor will be a decorative panel. It can be made of colored clay (polymer), stone, wood, papier-mache and other material. An important condition is that it should not cause anxiety and fear in the child.

The work can be done in the form of a fairy-tale ship, a magic tree or a beautiful castle and much more. Of course, a decorative panel can also be made from wallpaper, you can take the remaining photo wallpaper as a basis. And if the child himself takes part in the creation of such a panel, then the result of the work will exceed all expectations.
How to make a panel with your own hands at home
The creation process is not that complicated. First you need to make a beautiful frame, inside which a wallpaper composition will be created. The frame can be made of wood or polyurethane foam, twisted rope (especially such frames are suitable for a “nautical” style) and much more. For the main idea, you can take a photo of a panel of wallpaper on the wall. They will look great as a frame.

Initially, on the wall, you need to mark the future panel, carefully drawing the boundaries of the existing or future frame on both sides. Prepare the frame elements (treat and spread with glue) and glue them to the wall, you also need to cover the seams of the joints. The frame can be painted in a beautiful color that matches the style of the panel.

After making the frame, prepare the elements of the panel, after collecting the pattern on the floor (on the substrate). Thoroughly coat each element with glue and carefully stick it on the wall. After completing all the work, cut off the extra edges around the perimeter of the entire panel.

Another option for a beautiful wall decor is a wallpaper panel made of wallpaper. Against the background of plain wallpaper, a bright, mirrored panel is created that will look very impressive on the wall of the room. But it should be the only bright element of the whole room, otherwise you will get an excessive amount of unnecessary details.
You can create a panel from the remnants of materials in the same way - decorating a room with pieces of various wallpapers. But this work requires great accuracy and design taste, and you can start it only when you have a sketch of the future panel at hand.
Creating a bright and unique interior is in your hands. A little imagination, desire and everything will work out.