The installation of an attic roof allows you to significantly increase the usable area and rationally organize the space of a low-rise building. However, its construction often frightens home craftsmen because the process is too complex and labor-intensive.
There is no need to be afraid, because the result will provide a beautiful roof and comfortable additional rooms. And in order for the result of the work to please the owner and household members, you need to know what rules are used to construct the rafter system of an attic roof, and what is the easiest and best way to arrange it.
When we mention mansard roofs, we immediately recall a pentagonal gable structure of impressive size over a log house, concrete or brick walls. Visual memory suggests that its slopes must certainly have different slopes, i.e. the bottom of the roof simply has to be much steeper than the top. Due to the difference in the angles of inclination, a convex fracture is formed, which gave the roof the popular name “broken”. The term has justifiably migrated to the technical definitions of attic structures. It reflects the essence of the usual standard in the device, but often has nothing in common with the configuration. Despite the fact that the design of all mansard roofs necessarily includes two parts, their presence cannot always be determined visually.
Purely based on external indicators, the predominant number of attic structures can be divided into:
- Triangular roofs, the lower and upper parts of which have an equal slope. Outwardly, they resemble traditional gable structures without kinks in the plane of the slopes.
- Pentagonal roofs with slopes having convex corners. This category clearly demonstrates the presence of two joined parts in the design.
In both of these varieties, the rafter system consists of two tiers stacked on top of each other. The lower structure forms the useful space of a residential attic with a height of 2 to 2.5 m, so that moving inside it is not difficult. The second tier creates the shape of the roof top and is allowed to be of arbitrary height.

By varying the angle of inclination of the upper and lower rafter legs, you can obtain the optimal roof shape in your own opinion. It is believed that a pentagonal attic, the corners of which are in contact with an imaginary circle, looks best.

Note that the principle of constructing a sloping roof is suitable not only for gable rafter systems. Interpreting the basic method, the attic can be organized in hip, single-pitched, hipped and other roofing structures.
Sometimes an existing structure is converted into an attic, the construction of which did not use “broken” technology. However, these roofs cannot a priori be classified as attic. True, if the rafter legs have sufficient power, no one bothers to use the crossbars of pitched rafter systems as ceiling beams, and the supports of additional purlins as beams for cladding the attic.

We found out that the main feature of an attic roof is the presence of two adjacent rafter structures connected into a triangle or pentagon of a shape that is attractive to the owner. In their construction, standard ones are used:
- Layered, according to which the lower tier of the attic is built and used in the construction of the upper part.
- Hanging. In accordance with it, only the upper part of the structure is built.
If, to simplify, the section of the attic roof is divided into two halves, you will get a trapezoid at the bottom and a triangle at the top. The inclined sides of the trapezoid are allowed to be exclusively layered, and the sides of the triangle are layered and hanging.

Basic diagrams of rafter systems
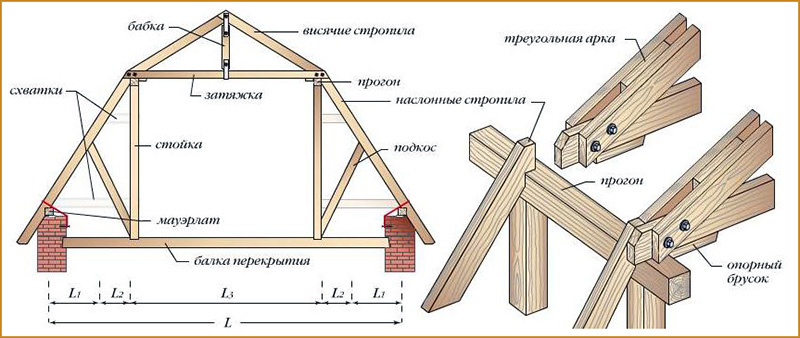
A “classic of the genre” is rightfully considered to be the pentagonal diagram of the rafter system of an attic roof with support posts forming the walls of the interior. Its section is conventionally divided into simple geometric shapes. In the center there is a rectangle, on the sides of which there are two mirrored rectangular triangles, and an equilateral triangle on top.
Standard attic construction
The layered rafters of the lower part of the structure rest at the bottom on the mauerlat, and with the upper heel on the right or left purlin. The part of the mansard roof frame that crowns the structure is made up of hanging rafter arches. They are supplemented with a suspension headstock in the middle if they are intended to cover a span of more than 3 m. The headstock cannot be connected to the arch tightening with a notch, like a support post. Its job is to prevent the tie from sagging - it is not a support, but a suspension.
The supports-racks of the layered rafters of the lower part rest through the beam on the ceiling. If it is necessary to increase stability, struts are installed under the supports. The posts are connected to the frame and purlins by notches, the joints are duplicated with metal corners and toothed plates. If the floor is concrete, bitumen waterproofing is laid under the floor. The bed can be laid not on the ceiling, but on brick pillars or on leveling boards. When constructing an attic on a wooden floor, you can do without the beams altogether and embed the racks directly into the beams.

The rather steep lower parts of the slopes of attic roofs are practically not affected by the snow load; precipitation does not linger on them. However, steeply installed rafters have another problem - gusty winds will tend to overturn and tear off the roof. Therefore, attaching the system to the Mauerlat must be taken very seriously. In an attic situation, each rafter is tied to the walls with twists, and not through one, as in conventional pitched structures.
Method of moving rafters beyond the wall line
It often happens that the planned attic structure creates too narrow an internal space. It can be expanded by moving the rafter legs outside the walls. Those. the rafter leg will rest not on the mauerlat, but on the beams of the upper floor. This case, in theory, does not need a Mauerlat at all. But reinforcing struts in the scheme with the removal of rafters are used without question, because there is no support at all under the extreme part of the side triangles.
The installation of the Mauerlat can be eliminated, but pouring a monolithic reinforced concrete belt for attaching beams to brick walls is highly desirable. The floor beams are attached to the monolithic belt with anchors, and support posts are driven into them to a maximum of 1/3 of the thickness of the beam. An important point: moving the rafters outside the wall is simply required to form a cornice for wooden houses with a width of at least 0.5 m, for concrete and stone houses at least 0.4 m.

Technology for constructing a rafter structure with the rafter leg extending beyond the wall:
- We install the outermost floor beams that define the contour of the eaves overhangs. Because the ceiling will be loaded, the section of the beams is taken from 150x200mm. If, when laying the starting beam, it turns out that the walls do not form an ideal rectangle, we try to correct the flaws by changing the position of the beams.
- We lay and fix the remaining bars along the laces stretched between the fixed outer beams. We control the height and pitch of the beams before fastening. The distance between the floor elements is equal to the step between the rafter legs. For insulated roofs, the optimal rafter installation pitch is 0.6 m, because it is equal to the width. If the rafters will be installed with a similar frequency, they can be made from 50x150mm boards.
- From the left and right edges we set aside a distance equal to the length of the short leg of the right triangle. At the marked points, carefully use a chisel to select nests a third of the height of the beam under the outer supports.
- Let's make supports by cutting out tenons. They need to be made according to the size of the selected nests. For the manufacture of corner supports, a beam with a cross-section of 100×150 mm is suitable, and two load-bearing supports for the gable sides of the roof should be made from it. For ordinary racks, 50×100 mm timber is sufficient. The material for the supporting elements should be longer than the design height by the length of the tenon, but it is better by 10 cm in case of errors during cutting.
- We install the corner posts and fasten them with temporary spacers. We connect the posts with lace.
- We use a plumb line to check the points in the beams for selecting nests for row supports and select the indicated holes.
- We install row posts and two load-bearing supports in the centers of the attic gables.
- On the installed supports we lay purlins - boards with a section of 50x150mm. We fasten the purlins with corners. It is not necessary to use as many nails as in the corners of the holes. Two or three are enough for each plane. As a result of laying the boards, the frame of the walls of the future attic is obtained.
- We connect the supports installed opposite each other with bars, attaching them to the purlins with corners. These elements will serve as tensile crossbars. Therefore, for their manufacture you will need 1st grade lumber with a cross-section of 100×150mm. For each installed crossbar, a temporary support from a 25x150mm inch is needed.
- We temporarily fasten the crossbars on top with the same inch, retreating 20-30cm from the edges of the frame. Temporary thin flooring of one, two or three boards is needed for ease of installation of the upper part of the rafter system.
- We make a template for the rafters of the bottom row from an inch. To do this, we apply a blank board to the end of the purlin and beam. Then we outline the lines of the grooves along which the excess will be sawed off. We try it on and trim the excess if necessary.
- We make rafter legs using the template. If there are doubts about the flawlessness of the construction, then it is better to cut out only the upper groove first. By placing the rafter in its proper place, you can then adjust the lower groove after the fact without unwanted damage to the material.
- We install the end rafter legs, which will need to be connected again with lace.
- Using the lace as a guide, we install the rafter legs of the lower tier of the attic.
- Similarly, we make a template for the upper part of the rafter system. In order to find the line of the top cut, we temporarily sew a board onto the gable support.
- Let's make a mirror version of the previous template. The rafters of the upper tier will rest against each other.
- Let's try both templates on the roof. If everything is normal, we use them to make the required number of upper rafters from 50x150mm boards.
- We are constructing the upper tier of the rafter system.
- To prevent the crossbars from sagging, we install headstocks of the required size to each upper truss. We firmly sew them only to the ridge area; the bottom should not be rigidly fixed.
Next, the rafter legs are screwed to the walls with wire ties. Then the pediment frame is installed, along which it needs to be sheathed. Finally, the sheathing is installed at a pitch corresponding to the characteristics of the roofing material.

Method with frame modules
The technology differs from the previous method in that it is not individual supports that are installed on the floor, but modules-blocks of the side walls of the future attic that are completely prepared for fastening.
The block method of constructing a rafter system allows you to optimize the construction of an attic roof, because the construction of modular elements is carried out on the ground. In quiet conditions without a sense of altitude, it is easier to achieve precision node connections.

The process of installing a block mansard roof:
- Based on a pre-made design, we manufacture the frames of the attic walls. Using this method, longitudinal beams play the role of purlins and beds. We lay them out together with the racks on a flat area and use a square to mark the sockets for the supports of the side walls. We make cuts along the measured lines.
- We cut out spikes on the racks, the size of which must correspond to the size of the nests.
- We connect the longitudinal beam with vertical posts, we get two modular frames - these are the walls of the attic.
- We lift the frames up and install them in the intended place. We temporarily fix the position of the walls with spacers, then attach them to the floor beams with brackets.
- Using a chisel, we select sockets at the edges of the beams for installing the lower row of rafters. They need to be placed in one line. To maintain the geometry, it’s easier to first mark them with a chainsaw, then modify them with a chisel.
- We perform the upper rafter tier of the attic on the ground, having previously fitted the blanks to the installed elements. To ensure an accurate fit, we temporarily nail a board to the end of the future roof so that one of its edges clearly follows the central axis of the rafter system. The base of the upper attic triangle serves as a stretcher. Its length is equal to the distance between the outer vertical planes of the installed frames. We select nests along the edges of the guy wires, and spikes on the lower heels of the rafters.
- We assemble the trusses of the upper tier, for reliability we install an additional crossbar, and we reinforce the ridge assembly with a triangular wooden overlay.
- Before we move to the roof, we make preparations for the rafter legs. We try them on to the frames laid out on the ground. It is more convenient to “cut” them in one fell swoop, grabbing several pieces with a clamp. We cut out only the upper bevel, taking into account the fact that it will rest partly on the wall post, partly on the stretch of the upper rafter trusses.
- We try on the bottom rafter to the end. In the area of its lower heel we draw the shape of a spike, repeating the configuration of the nest in the beam. We cut out the thorns.
- We move the trusses of the upper tier and the rafters of the lower tier to the roof. We first install the trusses, attaching them to the upper frame of the walls with staples, then the rafters of the lower part, attaching them to the floor beams with the same staples.
The subsequent stages of roof construction are carried out according to standard rules. Drawings for a mansard roof, clearly representing the structure, will introduce you in detail to the described principles of constructing a rafter system. Thanks to the production of joints by cutting half a tree, the strength and rigidity of the frame as a whole increases, which will eliminate the need to install additional struts.

The disadvantage of this method is that the finished modules are quite difficult to transport to the roof. To transfer the assembled blocks there without the use of lifting equipment, a minimum of 4 people will be required.


Board and nail rafter system
It is impractical to build a powerful attic over small country houses, but you still want to save space on a small plot. For owners of small buildings there is an excellent option - a lightweight board and nails layered structure. The method should appeal to those who love saving, because the construction does not use solid timber.
For the manufacture of each of the supporting elements, two boards are used, between which spacer sections of the bar are installed. The cavity formed by the bars explains why the system is lightweight compared to its solid counterparts. To ensure spatial rigidity, wind braces are installed connecting the supports to the rafter legs. The lathing, in turn, will make its contribution to strengthening the structure.

The popular way to develop a layout
For a successful work result, a project is very desirable. It is not a fact that the presented drawings with dimensions are suitable for furnishing a particular home. Typology in construction is now not at all welcome. If there is no documentation at all, it is better to make at least a sketch of the future roof, not forgetting the height of the ceilings in the attic. Wherein:
- Proportions must be observed, because an attic that is too large can turn a small house into an awkward, mushroom-like building.
- It must be remembered that the lower part of the attic roof is built using layered rafter legs, and they optically lower the overhang and overlap the upper part of the high windows. There will be no noticeable overhanging effect when constructing an attic according to the scheme with the rafters removed.
- Do not forget that the height of the attic room must ensure freedom of movement. It is this landmark that is required to correctly determine the height of the racks of the attic walls.
You can select the best roof proportions using the traditional template-layout method. According to it, bars or boards are laid out on a flat, spacious area, repeating the contour of the building in real size. By changing angles and moving components, you can achieve the optimal configuration. The elements need to be fixed with nails and immediately measure the lengths of beams, rafters, tie rods, and posts. The resulting dimensions will help in making templates.

The video will demonstrate the calculations and layout of the rafter system for an attic roof:
The basic options and diagrams for the installation of an attic rafter structure that we have given will help you decide on the choice of the optimal type of rafter structure.
Attic It is most convenient to arrange a room in a country house or a country house on a garden plot under a roof with two slopes.
Uncomplicated the rafter structure can be completed independently, without lifting mechanisms and complex tools.
Space under traditional for wooden and brick houses gable The roof is most often used as a cold attic space.
However, at low cost and well-installed roof insulation, the attic can be turned into a cozy room, bedroom, nursery, and even living room. From choice the type of room under the roof will depend
In small country houses, the construction of a gable roof with an attic solves the problem of shortage residential premises.
Features of a gable roof with an attic
To determine the design of a gable roof should be considered:
- House layout;
- Dimensions;
- Wall thickness;
- The presence of a load-bearing longitudinal wall.
In addition to construction factors, the choice of roof configuration is influenced by climatic features of the location of the building.
For houses with a width of up to 6 m located in a temperate climate zone, choose a gable roof with a hanging rafter structure and a slope angle of at least 400 degrees.
A smaller angle of inclination will not allow you to arrange an attic room with a sufficient ceiling height. In addition, the steeper the roof, the less snow and water on it will be delayed. From a roof mounted at an angle 450 degrees, snowflakes slide under their own weight.
The principle of the rafter system
Supporting roof structure with hanging rafters does not require complex calculations and design solutions. The diagram shows that the rafters of a gable roof with an attic are installed in the form triangular arches along the entire length of the house with a step that depends on the weight of the roofing material with sheathing and insulating materials. Frontal the surfaces are a continuation of the walls of the house and are made of the same material.
Important! For the attic room, during the construction of the gables, the installation of window openings is provided.
The principle of hanging rafters is based on spacer system. The rafter legs rest on each other at the top point and are tightened with a crossbar, which is fixed at the height of the attic ceiling. Puff is performed to balance the thrust load acting on the walls of the house. At the bottom, the rafters are rigidly attached to the mauerlat - a wooden foundation for the roof truss structure.
Mauerlat is located along the perimeter houses, on the upper bases of the walls. Such a foundation is made by continuous laying of timber 100 on 150 mm or 150 on 150 mm for waterproofing.
If the length of the beam is not enough for laying in one cut along the entire wall, it is connected in two parts in the center of the fence, driving the fastenings at an angle 450 degrees. The Mauerlat is secured to the base of the wall closer to its inner edge with anchor bolts and studs.
Vertical supports for installation are attached to the Mauerlat with metal corners rafter legs, on which cuts are made for better emphasis on the mauerlat beam.
Determination of structural dimensions
Length rafter beams can be determined without calculations. For this:
- In the center the front wall is installed vertically temporary support with tied twine on the intended one;
- Leg-split taken to the corner of the house, thus determining slope size roofs. Add to this value 60 cm on the eaves overhang and get the size rafter beam.
Calculated dimensions of the hanging truss structure of a gable roof for a house with a width 6 m indicated on drawing.
We define number of rafter arches. For this:
- We divide length buildings on distance between supports. For a small country house optimal step installation of rafters – 1m. If the length of the house is 8 m, then the number of arched structures will be:
8/1 + 1 = 9 , and the distance between them: 8/9 = 0.9 m.
Installation of truss structure
After determining the amount of consumables, proceed to installation rafter system of a gable mansard roof. It can be done with your own hands:
- A triangular truss is assembled from two beams and a tie. If the roof slope is 450 degrees, then at the top point the beams rest on each other at an angle of 900 . The upper connection is fixed with a metal plate. Tightening bolt fastened with self-tapping screws at the height of the expected attic ceiling;
- Rafter structure lift to the installation height and attached to a temporary support on the front wall. The rafter legs rest against Mauerlat cut in places and screwed to pre-installed supports. Under the rafters they put wooden corners;
- Plumb check vertical installation of the farm;
- Likewise install a rafter arch on the opposite front wall;
- Between the tops of the outer arches pulling the twine or nailed run for installation of intermediate trusses. To better fix the vertical position of the arches, the rafters are temporarily fastened together with boards;
- Installing a skate and begin lathing the rafter structure.
Advice! To increase the reliability of the structure, a tie bolt is installed on both sides of the truss. Fastening is done with bolts.
Important! After installing the truss structure, air ducts and chimneys should be removed from the roof.
Roof lathing and waterproofing
 To strengthen rafter structure and creating a base for roofing material is installed on the rafters sheathing.
For step-by-step lathing under, corrugated sheets, slate or metal tiles, use a softwood board. Can be used 40x50, 50x50, 50x60 mm but he will weigh down roof structure.
Now let's consider types of waterproofing for a gable roof. For a gable roof, the following is suitable as a water barrier:
- Bituminous roll material– traditional, inexpensive, but short-lived roofing waterproofing;
- Reinforced film– polyethylene, reinforced with synthetic thread, creates a waterproof barrier between the roofing material and the wooden roof structure;
- Waterproofing film– perforated polyethylene, which has the unique ability to allow moisture evaporation from the insulation to pass through, but does not allow water to pass inside;
- Anti-condensation film designed to protect metal roofing materials from condensation. The outer layer of the film is made of geotextile, which perfectly absorbs moisture, and the bottom polymer layer does not allow water to pass to the wooden elements of the roof.
Start laying roll waterproofing from lower the edges of the slope. Subsequent rows are overlapped.
Installation of sheathing
Installation of gable roof sheathing is a step-by-step process. The installation steps are as follows:
- The waterproofing layer is attached to the rafters with galvanized brackets with a slight sag for under-roof ventilation;
- To install the sheathing, wooden slats are nailed to the rafters on top of the waterproofing; the sheathing lamellas are fastened with self-tapping screws;
- A cornice is attached to the lower edge of the rafters;
- Through 30 cm the next line of sheathing is installed from the eaves;
- Rows of sheathing are attached parallel to the cornice in increments 60 cm;
- The wooden lamellas of the sheathing are connected at the intersection with the rafters;
- An additional row is installed on 10 cm below the roof ridge;
- Wind trims are fixed to the end rafters;
- Compare the diagonals of the roof slopes.
After lathing the truss structure, they begin external cladding roofs with roofing material.

Roofing materials and their fastening
 For the top covering of a gable roof, modern roofing materials are used - ondulin, corrugated sheets, and metal tiles.
In addition to strength and durability, they differ easy weight, therefore suitable for cladding attic roofs.
The roofing sheets are attached to the sheathing with self-tapping screws, beginning from the bottom row.
The amount of material is calculated based on the area of the roof slopes with a coefficient 1,2 for overlapping fastening.Before covering smooth surfaces, aprons made of metal of suitable thickness or special blanks are installed around chimneys and air ducts.
In conclusion roofing work, ridge elements and end strips are attached.
Advice! It is necessary to glue a sealing tape under the ridge covering, which will prevent water from getting under the roof sheathing.
The roof is insulated from the inside and a vapor barrier layer is laid.
Thermal and vapor insulation of a gable roof of an attic room
Insulation The attic roof is made by laying a heat-insulating layer in the recesses between the rafters. Used as thermal insulation mineral wool, which has low weight, good vapor permeability and low thermal conductivity.
To avoid mineral wool getting wet due to condensation, it is covered with "breathable" layer of vapor barrier. Perforated polyethylene films, anti-condensation multilayer coatings and diffuse membranes cope well with the task of vapor insulation of the inner surface of the roof.
The vapor barrier is laid across the rafters, along the entire length premises, with lanes overlapping for at least 10 cm. The seams are taped with a special tape. The film is stapled to the rafters using a stapler.
At the final stage of constructing the attic space, internal the surface of a gable roof is sheathed with sheets of plywood, plasterboard, clapboard or other decorative coating.
Read more about how and how to insulate an attic roof correctly.
Subject to the basic rules for constructing a gable roof, taking into account the advice of specialists on the selection and fastening of building and insulating materials, the installation of the attic room is carried out independently. A warm, well-ventilated attic will serve as additional living space and improve the microclimate of the entire house.
Look video about the installation of the rafter system of a gable mansard roof:
The difficulty lies in the fact that it is necessary to take into account several important components: snow load, gusts of wind, slope angle, weight of the rafters themselves, insulation, waterproofing, roofing materials. Rafters can be combined, metal or wood.
The attic roof should be light so as not to load the foundation. Developers are increasingly using thin-walled metal rafters for mansard roofs; their cost is much higher than wooden ones, but the speed and ease of installation of such systems more than makes up for this drawback.
In independent construction, the rafter system of an attic roof is traditionally made of wood, so we will take this material as a basis.
Good to know
In order to correctly calculate the truss structure of the attic, it is necessary to take into account 3 types of loads acting on the roofing system. First, you should calculate the weight of the attic roof itself: roofing material, sheathing, counter-lattice, waterproofing, rafters, attic insulation layer, vapor barrier, finishing. To do this, you will need to know the weight of each material per 1 m2; such parameters are indicated in the instructions and certificates of the manufacturers.
For example, polymer-bitumen waterproofing will require 5 kg/m2, one square meter of mineral wool weighs 10 kg, standard sheathing made of 25 mm boards - 15 kg, ondulin approximately 3 kg, metal tiles - the heaviest roofing material. When calculating the load, add up all the indicators and multiply by a correction factor of 1.1.
Secondly, the design of the attic roof rafter system must withstand snow loads; in some areas this figure exceeds more than 500 kg per m2. Formula for calculating snow load:
S=Sg x µ, where
Sg is the mass of snow on 1m2 of horizontal surface, the indicator is established by regulatory documents for each climatic region separately;
µ - coefficient depending on the slope of the roof: an angle of 25 o - coefficient 1.0, 25-60 o - 0.7, if the slope is above 60 o the coefficient is not taken into account.
And finally, wind loads. To calculate them, the formula is used:
W = Wo x k, where
Wo – normative data, which are determined individually for each district;
k – correction factor for different types of areas and building heights.
Based on the total load on the rafter system of the attic roof, the length, pitch and cross-section of the rafter leg are determined. Below we have provided a table of recommended parameters for installing a rafter system in a temperate climate zone (Moscow region):
| Distance between attic roof rafters, m | Leg length, m | ||||||
| 6 | 5.5 | 5.0 | 4.5 | 4.0 | 3.5 | 3 | |
| Cross section of beams, mm | |||||||
| 0,6 | 50*200 | 50*200 | 50*175 | 50*150 | 50*150 | 40*175 | 40x150 |
| 0,9 | 75*250 | 75*200 | 75*175 | 75*175 | 50*200 | 50*175 | 50x150 |
| 1,1 | 100*200 | 75*200 | 75*200 | 75*175 | 75*175 | 75*150 | 75x150 |
| 1,4 | 100*200 | 100*200 | 75*200 | 75*200 | 75*200 | 75*175 | 75x150 |
| 1,75 | 100*250 | 100*200 | 100*200 | 100*200 | 75*200 | 75*200 | 75x150 |
| 2,15 | — | 100*250 | 100*250 | 100*200 | 100*200 | 100*175 | 100x150 |
Other elements of the attic roof rafter system have their own parameters:
- the Mauerlat is made of timber 150*150, 100*150, 100*100 mm;
- crossbar – 100*200-150 mm;
- purlins – 100*200-150-100 mm;
- valleys, diagonal legs – 100*200 mm;
- tightening – 50*150 mm;
- strut – 150*150, 100*100 mm.
- hemming board – 25*100 mm.
Rafter system of a gable mansard roof, drawing of the main elements of the truss
Main nodes
The truss structures of attic roofs, regardless of whether they include many interfaces and butt joints, are connected to each other, cut into a tie and a mauerlat, have auxiliary elements of the system: crossbars, headstocks, supports or struts, and are additionally fastened with staples, bolts, clamps. The design of the rafter system of the attic roof must provide for the uniform distribution of all loads on the base and load-bearing structures of the building.

Scheme of the attic roof rafter system, main components and elements
Depending on the architectural solution, the type of attic roof is determined, in turn, not only its usable area depends on the configuration of the roof, but also what type of rafter system is applicable in each specific case: suspended or layered.

Layered system, resting the foot on the ridge beam and Mauerlat
Layered rafter legs rest on the load-bearing walls of the attic, and are supported in the middle by intermediate supports; in such systems, loads are transferred exclusively to bending. Hanging ones rest only on attic walls, they are usually installed where there is no internal load-bearing wall, they do not create a horizontal load, only compression and bending.
A hanging system is installed if the distance between the wall supports is no more than 6.5 m; installing an additional support makes it possible to cover an attic up to 12 meters wide; if you need to cover a wider area, then each 3 meters has its own support.

Hanging and layered rafters of the attic roof
If the attic design provides for not one, but several slopes, as in a classic attic roof, then hanging (upper) and layered (lower) rafters usually alternate.
Watch how the rafter system of mansard roofs is installed; the video lesson will help you understand all the intricacies of the construction of a broken structure.
The load-bearing elements of the system ensure the strength and stability of the entire attic roof structure. The load-bearing elements of an attic roof are: sheathing, rafters, and mauerlat. The design features of the system are determined by the type of attic roof: single-pitched, hip, multi-pitched, gable, etc.

Mansard roof truss system, layout diagram of single-pitched floor units
The shape of the attic roof depends on the area to be covered and the architectural design; it is better to choose simple types of attic roofs so that the beams and racks do not clutter up the space inside.

Attic, rafter system of hip hip roof
Stages of installation of the attic rafter system
The technology for installing an attic roof requires a certain sequence:
- Mauerlat installation;
- laying cross beams;
- installation of vertical racks;
- tightening the side posts or installing a ridge beam;
- step marking and installation of rafter legs;
- installation of auxiliary units: crossbars, struts, rafter legs;
- sheathing, waterproofing, roofing material.

Attaching the Mauerlat is an important step for the design of the entire system; it is the basis of the design
Docking technology
Despite the fact that the algorithm for constructing a rafter system is quite simple, installing attic roof rafters requires a competent approach to the installation of docking units. The main load in the system falls on the legs, so the safety and strength of the roof, and the attic as a whole, depend on the quality of their installation on the Mauerlat, as well as on the reliability of their connection to each other.

Rafter system of the attic roof, photo of attaching hanging rafters to the Mauerlat
There are 2 options for connecting the rafters to the Mauerlat: sliding and rigid. In wooden attic structures, it is impossible to make all connections rigid, since wood, under certain conditions, compresses and expands, and with a rigid connection, thrust loads arise on the load-bearing units, which together leads to deformation of the elements of the attic rafter system.

How to properly attach layered rafters for an attic
Important: A rigid connection is used if the rafters are layered, then the leg is rigidly attached to the mauerlat, but at the same time, on the ridge, between each other or on the run, the system nodes must be attached with a sliding connection.If a rigid fastening system is used on the attic roof, then it is necessary to exclude any forces: sliding, torques, turns, shifts. For rigid fastening there are two connection methods:
- notch in the rafter leg;
- support beam patch.
The saddle (notch) is made on the leg, the cuts should ensure a tight fit of the parts, and should not exceed 1/3 of the height of the beam. For rigid fastening, the rafter is notched against the mauerlat, 2 nails are driven from the sides, at an angle to each other, crosswise, the third nail is driven from above, vertically. It is recommended to further strengthen the fastenings with metal plates, corners, and bolts.
The sliding method of connection is that a recess for the leg is cut out in the Mauerlat, then the parts are connected to each other with a special metal corner - a slide. This is how the layered system is attached.

Sliding fastening of the attic rafter system
Regardless of the method of connecting the attic rafter system, the rafters and Mauerlat are screwed together with wire or additionally connected with anchors to prevent the roof from shifting due to strong gusts of wind. The struts, headstocks, spacers and headstocks are secured with staples and clamps.
How to build up and strengthen attic rafters
Often the rafter leg is not long enough for the timber, so they are built up to avoid ordering special boards and to avoid increasing the cost of attic construction.
Important: Since the rigidity of the rafter system is lost at the joining points, connections should be made where the bending moment tends to zero.Rafters made of timber are joined with an oblique cut. Inclined cuts are made in the parts, their length should be equal to twice the section, and the ends should be of a height equal to the cross-section of the beam, multiplied by a factor of 0.15. The joint is secured with bolts. This connection of beams harmoniously fits into the design of the attic, and allows you to leave the load-bearing elements of the roof open.
Sometimes attic rafters are attached with an overlap, the boards should overlap each other by at least a meter, then they are fastened with nails or bolts in a checkerboard pattern. If attic rafters are built up end-to-end, then the cut must be exactly 90°, the elements are applied at the ends, boards are laid on both sides, then the structure is secured with bolts or nails.

Options for extending the rafter leg
If the cross-section of the material is not enough, then the boards are reinforced. Paired rafters consist of two or more boards that fit tightly together; this structure is stitched with nails in a checkerboard pattern. Composite rafters are made from two boards, between which liners are inserted with a length of 2 board heights. The distance between the liners should not exceed 7 foot heights. The top of composite rafters may consist of a single plank.

Ways to strengthen the rafter leg
How to join rafters at the top
There are several options for connecting the rafters of the attic roof to each other at the top. If a ridge is not provided, the boards are cut at an angle, fastened together with nails, and additionally with the help of metal and wooden overlays. Hanging systems for complex raftering of a multi-slope mansard roof are fastened into a tenon with a single or double tooth.

Upper rafter connection on a ridgeless mansard roof
If the rafter system provides a ridge, then the rafters can be attached to the ridge beam with an overlap, or by sawing the ends at the desired angle, the joints must be reinforced with metal or wooden overlays.

Joining rafters on a ridge beam
It is better to assemble trusses on the ground, and then lift and install the structure on the attic floor. First of all, you need to make a template. To do this, the board is placed in place, the corner of the cut is drawn for the upper joint, and a groove is marked for attachment to the Mauerlat, then the second board is tried on in the same way.
On the ground, according to the marks obtained, the boards are sawed down, joined together, the template is lifted onto the roof and tried on. If the geometry of the attic roof is met, then the entire rafter system can be made according to one template, but in case of small deviations, it is recommended to do only the top cut and joining, and make the tie-in into the Mauerlat locally.
There are several roof options under which you can place a comfortable living space. In order to ensure the maximum volume of the attic space under the roof, it is necessary to select the optimal angle of inclination of the slopes and not to forget about the snow and wind load on the roof. We will look at the most popular designs of attic rafter systems in the middle zone.
The design of the attic roof truss system
A mansard roof makes it possible to obtain additional usable space with a relatively small financial investment, which is why this architectural solution has gained great popularity. So what is called an attic?
Attic (from the French mansarde) is an usable attic space (both residential and non-residential premises), formed on the top floor of a house, or the top floor of a part of a house, with an attic roof.
Wikipedia
https://ru.wikipedia.org/wiki/Attic
The attic is located within the load-bearing walls of the building and rests on them through the mauerlat, horizontal beams (strings) and rafters. The larger the attic space, the greater its useful volume, which is achieved by increasing the angle of inclination of the slopes and is formed by a more complex rafter system. The location of the rafters of the attic roof depends on the structure, which can be of different types, namely:
- Tent or pyramidal structure with a minimum volume of under-roof space.
The slopes of the tent structure rest on the side rafters and the central post, so the volume of the under-roof space here is minimal
- A hip or half-hip roof, in which the main living space is located under trapezoidal slopes.
The rafters of the hip roof form two triangular and two trapezoidal slopes
- A gable structure, which is a symmetrical gable roof with gables cut in at right angles, which provides a significant volume of attic space.
A multi-gable roof allows you to equip a full attic floor
- A gable symmetrical roof with an attic is a classic option, characterized by ease of installation and resistance to wind influences due to its rigid structure.
A gable roof requires the least amount of working time and low consumption of building materials
- The rafter system of an attic sloping roof provides the maximum volume of living space at a relatively low cost.
A sloping roof is the optimal solution in terms of the ratio of the cost of construction to the volume of usable space in the attic
The rafter system must withstand constant loads, which consist of the weight of structural elements, insulation and roofing. In addition, there are variable loads depending on the strength of the wind and the weight of the snow on the roof. The choice of the cross-section of load-bearing elements and the method of connecting them should be aimed at creating the most durable and rigid structure that evenly distributes the load on the walls of the building.
Depending on the width of the building, different types of attic rafter systems are used, which are divided into hanging, layered and combined.
- Hanging rafters are those that rest on the walls of the building through the mauerlat and tie, and form a ridge in the upper part. With this connection method, there is no intermediate support, and the bursting pressure on the walls of the house is reduced with the help of crossbars, racks and struts. The hanging rafter system is usually used when the building width is no more than 6 m.
To compensate for bursting forces in suspended rafter structures with a span of up to 6 m, tie rods and crossbars are used
- Layered rafters are called rafters with intermediate support on the internal wall of the house. They are used when the width of the building is from 6 to 16 m. The larger it is, the more elements are used to evenly distribute the load.
Layered rafters have one or more supports inside the house
- The combined type of rafter system is used in mansard roofs with variable slope angles. The most typical example is a broken mansard roof, where the lower rafter legs are layered and supported by a post and a mauerlat, and the upper ones are mounted as hanging rafters supported by a tie rod and a headstock. When constructing mansard roofs, all types of rafter systems are used, and their choice depends on the structure in which they are used.
In the design of a sloping roof, the upper rafters are hanging, and the lower ones are layered
Scheme of the rafter system of the attic roof
To erect a roof, you must have a project that specifies the list and size of structural elements, as well as the method of connecting them. To understand the principle and sequence of installation, you need to know the purpose of the elements of the rafter group and the way the roof adheres to the walls of the building. The attic roof consists of the following elements:
- the connecting element between the wall of the building and the rafter group is the Mauerlat, which is attached to the walls of the house with studs, brackets or anchors;
- strings are attached to the Mauerlat parallel to the short wall of the building, and beds are installed along the long side;
- vertical posts are mounted on the central floor;
- the ridge girder rests on the posts;
- the upper part of the rafters rests on the ridge girder, and the lower part is connected to the tie, forming a cornice overhang;
- the rafter legs in the upper part are connected by crossbars;
- on hip roofs, diagonal rafters and shortened eaves are used;
- trusses serve as additional support for the diagonal rafters;
- for intermediate fastening of rafters, racks and struts are used;
- if necessary, the rafters are lengthened with fillets.
The main load-bearing elements of the attic roof are rafters, beams and tie rods, as well as vertical posts and a ridge girder.
The diagram indicates the dimensions of the elements of the rafter system, their location, angles of inclination and methods of insertion at the connection nodes. Information about the location of double rafters, the presence of additional supports, and the dimensions of eaves and gable overhangs is also required.
The diagram is the main document for assembling the rafter system; it reflects all the necessary parameters. However, before cutting the material, it is necessary to check the calculations again and create templates for the main parts. If there is no project, you need to carry out calculations and create a diagram yourself.
Mansard roof rafter spacing
Before starting work, you need to select the pitch of the attic roof rafters. The distance between the rafters and the eaves (in the case of a hip roof) depends on several factors:
- building size;
- type of rafter system;
- constant and variable load on the roof;
- sections of rafters, racks and slopes;
- type of roofing;
- type and pitch of sheathing;
- insulation sizes.
For rafters, sheathing and counter-lattens, softwood material is selected in accordance with SNiP II-25, and the load on the rafters is calculated according to SNiP 2.01.07 and ST SEV 4868. Based on what is stated in the building codes and regulations, we can say that for rafters less than 9 m applicable beam cross-section from 50X150 to 100X250 mm with a pitch of 60 to 100 cm. The size of the building affects the design of the truss and the presence of racks, struts and crossbars, the use of which increases the strength of the rafter legs and allows you to increase the pitch between the rafters to 120 cm or more . Usually, to select a step, reference tables are used, which contain recommendations taking into account the length of the rafters and the cross-section of the beam.
Table: dependence of the pitch between the rafters on the section of the beam and the length of the rafters
The type of roofing used also affects the choice of rafter spacing, because different materials have different weights:
- tiles, depending on the type, weigh from 16 to 65 kg/m2, slate - 13 kg/m2. Such heavy coverings imply a reduction in the pitch of the rafter legs to 60–80 cm;
- the weight of metal coatings and ondulin does not exceed 5 kg/m2, so the pitch of the rafters can be increased to 80–120 cm.
On hip roofs, in any case, the step of the roofers is chosen to be 50–80 cm to give the slope greater rigidity.
In addition, the installation step of the rafters depends on:

The length of the rafters and sheathing of the attic roof
When doing independent calculations, the dimensions of some structural elements of the roof have to be calculated based on the existing dimensions of the building and the angle of inclination of the slopes. The length of the rafters sometimes has to be adjusted for different types of attic roofs, selecting the optimal dimensions of the entire structure as a whole.
Let's assume that the main dimensions of the building are known and it is necessary to calculate the length of the rafter joists for several proposed options for the angle of inclination and type of roof. Let half the width of the building L be 3 m, and the size of the eaves slope be 50 cm.

Additional calculations show that increasing the angle of inclination of the lower slope from 60 to 70 o will increase the width of the attic by 10%.
The length of the sheathing connecting the rafter legs is determined taking into account the gable overhangs that protect the facade walls from precipitation. The length of the gable overhang depends on the height of the building and is selected in the range from 40 to 60 cm. Therefore, the total length of the slope will be equal to the length of the house, increased by twice the length of the overhang.
Let's assume that the length of the house is 10 m, and the gable overhang is 0.6 m. Then the dimensions of the sheathing must be calculated taking into account the length of the slope, equal to 10 + 0.6 ∙ 2 = 11.2 m.
The parameters of the sheathing should be calculated taking into account the length of the gable and eaves overhangs
Any adjustment to the project requires a careful recalculation of the parameters of the rafter system, taking into account the changes that have arisen.
Video: calculation of the attic roof
Knots of the rafter system of the attic roof
The nodes of the roof truss system represent the junction of individual elements into a single structure, which allows you to evenly distribute the load on the walls of the building. The connection is made with nails, self-tapping screws or bolts using overhead wooden elements or metal squares and plates, as well as by connecting to a groove. To construct a gable roof, the following main components are used:
- A ridge unit that provides a connection between the rafter legs and the ridge purlin.
- Places where the crossbar connects the rafters to give greater strength and rigidity to the trusses.
- Attachment points for struts and posts that provide additional support to the rafters.
- A cornice assembly in which the rafters are attached to a tie rod or mauerlat, forming a cornice overhang.
Nodal connections of the rafter system must be made in such a way as to ensure the most rigid fastening of the elements to each other
A characteristic feature of a gable sloping roof is the knot where the upper and lower rafter joists, the vertical post, the crossbar and the purlin are connected. Such a complex connection requires the use of mortises, bolts, steel plates and construction staples.
In the most complex unit of a broken mansard roof, five rafter elements are connected
The most complex component of a hip mansard roof is the junction of the side or diagonal rafters with the mauerlat. The side rafter in the lower part rests on the corner beam of the mauerlat and on the embedded beam; in another option, a vertical post or truss is placed between the embedded beam and the rafter leg. The upper part of the hip rafters is attached to the ridge purlin using bolts or nails.
The corner rafters of a hip roof bear the greatest load, so their connection to the Mauerlat must be thought out most carefully
The described units are used most often when installing rafter systems of various designs and allow you to install load-bearing elements on your own. For efficient and high-quality assembly, drawings and production of templates with verified angles of joints and inserts are required.
Video: rafter system components
Calculation of the rafter system of the attic roof
The rafter system is the basis of the roof, so it is important to choose the design that is most suitable for the climatic conditions of the region and the existing requirements for the size of the residential attic. After selecting the design, the angle of inclination of the slopes and the height of the ridge are calculated for the required dimensions of the attic room. Calculations are made taking into account the size of the cornice using the following formulas:

The meaning of trigonometric functions can be found in reference tables.
Table: values of trigonometric functions for different slope angles
The most difficult thing when designing mansard roofs is counting lumber. Calculating the number of rafters required and matching them with a standard length of 6 m can sometimes be quite difficult. Let’s assume that we have chosen the hip roof, the most difficult to calculate, measuring 10X13 m, taking into account the eaves overhangs 80 cm long and the slope angle of 45 degrees. Then the side rafters will have a length of 5 / sin 45 o = 7.04 m. Therefore, the standard six-meter beam will have to be lengthened. Typically, for rafters a little more than 6 m long, a 100X200 mm beam or a 50X250 mm board is used.
If the building is large, it requires rafters longer than the standard size of 6 m, so the beam has to be extended
As for the horizontal floor beam, since the width of the building is 10 m, the tie rods should consist of two parts, which either rest on the internal wall of the building, or are joined together by reinforcing elements and rest on the purlin. For tightening and purlins, use timber with a cross section of at least 50x200 mm. Along the perimeter of the building there is a mauerlat, for which timber 150X150 mm or 200X200 mm is used. According to the scheme we have chosen, the perimeter of the building is 39.6 m, so installing the Mauerlat will require seven six-meter beams. The dimensions of all other elements of the rafter system will not exceed 6 m.
The weight of the lumber of the rafter system is calculated by summing the lengths of all elements with a certain cross-section and converting their quantity into cubic meters. This is necessary to determine the mass of the entire roof, and is also necessary when purchasing and transporting material. The calculation is made according to the table, and then the obtained values are multiplied by the weight of 1 m 3 of lumber.
Table: calculation of the amount of lumber in 1 m3 and the volume of one unit of material
Pine lumber weighs 505 kg/m 3 at 12% humidity, and 540 kg/m 3 at transport humidity 25%. Here are some examples of calculations:
- If 1 m 3 of material with a cross section of 50X200 mm contains 16.6 boards, then the weight of one board will be 540 / 16.6 = 32.5 kg.
- If 25 m 3 of lumber is purchased, then it will weigh 25 ∙ 540 = 13,500 kg.
- If 100 boards 25X200 are required, then you need to buy 100 / 33.3 = 3 m 3 of wood, which will weigh 3 * 540 = 1,620 kg.
It is important to note that it is advisable to purchase edged lumber with the lowest moisture content so that after installation it does not warp or crack, especially for large-section timber. For the construction of a rafter system, the wood moisture content should not exceed 18%.
Installation of attic rafter system
Installation of a rafter system with a residential roof space requires careful preparation. It is necessary to install convenient scaffolding, decking and ladders, as well as provide workplaces with safety ropes. Workers must be provided with protective clothing, protective equipment and working equipment. It is necessary to select a flat place on the ground for pre-assembling the trusses, marking the corners and making templates. All wooden elements must be treated with antiseptic and fire-retardant compounds.
After this, you can begin work, which takes place in the following sequence:
- On walls with walled studs, a mauerlat is mounted around the perimeter. If there is a load-bearing wall inside the building, we lay a beam or purlin on it that is the same height as the mauerlat.
If the house is being built from building blocks, then the Mauerlat is most conveniently laid on threaded rods, walled into the wall during its laying.
- Cable ties with cornice extensions are attached to the Mauerlat parallel to the short wall.
- Vertical posts are placed on the tie rods, delimiting the attic space.
- The racks are connected to a tie that serves as the ceiling of the attic space. The trusses installed in this way are connected to each other by horizontal girders.
Vertical posts, top ties and horizontal purlins form the frame of the attic space
- The lower and then the upper rafters are installed, which are attached to the ridge part.
- To strengthen the lower and upper rafters, struts, headstocks and ribs are used.
- The sheathing and front board are installed on the eaves overhang.
After installing all the rafter joists, all that remains is to lay the sheathing and nail the front board
We looked at the assembly of the rafter system using the example of a broken mansard roof. The construction of other structures consists of similar operations and mainly consists of performing work according to the design installation diagram, which reflects the methods of connecting the elements of the rafter system. With carefully calculated drawings, a team of four people is able to install a roof with a rafter system of any complexity.
Video: installation of an attic roof
We examined the rafter group of the attic roof, its design, calculations, as well as a diagram and description of the main components. They offered an option for step-by-step installation of load-bearing structures of the attic, attached illustrations and videos that explain the procedure for assembling the structural elements of the attic roof. Now its successful construction depends only on the careful fulfillment of the requirements of instructions and technologies and the availability of certain skills for the performers to carry out construction work. We wish you success.
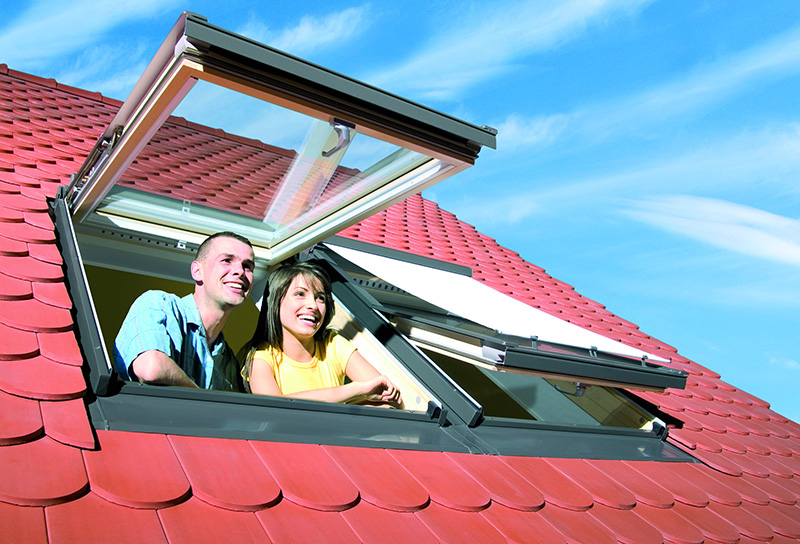
An attic in a private house is an ideal solution for expanding living or utility space without adding an upper floor. Arranging an attic in the attic space is an original and new exterior of the house, saving energy by reducing heat losses in the roof, and increasing living space. But the large size of the house is not a reason to start work on arranging the attic: you need to have a foundation with a sufficient margin of safety for the weight load, since the finished attic space will have to be thoroughly remodeled.
Features of the attic
The main thing that distinguishes an attic from ordinary rooms is that it has almost no walls in the usual sense, since the walls are a modified rafter system constructed from many inclined roofing surfaces. Therefore, the design of the window will be very different - it should not interfere with natural light, and must take on loads in the form of precipitation and strong wind - the impact of weather conditions on a sloping roof is stronger than on the massive elements of the building.
Important! SNiP regulations stipulate that the area of the window opening should not be less than 10% of the floor surface in the common room. Therefore, when dividing an attic space with partitions, it is advisable to also make a window in each newly formed room.

It is easier, cheaper and faster to install inclined windows in the attic roof than to make a special vertical projection under it, violating the design calculations. In any case, the window opening must be waterproofed or a window with reinforced glass and a reinforced metal-plastic profile must be ordered.
Advantages of installing a tilted roof window:
- A large flow of natural light, smoothing out chiaroscuro;
- There is no need to radically alter the shape of the roof or change its relief;
- Simple installation, feasible for the owner himself.
The degree of illumination depends on the area of the opening, which is proportional to the angle of inclination of the roof. Therefore, the conclusion is obvious: the steeper the sloping attic roof, the wider and higher the window opening should be. The thickness of the metal-plastic profile should almost fit into the distance between the rafters, so that there is something to attach the window to without destroying the rafter system. If you order a wider window, you will have to make a reinforced lintel that fastens the rafters cut at the place where the window is inserted. If you need to install a wide window, you should first think about the option of installing two small adjacent windows so that the roof remains solid. 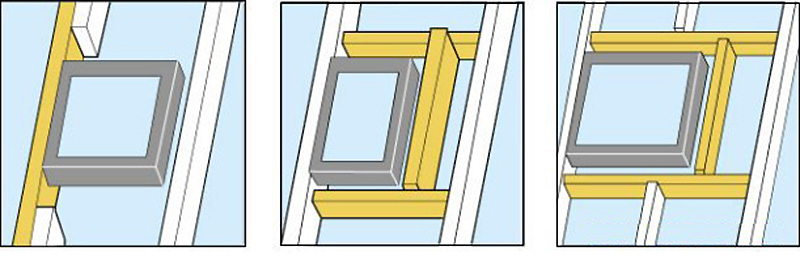
When installing a dormer window (a vertical dormer window that requires the frame to be moved outside the attic), the geometric shapes of the roof must be complicated by installing the top and side valleys, and the laying or installation of the roofing also becomes more complicated. It is much more difficult to remake a finished rafter system than to install a new attic window into your individual one. Valleys must be carefully waterproofed, since their location and geometry relative to constant atmospheric influences make these places most vulnerable to the penetration of moisture and cold. In regions with high average annual precipitation, it is recommended to install snow guards over dormers. But the main advantage of the dormer - you can stand next to it at full height - outweighs all the disadvantages that can be eliminated.
A window recessed into the roof is made if access to the balcony is provided through this window. In other cases, this is an unattractive option: poor natural lighting, unjustified complication of the roof geometry, high labor costs with minimal effect. 
The most affordable option is a window at the end of the attic - a cheap and practical solution that can be fully implemented without outside help.
Attic rafter system
In individual construction, a house with an attic is often built with a sloping roof, although this is an expensive solution. Sloping attic roofs, due to their design features, greatly increase the usable area of the interior of the attic. With the same width of the foundation of the house and the floor, the rooms in such an attic will have a larger area due to the projections and niches than the rooms under the roof of a conventional structure. 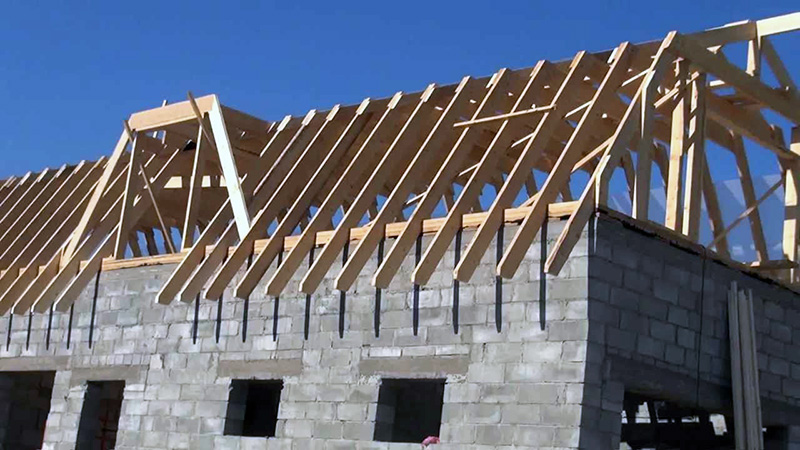
The standard design of a sloping roof allows you to lower the eaves overhangs much lower, not only making the exterior of the house very original - such overhangs protect the walls and foundation of the house from wind and moisture, directing precipitation away from the home.
The more complex a do-it-yourself sloping roof, the stronger the dependence of the reliability of the structure on the materials from which the roof is made, on climatic conditions, on the thickness of the beams of the rafter system and other factors. The classic do-it-yourself mansard roof, drawings of which are given below, has a slope ratio of the lower slopes to the floor of 60°, and the upper slopes of 30°. 
SNiP stipulates a comfortable ceiling height in attic rooms - at least 2 m. Therefore, a scheme with a roof slope of 600 is completely justified, and the reliability of the structure is ensured by thicker floor beams and rafter beams than with a conventional gable roof.
In the classic construction of an attic, the force of the wind and the load from the weight of snow on the sides of the roof with a large slope are not taken into account. Snow will accumulate on the upper surface of the roof, made with a slope of 300-450. The greater the angle of inclination of the roof, the stronger the windage of the roof, so in climates with strong winds it is necessary to build roofs with a small slope, and this poses a problem for arranging an attic - the area of the house in such conditions should be quite large.
Sloping roof schemes
The frame of a sloping roof is constructed from first or second grade pine lumber. To carry out calculations, parameters such as the cross-section of timber and sheathing boards, the dimensions and weight of roofs made of various building materials, snow and wind loads, and the spacing of rafters are regulated. 
A roof design with a hanging rafter system is justified if the base of the triangle (top in the figure) has a size of ≤ 4.5 m - this determines the width of the attic. If the width turns out to be larger, then layered rafters are installed, which are mounted on the wall.
How to calculate a broken type roof
The pitch between the rafters is often determined by the width of the insulation - this solution allows you to save on rolled materials, and the distance between the rafters is chosen 2-3 cm less than the width of the insulation material. For example, with a mineral wool slab width of 60 cm, the distance between adjacent posts should be 57-58 cm. 
The rafter boards are also calculated in width based on the insulation parameters. To ventilate the layers of thermal insulation, it is necessary to provide a ventilation clearance of 20-30 mm, otherwise the accumulating condensate will cause rotting of the wood, and then damage to the insulation. For conditions in the middle zone, the thickness of the insulation can be no more than 230-250 mm, therefore the minimum width of the rafter legs is 230 mm with a board thickness ≥ 50 mm. The greater the wind, temperature and snow loads in the region, the thicker the rafters should be made. 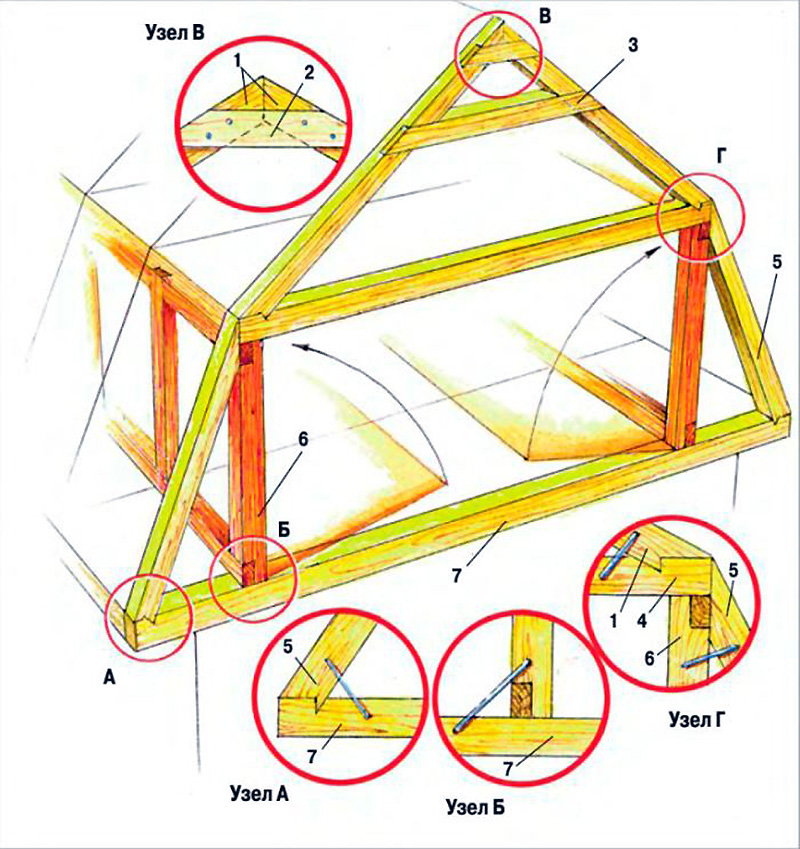
We recommend: To save lumber, insulation can be laid in two directions: along and across the rafters, making a thin and sparse sheathing between the layers. With a minimum thickness of basalt wool slab of 100 mm, you can use a 50 x 150 mm board, leaving a 50 mm ventilation gap.
Installation of attic roof
The mauerlat on the attic roof is equipped with standard techniques - fastening the timber to the wall with tying wire, anchors or studs. If the house is made of timber or logs, then the upper crown of the log house, impregnated with an antiseptic and substances that increase the moisture resistance of the wood, can serve as a mauerlat. 
For the Mauerlat in a house made of cellular concrete, a monolithic reinforced grillage is poured on top of the walls, and the Mauerlat itself is attached to the rods concreted into the wall. For walls made of brick or reinforced concrete, there is no need to make such a concrete grillage - the wall material itself is quite strong and will withstand any method of fastening the rafter system. It will only be necessary to make two-layer waterproofing around the entire perimeter of the house, and the Mauerlat beam with a cross-section of 150 mm.
To assemble elements of the rafter structure, long nails are used - 150-200 mm. At the corners and at the intersections of load-bearing walls with the internal partitions of the house, it is better to make bolted connections, or use double-sided threaded rods. It is also recommended that all intersections of roof elements be additionally reinforced with metal plates. 
Installation of the attic rafter system can be carried out in two solutions:
- Assembling elements on the ground, lifting finished structural units to the top. First of all, the vertical corner elements are attached, which form the future gables. The remaining elements of the rafter structure are vertically inserted into the grooves made in the Mauerlat timber at a calculated distance and rigidly fixed. To impart rigidity and the correct geometry, you can temporarily secure the elements with spacers and jibs, and after installing the side beams, when the structure acquires the desired rigidity, the spacers can be removed;
- The second method is the sequential assembly of the attic roof on site. It’s more efficient and convenient to work this way, because with a large rafter system, lifting the assembled roof manually will be problematic - you’ll have to rent a crane. After assembling the structure, floor beams are laid, to which vertical beam posts are attached to the grooves, and temporary jibs are installed to provide rigidity and give verticality to the system. Then comes the assembly of the upper and side rafter legs, and the jibs and spacers are mounted in the same way.
The last stage is the installation of the upper beams, which are made according to a template, and grooves for the rafters are immediately cut into them. Since the attic sloping roof does not have a ridge, slopes are mounted on the beam in the middle, which are designed to fix the upper triangle of the attic roof.