A bright fire made of felt, smoldering coals made of sticks, foil and New Year's garland - it is impossible to take your eyes off such beauty. Definitely do it safefire on New Year at home or offer to make an interesting craft for your friends for a school performance. The New Year's decorations will certainly be appreciated by both guests and spectators.
How to make a fire from felt?
Soft and pleasant to the touch felt will be an excellent basis for creating a New Year's bonfire. And bright colors will leave no chance for him to go unnoticed.
You will need:
- felt in yellow, red and orange colors,
- scissors,
- threads or glue,
- filler (synthetic fluff) - optional,
- paper templates,
- sticks and stones.
Hard felt with a thickness of 1.2 mm is ideal for work.
1. Make three arbitrary templates - tongues of fire: large, slightly smaller and very small. Transfer to felt.
2. The fire must consist of two parts, each of which must have five layers. The biggest one is red. On both sides of it, glue two smaller pieces: orange and yellow. Now make the cuts to create the 3D effect later.

3. Collect some sticks and stones from the street, wash them and dry them. Collect the hearth parts.

Congratulations! The fairy fire is lit.
But if you want to do fire in the shape of a soft toy, make six parts: two large, two smaller and two smallest. Sew as shown in the photo below and fill with synthetic down. To create a fabulous fire, you need to sew together three three-dimensional parts.
If desired, make soft toys such as firewood, cookies and marshmallows from felt.


With such a fire you can arrange various children's games: jump over it; “cook” food over a fire, imagining yourself as fairy-tale characters; play Indians and even learn English - why not?


Making a fire from lace and garland
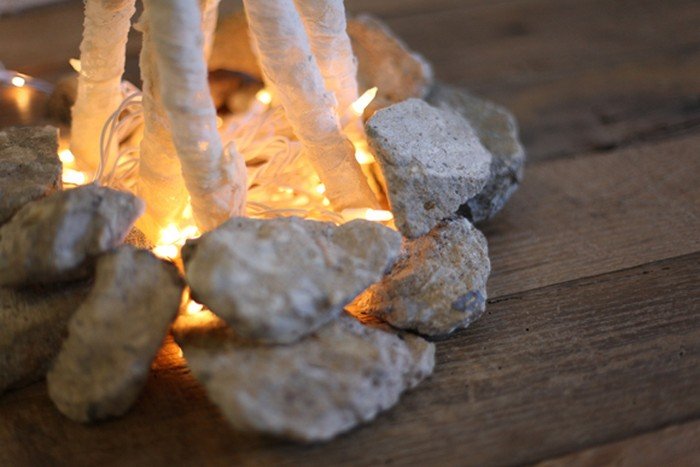
Mysterious atmosphere, flickering tongues of “fire” and crackling foil... It seems that this fireplace was lit by some fairy fairy. Another moment - and the timid sparks will swirl in a whimsical dance and flare up with a bright flame. A bonfire made of lace and garlands is an excellent decoration for a New Year's fairy tale.
You will need:
- lace ribbons,
- branches,
- foil,
- PVA glue,
- stationery knife,
- white paint and brush,
- stones,
- New Year's garland.

1. Wrap the chopsticks in foil.

2. Make a solution of PVA glue and water: one tablespoon of glue per liter of water. Cover the lace with several layers of mortar to stiffen the ribbons.
3. Wrap each branch tightly with lace. Leave to dry overnight.

4. When the glue is completely dry, use a utility knife to cut the lace along the sticks.


5. Carefully remove the branches and remaining foil from the shell.

Voila! The lace firewood is ready.

6. Light a fire. Make a small circle of stones and place a garland inside. Make sure the outlet is close and you can easily turn on the lights.

7. Add some wood to the fire. If necessary, clamp them with stones. Add more stones for effect.

A cozy fire is ready to warm you with its hot fire.

Of course, you have a lot of acting skills, and with such scenery on stage, the audience will certainly give you a standing ovation.
Happy holidays and may the flame of creative ideas never go out!
We remember! We are proud! Great Patriotic War not forgotten. It is extremely important that the younger generation knows about the feat of their ancestors from a very early age. There is still an opportunity to meet with participants of the Second World War, to whom, by the way, you can give a handmade craft for May 9th. For example, the eternal flame.
Materials and tools:
Cardboard box;
- colored cardboard;
- office paper;
- colored paper
- corrugated paper;
- felt-tip pen;
- scissors;
- stapler;
- pencil;
- ballpoint pen refill;
- ruler;
- stencil;
- glue.

DIY “Eternal Flame” craft
Using a stencil we write 1941-1945 on blue cardboard. 
From corrugated paper red, cut out a strip 4.5 cm wide and fold it like an accordion, draw a circle with a diameter of 4 cm, and then cut it out, we immediately got several circles. We take 6-7 circles and fold them in half, fasten them with a stapler, and cut the fringe with scissors. We fluff it up and it turns out to be a carnation.

Glue them onto cardboard. 
We cut out strips of 9*6 cm from green corrugated paper, roll them into a roll, glue the tip, and also cut out 4 leaves. Glue the stems with leaves.

We also cut out 4 trapezoidal strips and glue them to the flowers. 
We cut out 2 doves from offset paper, and from corrugated paper white– 3 (the template can be taken from here).
We glue the dove from offset paper and corrugated paper. We cover the second one with corrugated paper on both sides. We got 2 doves, we glue them together, leaving the wing free. Glue the dove onto cardboard and draw an eye for it with a felt-tip pen.

Let's move on to the bottom. A cardboard box (you can take it from a candy box, in our case it is from a cookie box with high sides that need to be cut off, leaving a height of 4 cm and covered with white corrugated paper). We cut strips of 6-3 cm from brown paper. We glue them like tiles, cutting the edges to the desired size.

It is better to cut the pedestal out of foam plastic, but you can make it out of cardboard, like ours. It is cut out according to a template (which you can take) and glued together.

First we glue the cardboard with the dove and carnations to the inside of the box, and then the pedestal. 
On the back side of the red cardboard we draw a star from 2 triangles with sides of 8 cm so that the rays are 2.3 cm high. 
We bend the rays inward. 
We cut from one side between 2 rays to the middle (the cut is marked with a thick line). 
Bend the star 3 times from different sides. 
We glue the rays between which the cut is located, placing one on top of the other. We got a 5-pointed convex star. 
Glue the star onto the pedestal. 
From red corrugated paper we cut out several leaves of different sizes, pointed at the top. We glue them together below - we get a fire fluttering in the wind. Cut off the very top of the star (literally 1-2 mm) and use a toothpick (needle) to insert the fire into the resulting hole.

From green, blue, yellow corrugated paper, cut into squares measuring 4*4 cm, take a pen rod, apply it to the center of the square and crumple the paper around the rod with your hands - you get a trim.

We lay out flowers on the sides of the pedestal and in front of it: a yellow core, a circle of blue paper and a circle of green.

We write by hand, print out those typed on a computer, or use a stencil to write 2 separate inscriptions: “we remember” and “we are proud.” Glue them to the sides. So we have successfully made a DIY craft for May 9th with our own hands. Happy Victory Day, dear handicraftsmen!


Irina Nagibina
Сhudesenka.ru
WikiHow works like a wiki, which means that many of our articles are written by multiple authors. During the creation of this article, 9 people, including anonymously, worked to edit and improve it.
There is nothing better than sitting by the fire and listening to the wood crackle. Unfortunately, starting a real fire is not always possible, especially where it is dangerous to do so - for example, on stage during a performance or at a party at someone's home. However, for such situations, you can always make an artificial fire or simulated flame. Read our article first.
Steps
Simulate fire using fabric and a fan
- You have several options on how you can make the flame. You can cut the fabric into many thin strips or just cut one piece into a fire shape. You can even make a 3D flame from a piece of fabric folded in half to form a tent with the bottom open and holes at the top for air to escape.
-
Attach the fabric to the wooden slats. The fabric at the base should be attached to the wooden slats to keep it in place when you turn on the fan. Take the pieces of fabric that will represent the flames and attach them to the wooden slats using a stapler or duct tape. Pieces can be attached to one slate, but for best effect, use several slats.
- For a 3D flame, attach each side of the fabric separately to help the air blown by the fan fan it better.
- Note: Attach the fabric along the entire length of the rail, not just at the ends.
-
Place slats with fabric in the place where you will have a fire. Place the slats on a wire rack or large basket. The slats should be directly above the fan. Place the slats parallel to each other so that the wide side of the fabric faces the audience.
Place a fan under the slats. Place a fan under the slats and adjust it so it blows straight up onto the fabric. If you put the slats on the fireplace grate, then place the fan directly under it. If the slats are on the basket, then place the fan at the bottom of the basket.
- You may find it easiest to place the fan near an electrical outlet so that the cord is not visible.
-
Place lighting fixtures under the fabric slats. Light the fabric with red, orange, or yellow light bulbs. You can rent special devices that are used in theaters, or you can take ordinary flashlights and attach colored glass or film to them.
Check what your fire looks like from the outside. Turn off the lights in the room, then turn on the light fixture and fan. If you did everything correctly, the illuminated fabric should look like flames. If this does not happen, then make the necessary adjustments to your fire.
-
Spectators should not see the fan or light bulbs. Therefore, cover them with firewood, which can be sprinkled with ashes for credibility.
- If you don't have real firewood on hand, you can make your own from foam tubes or construction paper.
- To create the effect of flickering coals, fold under the “flame” New Year's garland. The effect will be better if you find a garland with red or orange bulbs, or if you wrap them with red or orange film.
Simulate fire using paper and a flashlight
-
Make a flame out of tissue paper. You can make flames of any shape from sheets of tissue paper in red, yellow, and orange. Then glue the sheets together into one bud, reminiscent of a fire. Here is one of simple ways how to make flames out of paper:
- Place a clean sheet of tissue paper on the table in front of you. Gently press the middle of the sheet onto the table with your finger. Then quickly raise your hand up and gently catch the paper in the air. The paper will take the shape of a bud or tongue of flame. Be careful not to remember the paper.
-
Make firewood from paper towels. You can draw a pattern on them with a marker that resembles wood fibers. Long rolls can be cut in half to ensure your firewood is the same size.
- If you have time, try lightly soaking paper towels in water and kneading them with your hands. Let them dry before painting them. The rolls will look much more realistic.
Cut out a "flame" from the fabric. You will need a fan to blow the fabric, creating a flame effect. “Fire” can be of any size, everything will depend on the size of the fabric and the place where it will be located. So take that into account.
To create a craft for May 9, we will need very little time and a minimum of materials. Even a preschooler can make an eternal flame out of paper with his own hands.
Required materials for a 3D postcard for May 9:
- thick colored paper with 3 different shades: orange, green and any other;
- regular and manicure scissors;
- any napkins, 3 pieces;
- stapler or needle and thread;
- 2-3 cocktail straws (red, yellow or orange);
- black pencil;
- office glue or double-sided tape.
Do-it-yourself eternal flame made of paper - step-by-step instructions:
- First of all, you need to select all the materials and decide on the color of the background paper for the card. In our case it will be lilac, because it is similar to the marble that is used to decorate the monuments of the eternal flame. If you don’t have a stapler at home, ordinary threads will do; we will use them to fasten the nails.
Craft eternal flame from paper for May 9 - To make carnation buds, you need to cut the napkin into 4 equal squares. This is done for three napkins to then get three flowers for the card.

- The squares are overlapped, cut around the circle, and scored along the edges to create flower petals. In the middle, the structure is fastened with a couple of turns of thread so that the sheets of paper do not fall apart in different directions.
DIY paper crafts for May 9th - To get a flower from this, the leaves should be fluffed. These steps are done 3 times and the result is full-fledged carnation buds.

- Now it’s the turn of the eternal flame itself, which we will make in the form of an orange star. We mark a 6-pointed star on paper, cut it out, gradually fold the edges into the middle and bend the middle of the workpiece along the resulting lines.

- To make a five-pointed and voluminous star from a six-pointed star, you need to make a cut along one of the lines towards the center and combine the two rays of the star. The result will be a symbol of the Red Army and Victory on May 9!

- Now let's make the eternal flame itself. To do this, the cocktail tube is cut into 6-7 parts, and longitudinal cuts are made on each part for 2/3 of the length. This can be done with nail scissors.

- To make a fire from this pile of tubes, you need to take a second tube and make a cut 1/3 of its length. Then string all the small parts onto it, fluff them up and insert them into the hole made in the star. The eternal flame itself is ready.

- We cut out leaves and stems from green paper, which we then glue together with the carnations.

- The final touches and the eternal flame for May 9 are ready with your own hands: cut out a ribbon from orange paper, make black stripes on it and stick flowers on top. Under the eternal flame we write nice words and give them to veterans!

Is it possible to make a funny fire out of paper with your own hands? Even the smallest ones feel a great interest in natural elements. They watch with pleasure and joy the flow of wind, the flow of water and the burning of fire.
How do people make a fire now? They collect branches, chop wood, and look for lighter paper. You can already hear the click of a lighter or the brief creak of a match head. A warm, living flame engulfs the paper and spreads further and further. The branches and firewood are already burning. The fire has flared up!
Previously, people were very afraid of fire, because fires and lightning carrying fire brought a lot of destruction. Then, some ancient daredevil learned to tame the fire by planting it in one place and preventing it from burning everything in its path. Another ancient craftsman learned to make fire by quickly rubbing one stick against another. Now people could enjoy warm food cooked over a fire. They could illuminate their meager home and keep warm on cold nights. Imagine how important this was for them!
Let us also say thank you to the fire and make a craft in its honor! How to make paper fire? It's very interesting to do.
For the craft we need:
- CD – disk
- Glue brush
- Thin as tracing paper
- Dry twigs
- Stones

To begin with, we take our CD - this will be the basis on which it will be located. Apply a lot of glue to the disk and place pebbles on the glue in a circle.

Inside the circle of stones we need to fill the space with something that will look like black coals. It could be a handful of real earth, a tea leaf, ground coffee, scraps of dark paper or dark pieces of wood.
We roll yellow, red and orange paper into a bundle so that sharp corners remain on top - these will be future flames. We tie the bundle with thread or tape, leaving the top free and straightening it. We lay out dry twigs on the disk, like logs for a future fire. Insert a bunch into the branches